How to Enable or Disable Flash Screen during Audio Notifications in Windows 11

This tutorial will show you how to turn on or off visual alerts for sounds on your Windows 11 computer. This feature is called Sound Sentry.
If you have trouble hearing audio alerts, Windows can flash your screen instead. You can choose to flash just the title bar, the active window, or your entire screen when a notification arrives.
Reference:
Make Windows easier to hear – Microsoft Support
Learn about Windows accessibility features that can help make your PC easier to use.
Option One
Turn On or Off Flash Screen in Settings
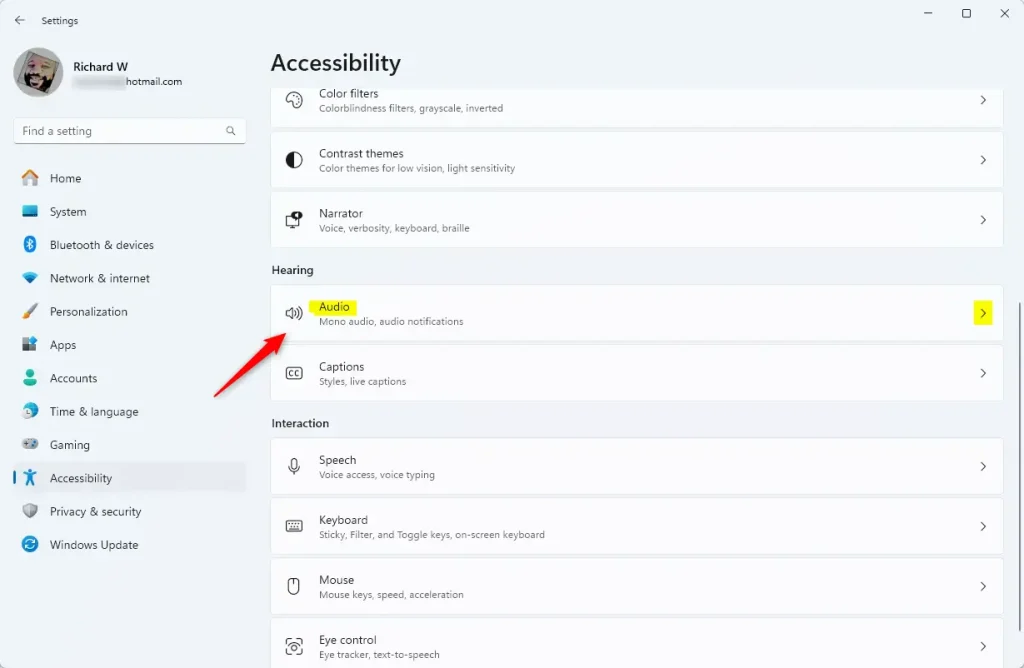
- Open Settings by pressing Win+I.
- Click on Accessibility on the left side.
- Click on AudioHearing on the right side.
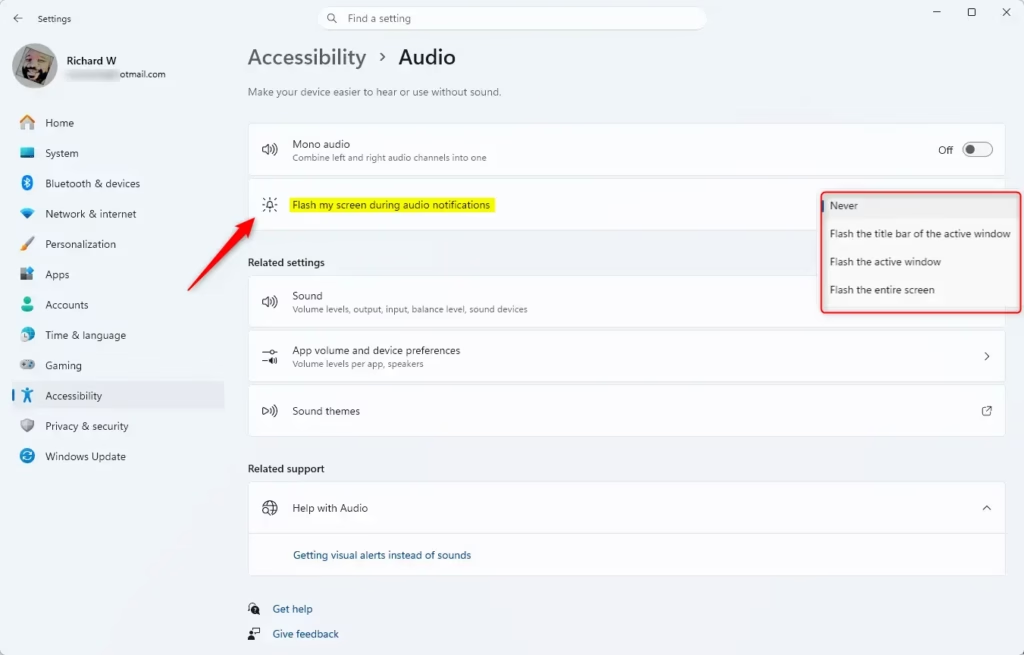
- Find the Flash my screen during audio notifications dropdown menu.
- Choose one of these options:
- Never (default)
- Flash the title bar of the active window
- Flash the active window
- Flash the entire screen
- You can now close Settings.
Option Two Open Audio settings
Turn On or Off Flash Screen in Control Panel
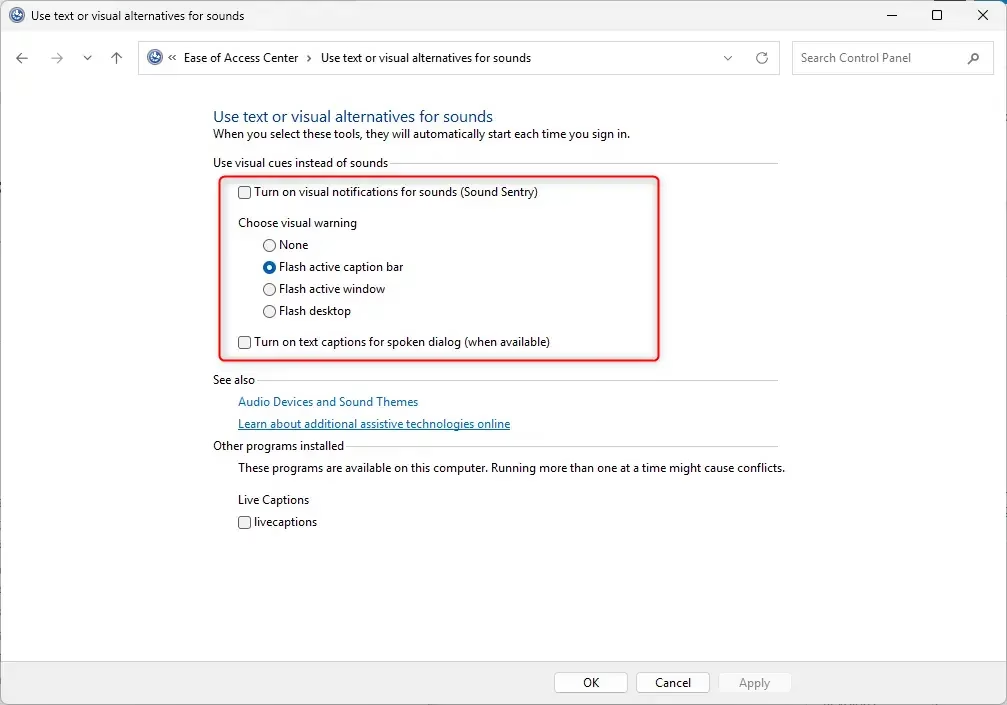
- Open Control Panel and click on the Ease of Access Center icon.
- Click on Use text or visual alternatives for sounds.
- Follow the steps below for what you want to do.

Turn On Visual Notifications for Sounds
- Check the box next to Turn on visual notifications for sounds (Sound Sentry).
- Select what you want under Choose visual warning:
- None
- Flash active caption bar
- Flash active window
- Flash desktop
- Click OK.
Turn Off Visual Notifications for Sounds
This is the default setting.
- Uncheck the box next to Turn on visual notifications for sounds (Sound Sentry).
- Click OK.
- You can now close Control Panel.
Option Three
Turn On or Off Flash Screen Using Registry
⚠️ Admin Required: You need administrator privileges to edit the registry.
Never Flash My Screen (Default)
This is the default setting.
reg add "HKEY_CURRENT_USER\Control Panel\Accessibility\SoundSentry" /v Flags /t REG_SZ /d 2 /f
reg add "HKEY_CURRENT_USER\Control Panel\Accessibility\SoundSentry" /v WindowsEffect /t REG_SZ /d 0 /f
Flash the Title Bar of the Active Window
reg add "HKEY_CURRENT_USER\Control Panel\Accessibility\SoundSentry" /v Flags /t REG_SZ /d 3 /f
reg add "HKEY_CURRENT_USER\Control Panel\Accessibility\SoundSentry" /v WindowsEffect /t REG_SZ /d 1 /f
Flash the Active Window
reg add "HKEY_CURRENT_USER\Control Panel\Accessibility\SoundSentry" /v Flags /t REG_SZ /d 3 /f
reg add "HKEY_CURRENT_USER\Control Panel\Accessibility\SoundSentry" /v WindowsEffect /t REG_SZ /d 2 /f
Flash the Entire Screen
reg add "HKEY_CURRENT_USER\Control Panel\Accessibility\SoundSentry" /v Flags /t REG_SZ /d 3 /f
reg add "HKEY_CURRENT_USER\Control Panel\Accessibility\SoundSentry" /v WindowsEffect /t REG_SZ /d 3 /f
Summary
Windows 11 lets you turn sound notifications into visual flashes. You can choose to flash just the title bar, the active window, or your whole screen. You can make these changes three ways: through Settings, through Control Panel, or by editing the registry. The Settings method is easiest for most users. If you use the registry method, remember that you need administrator privileges.
Was this guide helpful?

About the Author
Richard
Tech Writer, IT Professional
Richard, a writer for Geek Rewind, is a tech enthusiast who loves breaking down complex IT topics into simple, easy-to-understand ideas. With years of hands-on experience in system administration and enterprise IT operations, he’s developed a knack for offering practical tips and solutions. Richard aims to make technology more accessible and actionable. He's deeply committed to the Geek Rewind community, always ready to answer questions and engage in discussions.


No comments yet — be the first to share your thoughts!