How to Change Your Main Screen in Windows 11
You can change your main screen in Windows 11 by adjusting your display settings.
Think of your main display as the home base for your computer. This is where your taskbar, system tray icons, and most new application windows will appear by default. When you’re juggling multiple monitors, setting a main display is key to organizing your workspace.
For instance, if you’ve just connected a second monitor to your Windows 11 PC, you’ll want to pick one as your primary to make your workflow smoother. This only takes a few clicks within Windows settings.
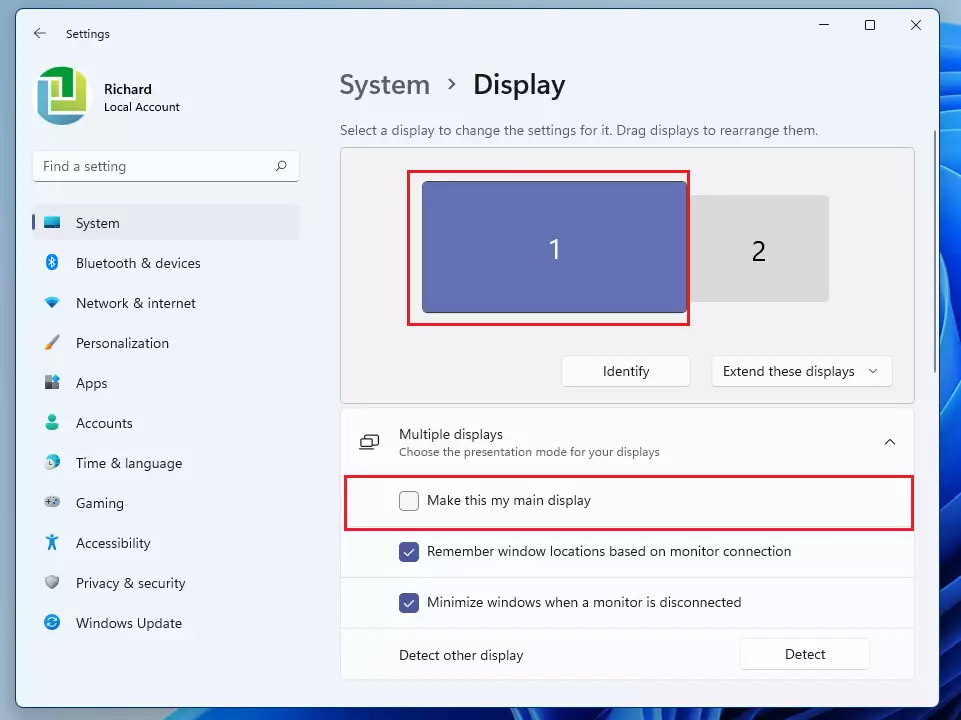
Open Windows Settings by pressing Windows key + I. Navigate to System, then Display. Click the screen you want as primary, scroll down, and check “Make this my main display.
Option 1Change Your Main Screen Using Windows Settings
- Press Windows key + I to open Settings.
- Click on System on the left side, then click Display on the right side. Open Display Settings
- At the top, you’ll see pictures of your screens with numbers on them. Click the screen you want to be your main one.
- Not sure which screen is which? Click the Identify button. Numbers will pop up briefly on each screen so you can tell them apart.
- Scroll down and click on Multiple displays to see more options.
- Look for the box that says Make this my main display and check it.
- If that box is already checked and looks grayed out, then that screen is already your main display.
- When you’re done, close the Settings window.

You can easily change your main screen in Windows 11 using the built-in Settings app, which is the simplest method for most users.
You can easily change your main screen in Windows 11 using the built-in Settings app, which is the simplest method for most users.
Option 2Change Main Screen Using NVIDIA Control Panel
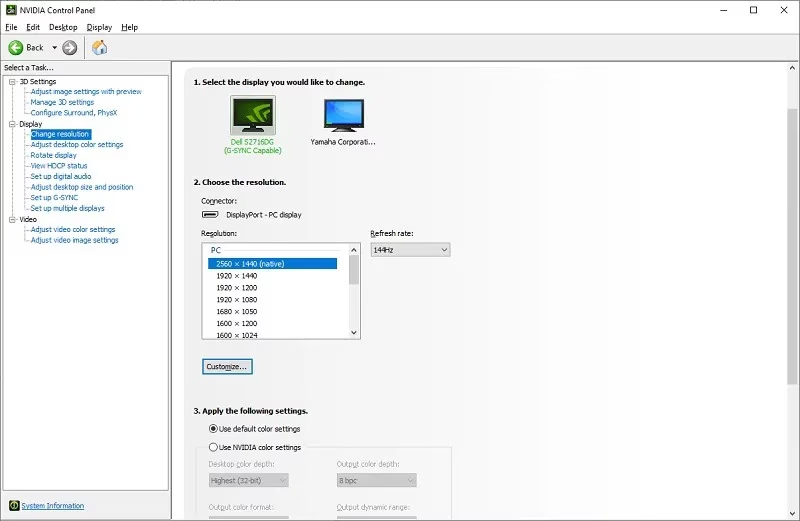
If your computer uses an NVIDIA graphics card, you can change your main display using the NVIDIA Control Panel, a tool that gives you more control over your screen setup.
- Open NVIDIA Control Panel. Right-click on your desktop and look for it in the menu.
- In the left menu, find Set up multiple displays under Display.
- Right-click on the screen number you want as your main display, then click Make primary.
- Click Apply.
- A message will pop up asking you to confirm. Click Yes within 20 seconds to keep the change. If you don’t click Yes in time, it will go back to how it was.
- Close the NVIDIA Control Panel when you’re finished.
Option 3Change Main Screen Using Intel Graphics Control Panel
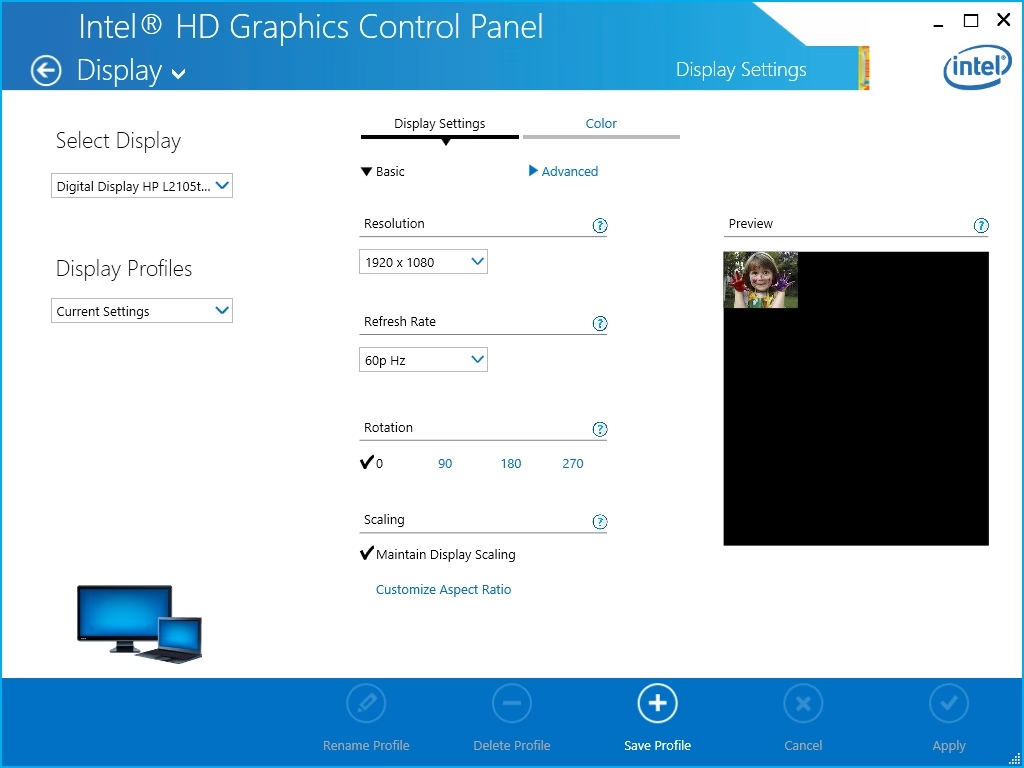
For PCs with Intel graphics, changing your main screen is straightforward using the Intel Graphics Control Panel, allowing you to set your preferred primary display.
- Open Intel Graphics Control Panel from the Start menu. Look under All Apps.
- Click the Display icon at the bottom.
- In the left menu, click Multiple Displays.
- From the Primary Display drop-down menu, choose the display you want as your main screen.
- Click Apply.
- Click Yes to confirm the change within 15 seconds. If you don’t click Yes in time, it will go back to the way it was.
- Close the Intel Graphics Control Panel when done.
Option 4Change Main Screen Using AMD Radeon Settings
Only use this if your PC has AMD graphics and drivers installed.
- Open AMD Radeon Settings.
- Click on Display.
- Select the display you want to be your main screen.
- Turn on the Preferred Display switch.
- You can now close the AMD Radeon Settings.
Summary
Your main display in Windows 11 is the screen where your taskbar, notifications, and most apps show up by default, acting as your primary workspace.
You can change your main display through Windows Settings or via your graphics card’s control panel. The method you choose depends on your computer’s graphics hardware.
Each method is quick. Follow the steps that fit your computer’s setup.
If the system prompts you to confirm your choice, be sure to do so. Otherwise, the change will revert to its previous state.
Following these steps will help you arrange your multiple monitors exactly how you want them. By picking your main screen, you can make your computer more comfortable and efficient for daily use!
How do I make my screen the main display in 🪟 Windows 11?
Once you have the correct monitor selected, check the box that says ‘Make this my main display.’ You’ll find this under the ‘Multiple Displays’ section. If you don’t see ‘Make this my main display,’ click on ‘Multiple displays’ to reveal a dropdown menu with the applicable settings.
Can you change the main screen?
To change your main monitor on Windows, right-click your desktop and select ‘Display Settings.’ Scroll down to the section labeled “Rearrange your displays” where you’ll see numbered screens. Click the monitor you want to set as your main display.
Was this guide helpful?

About the Author
Richard
Tech Writer, IT Professional
Richard, a writer for Geek Rewind, is a tech enthusiast who loves breaking down complex IT topics into simple, easy-to-understand ideas. With years of hands-on experience in system administration and enterprise IT operations, he’s developed a knack for offering practical tips and solutions. Richard aims to make technology more accessible and actionable. He's deeply committed to the Geek Rewind community, always ready to answer questions and engage in discussions.

No comments yet — be the first to share your thoughts!