How to Enable or Disable Always Show Scrollbars in Windows 11
You can enable or disable always showing scrollbars in Windows 11 through the Settings app.
Scrollbars are those visual cues on the side or bottom of a window that help you navigate content. Windows 11 often hides them by default for a cleaner look. They only appear when you move your mouse cursor.
This setting lets you decide if scrollbars stay visible all the time, giving you constant visual navigation cues. You can find this option in the Accessibility settings.
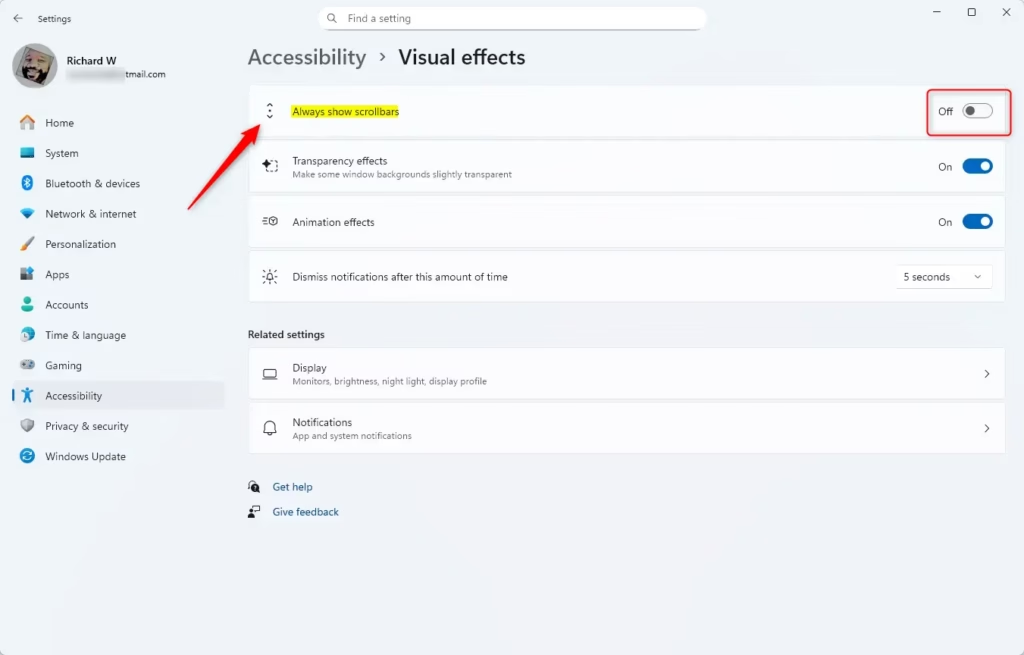
Go to Settings > Accessibility > Visual effects. Toggle the “Always show scrollbars” option to On for constant visibility or Off to hide them until needed.
Why Change Your Scrollbar Settings?
Let’s talk about why you might want to change this setting.
Some people prefer to see scrollbars constantly. Others like them to stay out of the way until they’re needed. It’s really about personal preference.
How to Turn On or Off Always Show Scrollbars (Easy Way)
Follow these steps to change your scrollbar settings using the Windows Settings app:
- Press the Windows key + I on your keyboard to open Settings.
- On the left side, click Accessibility.
- On the right side, click Visual effects.
- Look for the option called Always show scrollbars.
- Turn it On if you want scrollbars to always be visible, or Off to keep the default hiding behavior.
You can also open the Visual Effects settings directly by clicking this link (it will open the Settings app): Open Visual Effects Settings

Once you’re finished, you can close the Settings window.
How to Turn On or Off Always Show Scrollbars Using the Registry (Advanced)
If you’re comfortable with more advanced system tweaks, you can also change this setting using the Registry Editor.
To Turn On Always Show Scrollbars:
reg add "HKCU\Control Panel\Accessibility" /v DynamicScrollbars /t REG_DWORD /d 0 /f⚠️ Admin privileges required
To Turn Off Always Show Scrollbars (Default Setting):
reg add "HKCU\Control Panel\Accessibility" /v DynamicScrollbars /t REG_DWORD /d 1 /f⚠️ Admin privileges required
A quick heads-up: Messing with the registry can cause issues if not done carefully. Always back yours up first. If you’re not sure, sticking to the Settings method above is the way to go.
Summary
- What happens: You control how scrollbars appear on your screen — always visible or only when you hover.
- Two ways to do it: Use Settings (easy) or Registry Editor (advanced).
- Why it matters: Make your PC experience comfortable by customizing scrollbars to your liking.
- Next steps: Try it out and see what works best for you!
By following these steps, you can control how scrollbars appear on your Windows 11 PC.
How to keep scroll bars visible in 🪟 Windows 11?
And then in the settings app we would navigate to accessibility. Head up to visual effects. And here you’ll see always show scroll bars toggle that on.
How do I stop Windows from hiding the scroll bar?
Turn on “Always show scrollbars.” On Windows 10, open the Settings app. Head to Ease of Access > Display. Scroll down and turn off “Automatically hide scroll bars in Windows.”
Was this guide helpful?

About the Author
Richard
Tech Writer, IT Professional
Richard, a writer for Geek Rewind, is a tech enthusiast who loves breaking down complex IT topics into simple, easy-to-understand ideas. With years of hands-on experience in system administration and enterprise IT operations, he’s developed a knack for offering practical tips and solutions. Richard aims to make technology more accessible and actionable. He's deeply committed to the Geek Rewind community, always ready to answer questions and engage in discussions.

No comments yet — be the first to share your thoughts!