Secure SSH Access on Ubuntu with Google Authenticator

Securing SSH access on Ubuntu with Google Authenticator adds a second step to logging in, making it much harder for unauthorized people to get onto your computer.
This second step uses a temporary code from your phone, provided by an app like Google Authenticator, along with your normal password. This is called two-factor authentication (2FA).
Using 2FA is a smart way to protect your Ubuntu server, especially if you access it from the internet. You can set this up on versions like Ubuntu 20.04 and 18.04.
Secure SSH on Ubuntu by enabling two-factor authentication with Google Authenticator. After installing the app, edit /etc/ssh/sshd_config to enable ChallengeResponseAuthentication and UsePAM. Then, edit /etc/pam.d/sshd to add auth required pam_google_authenticator.so, and restart the SSH service.
Install Google Authenticator
Installing Google Authenticator on Ubuntu is the first step to adding SSH two-factor authentication. This app creates codes on your phone that you’ll use along with your password to log in securely. You’ll need to set it up on your phone first, then link it to your Ubuntu system.
We’ve already covered installing Google Authenticator on Ubuntu and setting it up on your mobile device. Please refer to the guide linked below to avoid repetition.
How to install Google Authenticator on Ubuntu Linux
After setting up the steps above, continue below.
Configure Two-factor SSH
To configure SSH for two-factor authentication, you need to edit its main settings file on Ubuntu. This tells your SSH server to ask for the code from your Google Authenticator app after you enter your password. Opening the file with the right command is the first step to adding this extra security layer.
The Secure Shell (SSH) daemon configuration file, `sshd_config`, on Ubuntu opens using the `sudo nano /etc/ssh/sshd_config` command, allowing you to change SSH settings for better security.
sudo nano /etc/ssh/sshd_config
Next, make the highlighted changes in the file to make this work.
# Authentication:
#LoginGraceTime 2m
PermitRootLogin yes
#StrictModes yes
MaxAuthTries 3

#MaxSessions 10

# Change to yes to enable challenge-response passwords (beware issues with
# some PAM modules and threads)
ChallengeResponseAuthentication yes


# PAM authentication, then enable this but set PasswordAuthentication
# and ChallengeResponseAuthentication to 'no'.
UsePAM yes
Save and exit.
Next, run the commands below to open Ubuntu’s PAM SSH configuration file.
sudo nano /etc/pam.d/sshd
Then append the highlighted changes below and save the file.
# PAM configuration for the Secure Shell service

# Standard Un*x authentication.
@include common-auth
# Disallow non-root logins when /etc/nologin exists.
account    required     pam_nologin.so

auth   required   pam_google_authenticator.so
Save the file and exit.
After making the changes above, restart the SSH service.
sudo systemctl restart sshd
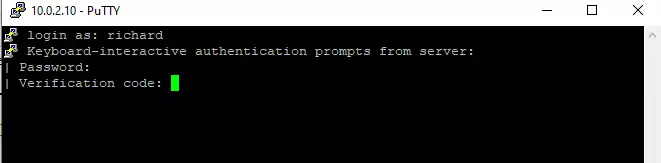
Now, go and test it out. You should be prompted for a one-time code every time you attempt to sign in.
If you set up SSH public key authentication, you’ll want to add this line to the main SSH configuration file at the/etc/ssh/sshd_config file.
AuthenticationMethods publickey,keyboard-interactive
auth required pam_google_authenticator.so
sudo systemctl restart sshd
That should do it!
Conclusion:
Configuring SSH to accept two-factor authentication with Google Authenticator significantly boosts your server’s security. This process adds an extra layer of protection, requiring both a password and a time-sensitive code from your phone to log in.
If you find any error above, please use the form below to report.
You may also like the post below:
Was this guide helpful?

About the Author
Richard
Tech Writer, IT Professional
Richard, a writer for Geek Rewind, is a tech enthusiast who loves breaking down complex IT topics into simple, easy-to-understand ideas. With years of hands-on experience in system administration and enterprise IT operations, he’s developed a knack for offering practical tips and solutions. Richard aims to make technology more accessible and actionable. He's deeply committed to the Geek Rewind community, always ready to answer questions and engage in discussions.


No comments yet — be the first to share your thoughts!