How to Optimize Windows 11 CPU Scheduling for Speed

Want your computer to run faster and smoother? One way is to change how Windows 11 shares your CPU (the brain of your computer) between the apps you use and the tasks running in the background.
What is CPU Scheduling?
CPU scheduling is how Windows decides which programs get to use the processor and when. It helps your PC work efficiently by sharing the CPU time between apps you see and background tasks like updates or security scans.
You can tell Windows to focus more on the programs you’re using (like browsers or games) or on background tasks that keep your PC safe and updated.
How to Change CPU Scheduling in Windows 11
Here’s an easy way to change your CPU scheduling settings:
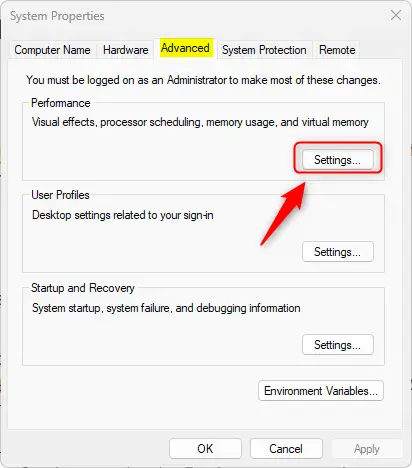
- Open System Properties. Click the Start button, then go to Settings > System > About. On the right side, click Advanced system settings.
- In the System Properties window, click the Advanced tab.
- Under Performance, click the Settings button.
- In the Performance Options window, click the Advanced tab.
- Under Processor scheduling, choose one of these options:
- Programs – to give more power to apps you are actively using.
- Background services – to help tasks running behind the scenes work better.
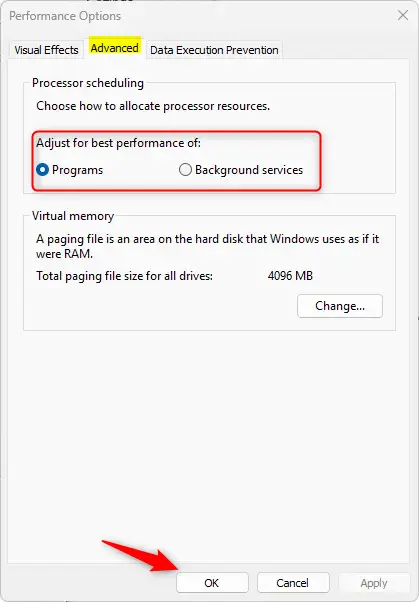
- Click OK to save your changes.
Advanced Option: Change CPU Scheduling Using the Registry Editor
If you want more control and feel comfortable tweaking your PC settings, you can use the Registry Editor. Be careful! Incorrect changes can cause problems.
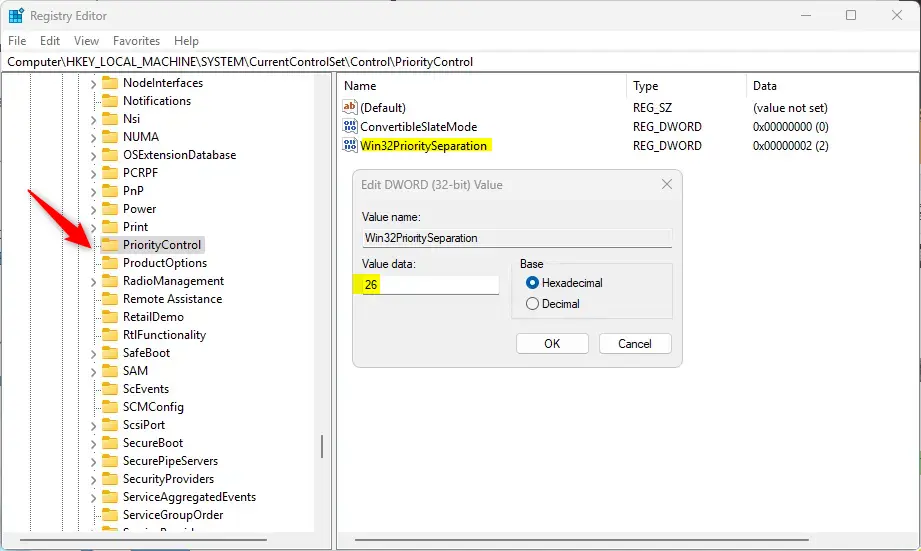
- ⚠️ Admin privileges required. Open the Registry Editor by typing
regeditin the Start menu and pressing Enter. - Navigate to this folder path:
Computer\HKEY_LOCAL_MACHINE\SYSTEM\CurrentControlSet\Control\PriorityControl - Right-click the PriorityControl folder, select New > DWORD (32-bit) Value, and name it
Win32PrioritySeparation. - Double-click
Win32PrioritySeparationand set the value to:26for prioritizing Programs18for prioritizing Background services
- Click OK and close the Registry Editor.
- ⚠️ Admin privileges required. Restart your PC to apply the changes.
Summary
- CPU Scheduling controls how Windows shares your processor’s time.
- You can choose to prioritize apps you actively use or background tasks.
- Changing settings through System Properties is simple and safe.
- Registry editing is for advanced users who want more control.
- Always restart your PC after making changes to make sure they work.
By following these steps, you can help your Windows 11 PC run better based on how you use it!
Frequently Asked Questions
What is CPU Scheduling?
Was this guide helpful?


Leave a Reply