

This article explains turning on or off the “Diagnostic data viewer” in Windows 11.
Microsoft collects information about your Windows devices through Diagnostic data and feedback.
A related feature called Tailored experiences lets you use your device’s diagnostic data to offer personalized tips, ads, and recommendations to enhance Microsoft experiences.
Microsoft yet has another feature called Improve inking & typing that lets it collect samples of the content you type or write to improve features such as handwriting recognition, autocompletion, next-word prediction, and spelling correction, and we use this data in the aggregate to improve the inking and typing feature for everyone who uses Windows.
These tools help Microsoft build and maintain the Windows ecosystem, keep Windows secure and up to date, troubleshoot problems, and make product improvements.
You can turn the Diagnostic Data Viewer on or off in Windows 11 to view or delete the diagnostic data that your device sends to Microsoft. If you turn it on, you can use the Diagnostic Data Viewer app to view the diagnostic data that your device sends to Microsoft in real time.
On the other hand, if you turn it off, your device will stop sending diagnostic data to Microsoft, and you won’t be able to use the Diagnostic Data Viewer app to view or delete any stored diagnostic data. However, it is essential to note that some diagnostic data is necessary for Microsoft to maintain and improve Windows.
Turn on or off the diagnostic data viewer
As mentioned, users can turn the Diagnostic data viewer on or off in Windows 11. Here’s how to do it.
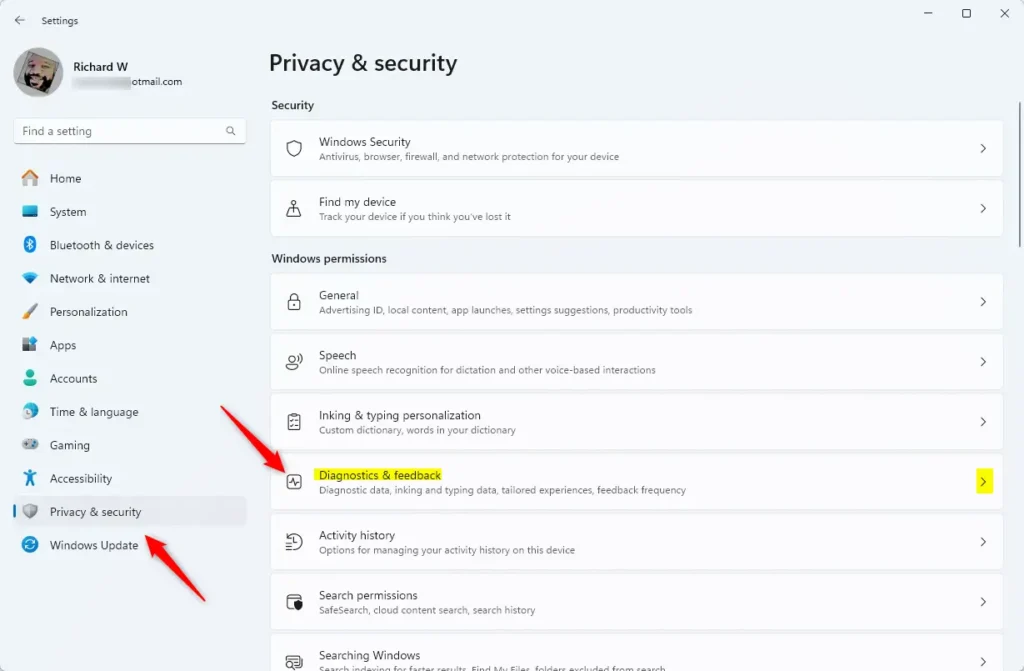
First, open the Windows Settings app.
Then, select Privacy & security on the left and the Diagnostics & feedback tile on the right to expand it.
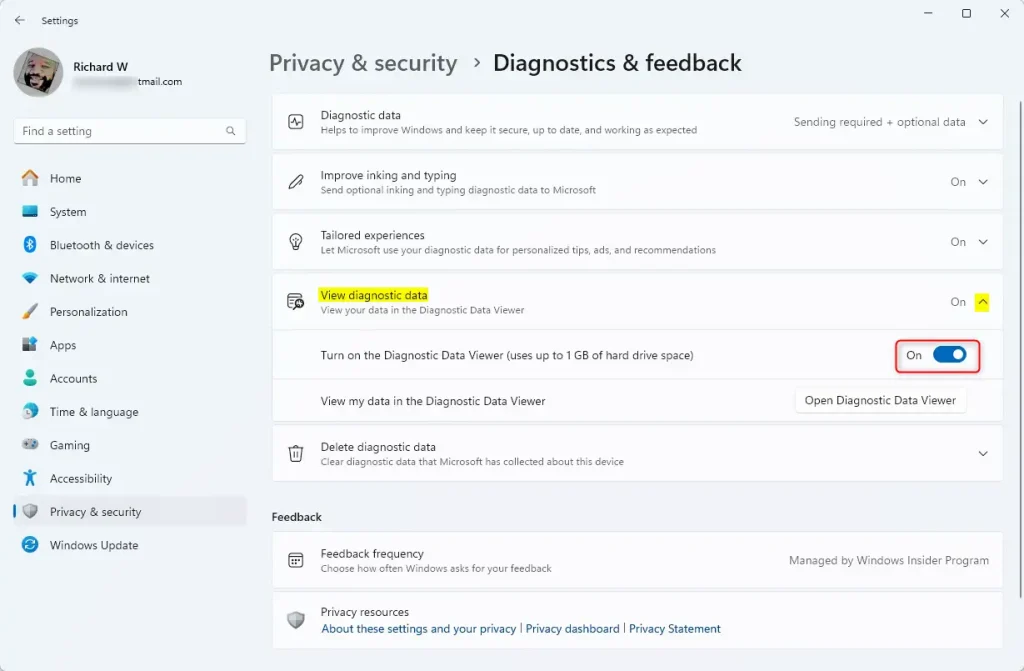
Next, select the “View diagnostic data” tile to expand it. Then, toggle the switch button to the On position to enable it.
To disable it, toggle the button to the Off position.
Exit the Settings app when you’re done.
Enable or disable diagnostic data viewer using group policy
Another way to disable or enable the diagnostic data viewer is to use the Local Group Policy Editor.
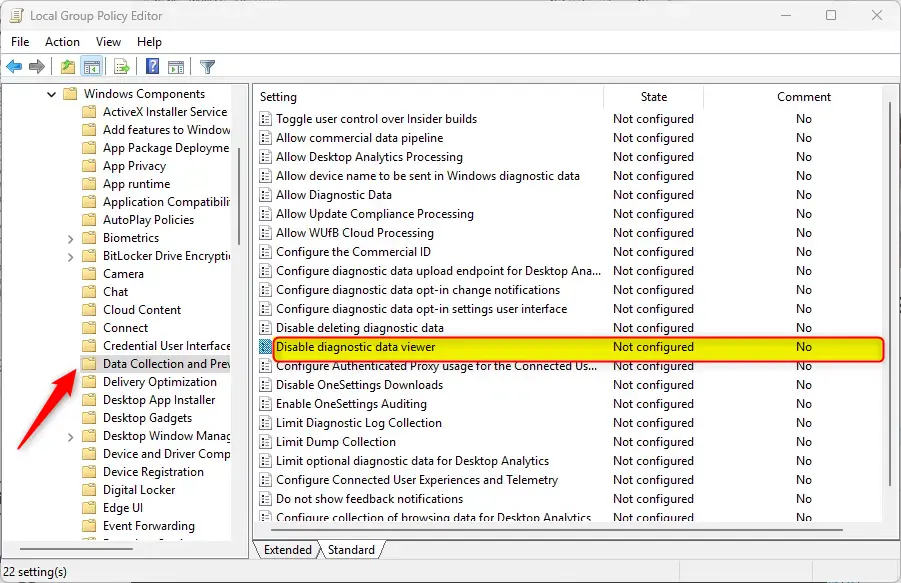
First, open the Local Group Policy Editor (gpedit.msc). (Search for “Edit group policy”) on the Start menu.
Then, navigate the folders below:
Computer Configuration > Administrative Templates > Windows Components > Data Collection and Preview Builds
In the Group Policy details pane on the right, locate and double-click the “Disable diagnostic data viewer” settings.
On the “Disable diagnostic data viewer” window, set the option to Not Configure, Enabled, or Disabled.
- Not Configured (default)
- Enabled – The Diagnostic Data Viewer will not be enabled on the Settings page, and it will prevent the viewer from showing diagnostic data collected by Microsoft from the device.
- Disabled – The Diagnostic Data Viewer will be enabled on the Settings page.
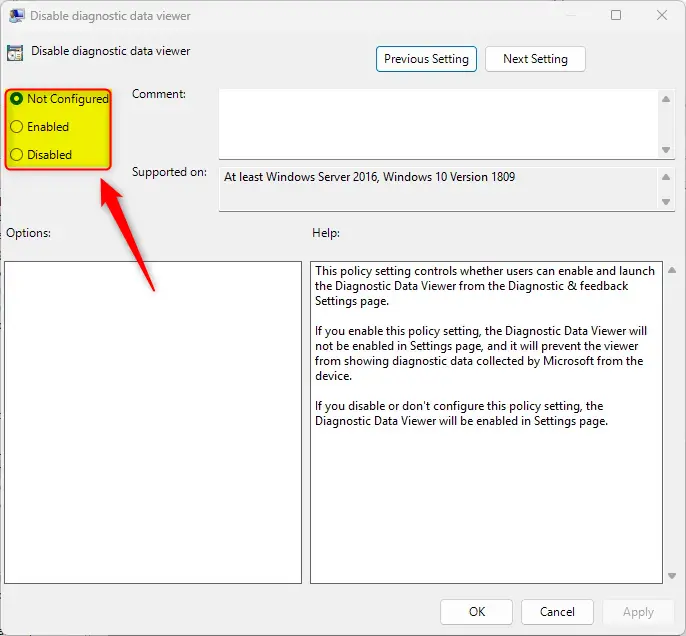
Click OK to save your changes. You may have to reboot your device for the settings to apply.
Turn on or off the diagnostic data viewer using the Windows Registry Editor
Yet another way to enable or disable the diagnostic data viewer is to use the Windows Registry editor.
First, open the Windows Registry and navigate to the folder key path below.
Disable or enable for current user:
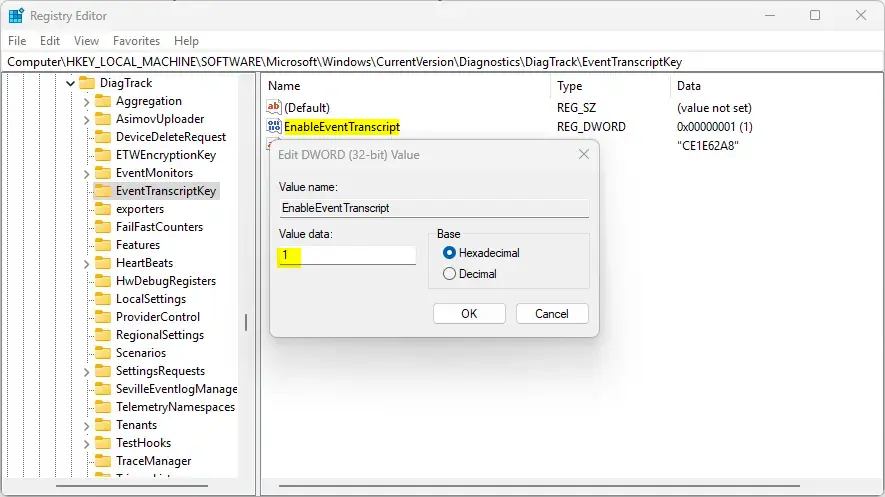
ComputerHKEY_LOCAL_MACHINESOFTWAREMicrosoftWindowsCurrentVersionDiagnosticsDiagTrackEventTranscriptKey
Next, double-click the EnableEventTranscript (REG_DWORD) name on the EnableEventTranscriptKey key’s right pane to open it.
Then, enter a value 1 to turn on the diagnostic data viewer.
Enter 0 to turn off the diagnostic data viewer.
If you do not see the “EnableEventTranscript” item, right-click a blank area and create a new DWORD (32-bit) registry item.
Then, enter “EnableEventTranscript” and your desired value to turn on or off.
Save your changes and restart your computer.
That should do it!
Conclusion:
- Windows 11 offers various methods to control the Diagnostic Data Viewer feature, providing users with flexibility based on their preferences and system configuration.
- Users can utilize the Windows Settings app to easily toggle the Diagnostic Data Viewer on or off, allowing for real-time monitoring and control of diagnostic data sent to Microsoft.
- The Local Group Policy Editor presents an alternative approach for more advanced management, offering granular control over enabling or disabling the Diagnostic Data Viewer.
- Additionally, tech-savvy users can leverage the Windows Registry Editor further to customize the enablement status of the Diagnostic Data Viewer, tailoring the experience to their specific requirements.
- By providing these diverse methods to manage the Diagnostic Data Viewer, Windows 11 ensures that users can maintain a balance between privacy and personalized experiences while contributing to improving the Windows ecosystem.


Leave a Reply