How to Enable or Disable Different Keyboard Layouts for Each App in Windows 11
You can enable or disable different keyboard layouts for each app in Windows 11 to switch languages seamlessly as you work.
This feature allows you to assign specific input methods, like US QWERTY or French AZERTY, to individual applications, preventing manual switching every time you change programs.
For instance, you might want your coding editor to use a US English layout while your messaging app uses a German layout, all without affecting other running applications.
Starting with Windows 11 build 22581, Microsoft officially rolled out this capability, making multilingual computing much more efficient for users who juggle multiple languages across their software.
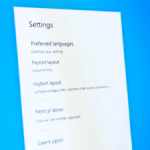
Enable this feature in Settings under Time & language > Typing > Advanced keyboard settings. Check “Let me use a different input method for each app window” to assign unique keyboard layouts to individual applications. Unchecking this box disables the functionality.
Why Change Keyboard Layouts?
You might want to change your keyboard layout to easily type special characters for different languages, like the ñ in Spanish or ä in German, especially if you often write in more than one language.
When you add a new language to Windows, it automatically adds the keyboard layout for that language. You can also add extra keyboards for special needs.
If you have more than one keyboard layout, you can switch between them. Click the language icon on the taskbar or press Win + Spacebar.
By default, Windows uses the same keyboard layout for all apps. But you can tell Windows to remember a different keyboard layout for each app window. What happens? Each app remembers its own keyboard layout.
How to Turn On Different Keyboard Layouts for Each App Using Settings
- Open Settings by pressing ⊞ Win+I.
- Click Time & language on the left side.
- Click Typing on the right side.
- Scroll down and click Advanced keyboard settings.
- Look for Let me use a different input method for each app window. Check it to turn on this feature. Uncheck it to turn it off.
- You can now close Settings.
To set up a different keyboard layout for each app in Windows 11, start by opening the Settings menu by pressing the Windows key and ‘I’ together.
You can also open the Typing settings directly by clicking this link (it opens your Settings app): Open Typing settings
How to Turn On Different Keyboard Layouts for Each App Using PowerShell
If you like using commands, you can do this with PowerShell:
- [REQUIRES ADMIN] Open Windows Terminal (right-click the Start button and choose it), then select Windows PowerShell.
- Copy and paste one of the commands below and press Enter.
Turn On Different Keyboard Layouts for Each App
To turn it on without showing the desktop language bar:
Set-WinLanguageBarOption -UseLegacySwitchModeTo turn it on and show the desktop language bar:
Set-WinLanguageBarOption -UseLegacyLanguageBar -UseLegacySwitchModeTurn Off Different Keyboard Layouts for Each App (Default)
To turn it off and hide the desktop language bar:
Set-WinLanguageBarOptionTo turn it off and show the desktop language bar:
Set-WinLanguageBarOption -UseLegacyLanguageBarAfter running the command, you can close Windows Terminal.
Summary
Windows 11 lets you use a different keyboard layout for each app, which is handy if you often switch between languages for work or communication.Was this guide helpful?

About the Author
Richard
Tech Writer, IT Professional
Richard, a writer for Geek Rewind, is a tech enthusiast who loves breaking down complex IT topics into simple, easy-to-understand ideas. With years of hands-on experience in system administration and enterprise IT operations, he’s developed a knack for offering practical tips and solutions. Richard aims to make technology more accessible and actionable. He's deeply committed to the Geek Rewind community, always ready to answer questions and engage in discussions.


No comments yet — be the first to share your thoughts!