How to Enable Memory Saver in Google Chrome


Memory Saver in Google Chrome is a built-in feature that puts inactive browser tabs into a resting state. Chrome can free up to 30% more RAM (Random Access Memory, your computer’s short-term storage) on Windows 10 or Windows 11. It works the same on Home and Pro editions, because it is a browser setting and not a Windows policy.
Chrome often eats large chunks of system memory when you keep dozens of tabs open, and that can slow down the whole computer. Memory Saver gives your other apps room to run without making you close the pages you want to keep.
When you want to look at a resting tab again, click it and the page reloads. You do not need to restart Chrome or Windows to use the feature or to change its settings.
Open Google Chrome, click the three-dot menu in the top right, select Settings, click Performance on the left sidebar, then turn on the Memory Saver switch. Choose Standard or Enhanced mode. Chrome frees up to 30% more RAM by putting inactive tabs to sleep.
Enable or disable Memory Saver in Google Chrome
Chrome handles this feature through its Performance settings. When tabs sit idle, Chrome frees the resources they hold, and the computer feels snappier. You will notice it most on machines with 8 GB of RAM or less, or when a lot of other programs are open.
Update it under Settings About Chrome, relaunch the browser, and then follow the steps below.
First, open the Google Chrome browser. A normal browser window is fine. You do not need to sign in to a Google account to change this setting.
- Click the Customize and Control button (three dots) in the top right corner of the window. A drop-down menu opens.
- Select Settings. Chrome opens the Settings page in a new tab.

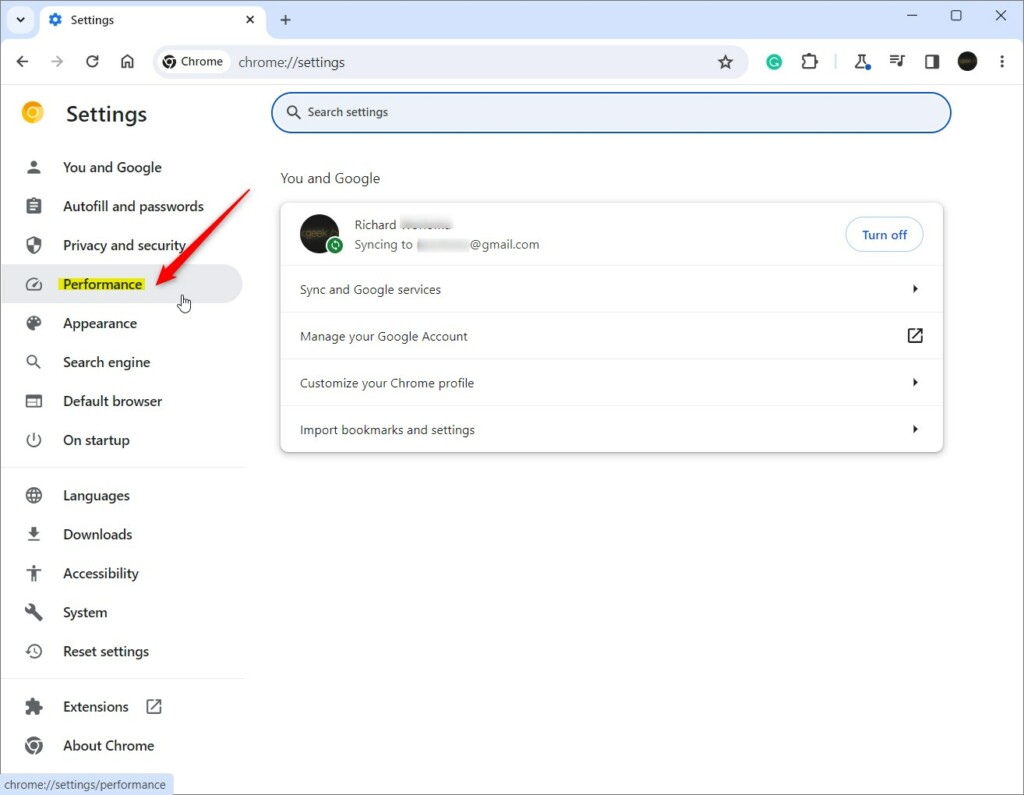
- On the left side of the screen, click Performance. If the left pane is hidden because the window is narrow, widen the window or use the menu icon at the top left of the Settings page.
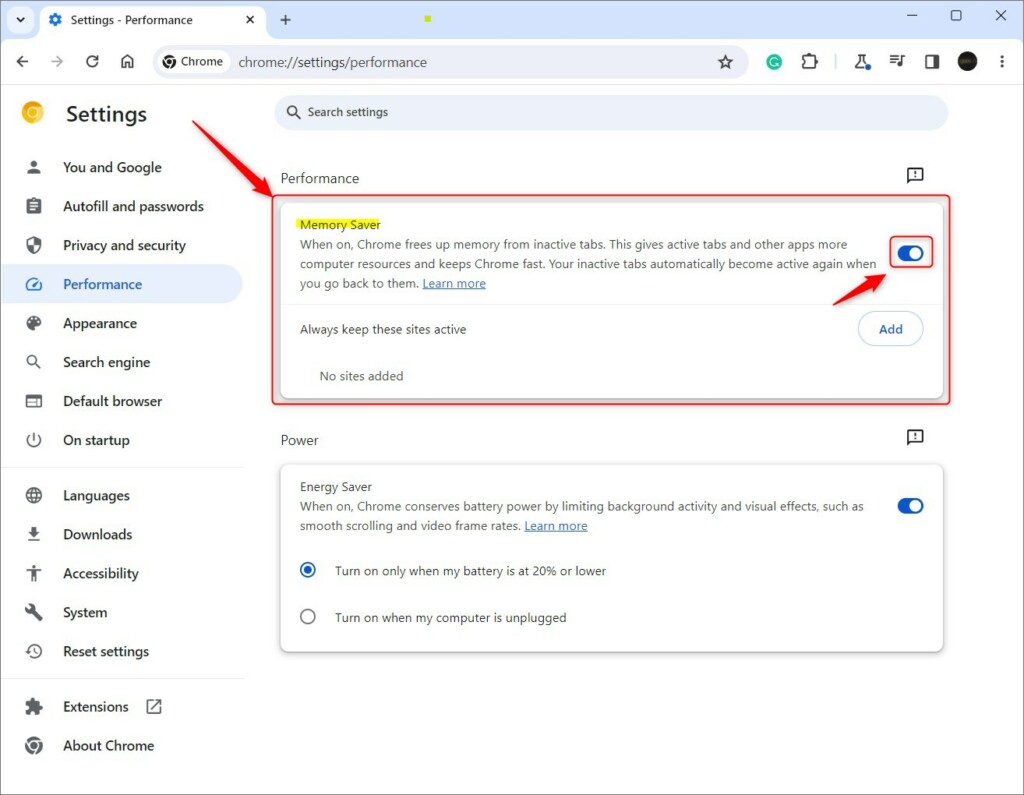
- Check that the Performance page shows a Memory section. This is where Memory Saver lives.
Turn on the Memory Saver switch. It changes colour to show it is on. The Memory Saver settings then appear alongside two available modes. The exact wording of these options can differ a little between Chrome versions.
- Standard Memory Saver: Chrome frees up memory based on your computer's needs. Pick this if you want the safer, lighter option.
- Enhanced Memory Saver: Chrome predicts which tabs you are done with and puts them to sleep more aggressively to keep your browser fast. Pick this if you keep many tabs open and want the most memory back. You may see pages reload more often.
You can switch between the modes at any time. Chrome applies the change right away.
The Energy Saver switch sits on this same page. Limiting background activity and visual effects helps laptop batteries last longer. It is a separate feature from Memory Saver, so you can use one, both, or neither. It matters mostly on laptops, and it may do little on a desktop PC.
Always keep sites active
If Chrome puts one of these to sleep, the music can stop or the page can miss updates. Keeping those specific pages exempt means they stay ready to go while the rest of your tabs still rest.
- On the Performance page, look for the section labeled Always keep these sites active. If you do not see it, check that Memory Saver is turned on first.
- Click the Add button. A small box opens asking for a site address.
- Type in the web address (URL) of the site you want to keep active.
- Click Add to save your choice. The site now appears in the list.
To undo this for a site, use the three-dot menu next to its entry in the list and remove it.
Certain computer activities naturally block tab deactivation, including:
- Playing audio or video.
- Sharing your screen.
- Active downloads.
- Connected USB or Bluetooth devices.
A tab doing any of these stays awake even if you have not touched it in a long time. You do not need to add it to the exceptions list.
You are all set. To check that it works, leave a few tabs untouched for a while, then hover over one in the tab strip. An inactive tab can show a note that it is resting and how much memory it freed. Click the tab and the page reloads.
If you ever need to turn Memory Saver off, repeat these steps (Settings Performance) and toggle the Memory Saver switch back off.
Reference:
Have a question about this guide?
Answered by AI from this guide. Good questions may be added to this page — please don't include personal details.
Did this guide fix your problem?

About the Author
Richard
Tech Writer, IT Professional
Richard is a writer at Geek Rewind who turns complex IT tasks into clear, step-by-step guides. He draws on years of hands-on experience in system administration and enterprise IT operations, focusing on Windows, Linux and WordPress: the problems people actually run into, and the fixes that work. His server and WordPress guides come from systems he runs himself. Richard builds and maintains the platform behind Geek Rewind, from its Ubuntu servers and Nginx configuration to its custom WordPress plugins. Many new tutorials start with readers' questions, and he's always glad to answer them in the comments.
No comments yet — be the first to share your thoughts!