How To Set Up And Use Multiple Monitors With Windows 11
You can set up and use multiple monitors with Windows 11 to expand your digital workspace and boost productivity.
Multiple monitors connect two or more screens to your PC, letting you spread your desktop across them. This feature is especially useful if you code, edit video, or juggle many apps at once, as it means you won’t have to constantly switch between windows.
Windows 11 makes this process quite simple, supporting up to 10 external displays per graphics card. You can configure these displays to either duplicate your main screen or extend your desktop area, providing a seamless multitasking experience.
Connect your monitors to your PC using the appropriate video cables. Then, right-click the desktop, select “Display settings,” and arrange your screens by dragging the monitor icons.
Getting Started: Connecting Your Monitors
Before you can enjoy multiple monitors, you need to physically connect them to your computer. This depends on the ports on your computer and your monitors.
Understanding Your Ports
Most modern computers and monitors use one or more of these common video connections:
- HDMI: Very common on most laptops and desktops, also found on TVs. It sends video and audio.
- DisplayPort (DP): Often better for computer monitors, especially for high resolutions and fast refresh rates. It sends video and audio.
- USB-C (with DisplayPort Alternate Mode): A versatile connector that can send video, data, and power. Many new laptops use this. You might need an adapter or a USB-C to DisplayPort/HDMI cable.
- DVI: An older standard, mainly for video. Less common on new devices.
- VGA: The oldest standard, analog. Usually found on very old computers and monitors. The quality is generally lower.
What You’ll Need
Here are the common video connections you’ll find:
- Your Computer: Make sure it has the right video output ports.
- Your Monitor(s): Make sure they have matching input ports.
- Video Cables: You’ll need the correct cables (HDMI, DisplayPort, USB-C, etc.) to connect your computer to each monitor. Check the ports on both devices to know which cables you need. You might need different cables if your monitors have different input types.
- Power Cords: For each monitor.
Step-by-Step Connection Process
- Power Down: It’s a good idea to turn off your computer and unplug it before connecting new hardware. Turn off your monitors too.
- Connect the First Monitor:
- Find a video output port on your computer (like HDMI or DisplayPort).
- Find a matching video input port on your first monitor.
- Use the right video cable to connect the computer to the monitor.
- Plug in the monitor’s power cord and turn it on.
- Connect Additional Monitors:
Repeat step 2 for each extra monitor you want to connect. Make sure your computer has enough video output ports. If not, you might need a docking station or a graphics card upgrade. (This is a more advanced topic, see our Advanced Setup section).
- Power Up Your Computer: Once all monitors are connected and turned on, turn on your computer.
Windows 11 should automatically find the new monitors. You might see your desktop on one or more screens, or you might just see your main screen with a message about new displays being found.
Configuring Your Displays in 🪟 Windows 11
After your monitors are physically connected, you need to tell Windows 11 how you want to use them. You do this in the Display settings. This process is quite simple!
Accessing Display Settings
There are a few ways to get to the Display settings:
- Right-Click Method: Right-click on an empty spot on your desktop. In the menu that appears, select Display settings.
- Settings App Method: Click the Start button, then click Settings (the gear icon). In the Settings app, click System in the left menu, then click Display.
You’ll see the Display settings window. At the top, Windows shows a numbered picture of your connected monitors.
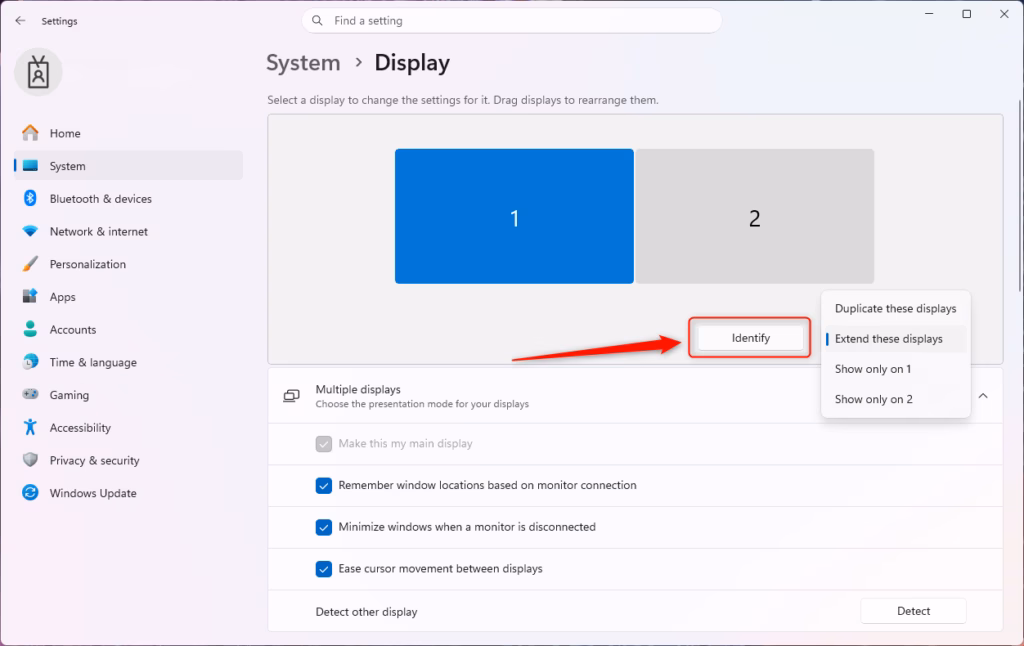
Identifying Your Displays
If you’re not sure which number matches which physical monitor, Windows can help.
- In the Display settings, click the Identify button.
A large number will briefly show up on each of your monitors. This number matches its number in the settings. This helps you know which screen you are changing.
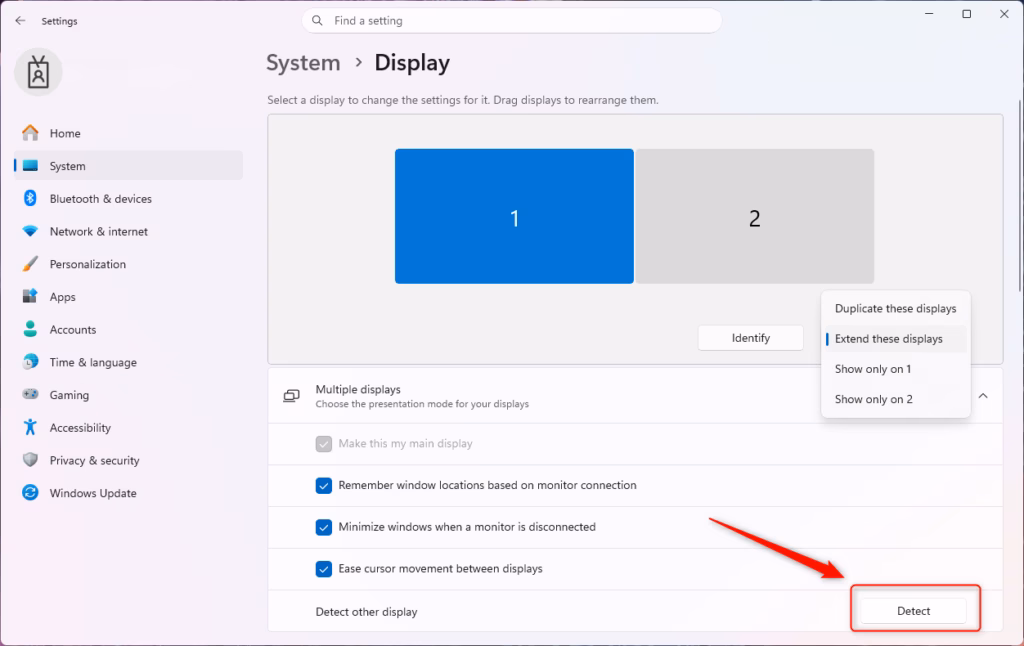
Detecting New Displays
Sometimes, Windows might not automatically find a monitor you just connected. If this happens:
- Scroll down in the Display settings to the “Multiple displays” section.
- Click the Detect button. Windows will look for any connected displays it might have missed.
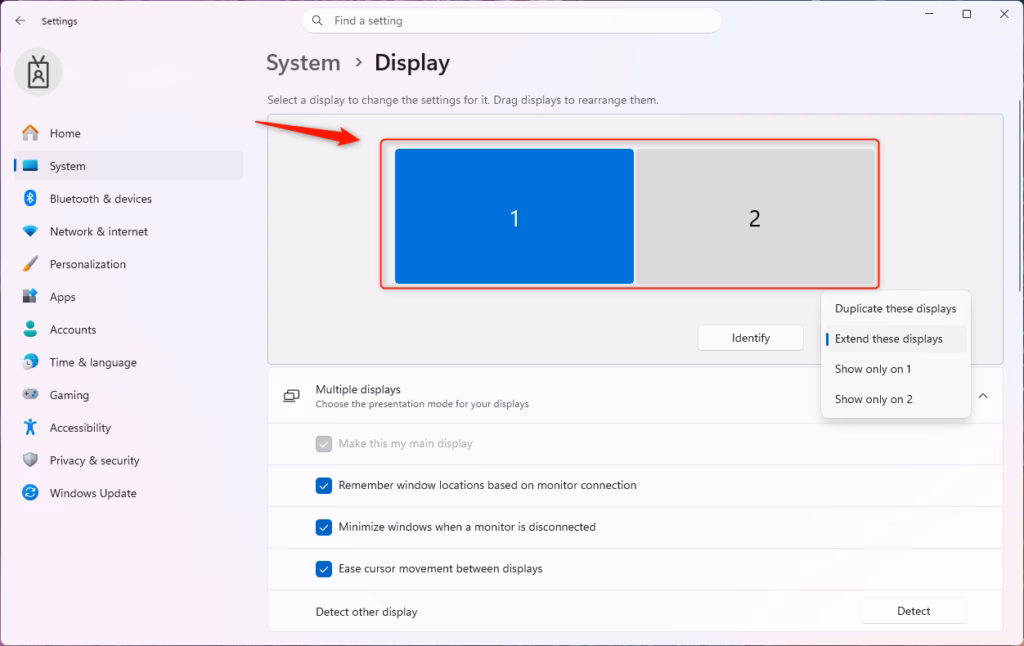
Arranging Your Displays
Getting this right is key to making your multi-monitor setup feel natural. You want the arrangement of the numbered screens in Windows to match how your physical monitors are placed on your desk.
- In the Display settings, click and drag the numbered monitor icons (1, 2, 3, etc.). Place them to match how they are physically on your desk. For example, if your second monitor is to the right of your main monitor, drag the icon for monitor 2 to the right of monitor 1.
- Once you have them arranged correctly, click the Apply button at the bottom of the window.
Once you have them arranged correctly, click Apply. Then, test the arrangement by moving your mouse cursor to the edge of one screen. It should glide smoothly to the next screen in the direction you set up. If it doesn’t, head back and adjust until it feels right.
Choosing a Display Mode (Extend, Duplicate, etc.)
Under the “Multiple displays” section, you’ll find a dropdown menu. This is where you tell Windows how you want to use your monitors.
- Duplicate these displays: Shows the exact same image on all selected monitors. This is useful for presentations or if you want a backup display.
- Extend these displays: This is the most common and useful option. It spreads your desktop across all monitors, creating a bigger workspace.
- Show only on 1 / Show only on 2: Turns off all displays except the one you choose.
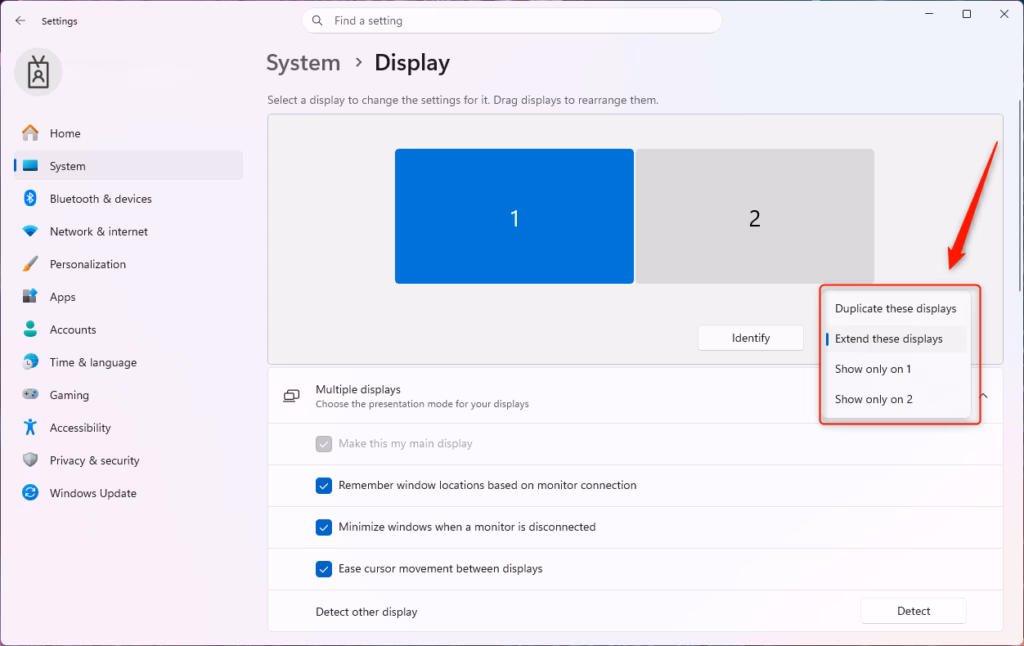
For a multi-monitor setup, you’ll almost always want to select Extend these displays.
Setting Your Main Display
One of your monitors will be set as the “main display.” This is where the Start menu, taskbar, and system notifications usually show up first. It’s also where new applications will open unless you drag them somewhere else.
- In the Display settings, click on the numbered icon of the monitor you want to be your main display.
- Scroll down to the “Multiple displays” section.
- Check the box that says Make this my main display.
- Click Apply.
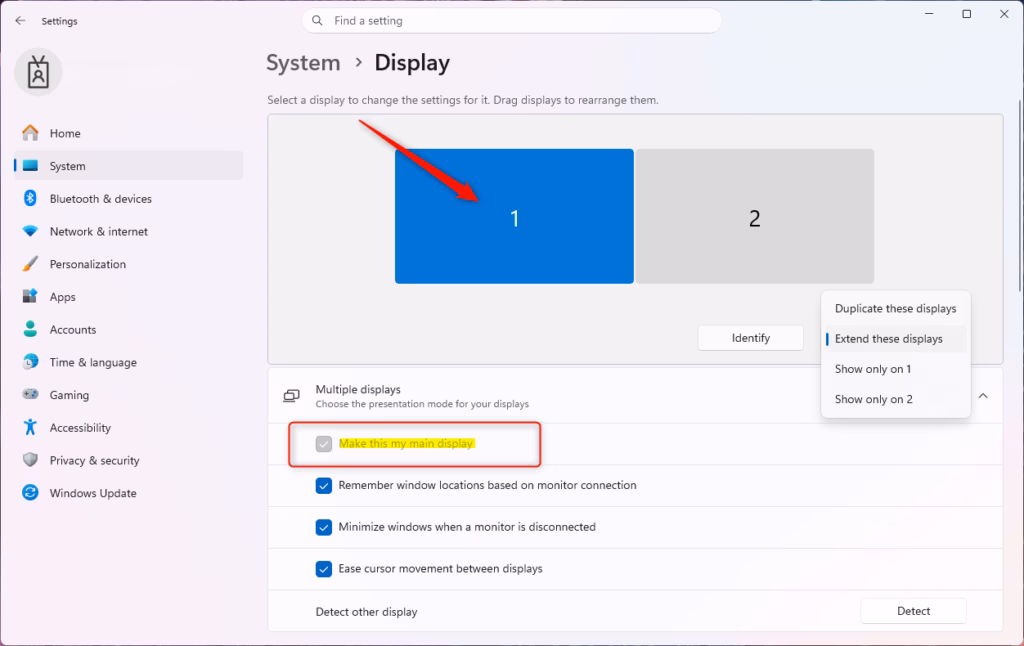
You’ll see the taskbar and Start button move to the monitor you chose as the main display.
Customizing Your Display Settings
After your monitors are set up and arranged, you can fine-tune how they look and work.
Changing Display Resolution
Resolution refers to the number of pixels on your screen. Higher resolutions mean sharper images and more detail. Windows 11 usually selects the best resolution for you automatically, but you can always tweak it if needed.
- In Display settings, click on the monitor you want to change.
- Scroll down to “Display resolution.”
- Click the dropdown menu and choose your desired resolution. The “(Recommended)” option is usually the best for your monitor’s built-in resolution.
- Click Keep changes if asked.
Adjusting Scale and Layout
Scaling adjusts the size of text, apps, and other items on your screen. This is a lifesaver if you have monitors with different resolutions or sizes, or if text seems too tiny.
- In Display settings, click on the monitor you want to adjust.
- Under “Scale & layout,” you’ll see “Change the size of text, apps, and other items.”
- Click the dropdown menu and choose a percentage (like 100%, 125%, 150%). 100% means no scaling, while higher percentages make things bigger.
The changes usually appear right away. However, if you adjust the scaling on your main display, you might need to restart some apps to see those changes fully take effect.
Changing Display Orientation
Most monitors are used in landscape (wide) mode. However, you might want to turn a monitor to portrait (tall) mode. This can be useful for reading long documents or writing code.
- In Display settings, click on the monitor you want to rotate.
- Scroll down to “Display orientation.”
- Click the dropdown menu and choose Landscape (normal), Portrait (rotated 90 degrees clockwise), Landscape (flipped), or Portrait (flipped).
- Click Keep changes if asked.
Adjusting Refresh Rate
The refresh rate (measured in Hertz or Hz) is how many times per second your screen updates its image. A higher refresh rate makes motion look smoother. This is noticeable when gaming or scrolling.
- In Display settings, click on the monitor you want to adjust.
- Scroll down to “Advanced display.”
- Under “Choose a refresh rate,” select the highest rate your monitor supports from the dropdown menu.
- Click Keep changes if asked.
Advanced Setup and Tips
Now that you know the basics, let’s look at some more advanced settings and helpful tips for your multi-monitor setup.
Dealing with Multiple Graphics Ports and Adapters
What if your computer doesn’t have enough video output ports for all your monitors, or the ports you have don’t match your monitors?
- Multiple Graphics Cards: Some desktop PCs have more than one graphics card or multiple ports on one graphics card. Check your computer’s manual or look at the back of your tower for all available video outputs.
- Docking Stations: For laptops, a docking station is often the best solution. It connects to your laptop (usually with USB-C or Thunderbolt) and provides multiple video outputs (HDMI, DisplayPort), USB ports, and sometimes even Ethernet.
- USB to Video Adapters: You can buy adapters that plug into a regular USB-A or USB-C port and give you a video output (like HDMI). These are great for adding one or two extra monitors, but performance might be limited for demanding tasks like gaming.
- DisplayPort Daisy-Chaining: Some monitors support DisplayPort Multi-Stream Transport (MST). This lets you connect one monitor to your computer, and then connect a second monitor to the first monitor using a DisplayPort cable. Check your monitor’s specifications to see if it supports this.
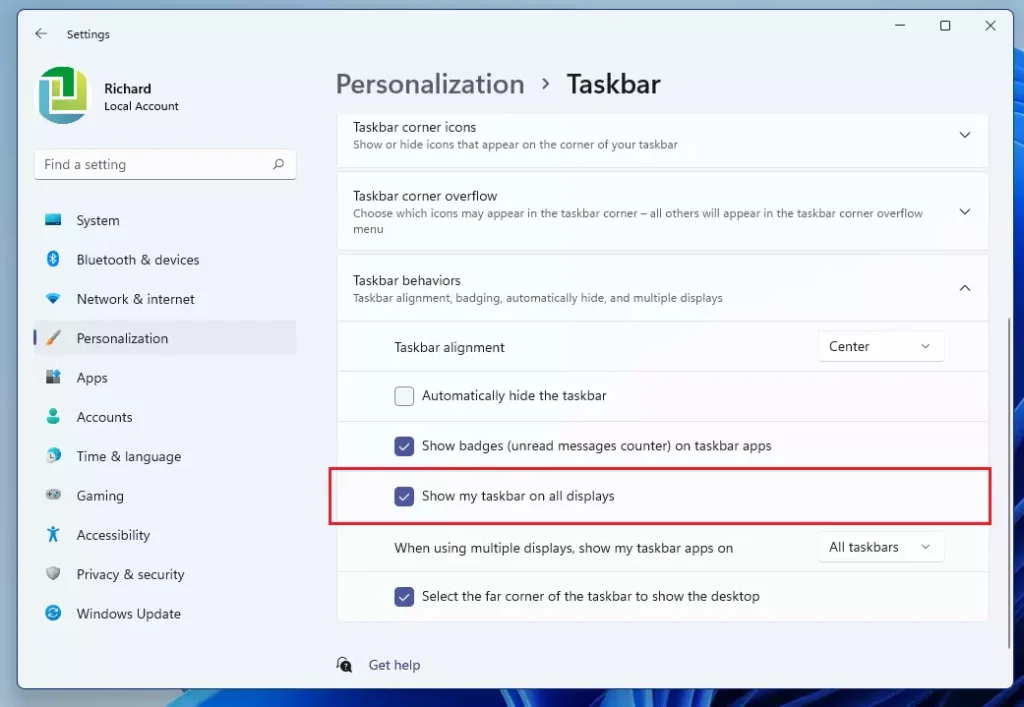
Configuring the Taskbar for Multiple Monitors
By default, Windows 11 shows the taskbar on all screens. You can change this.
- Go to Settings > Personalization > Taskbar.
- Expand the Taskbar behaviors section.
- Look for the option “Taskbar on all displays.” You can choose to show the taskbar on all displays, or only on the display where your mouse cursor is. You can also choose where taskbar buttons show up (like only on the taskbar where the window is open, or across all taskbars).
Using Windows Snap Layouts and Snap Groups
Windows 11’s Snap Layouts feature is really useful with multiple monitors. When you hover over the maximize button of a window, a grid of options appears for arranging that window on your screen. You can quickly snap applications into set layouts across your extended desktop.
Snap Groups remember the apps you’ve snapped together. If you minimize a Snap Group, you can bring all the apps in that group back by clicking on one of them in the taskbar.
Setting Different Backgrounds for Each Monitor
Want to make each screen unique? Windows 11 makes this easy.
- Right-click on your desktop and select Personalize.
- Click on Background.
- Choose a picture.
- Below the image selection, you’ll see an option like “Choose a photo to show on all displays.” If you select a picture here, it applies to all.
- To set different backgrounds: Right-click on the image you want to use for a specific monitor, and then choose Set for monitor 1, Set for monitor 2, etc.
Troubleshooting Common Issues
- Monitor Not Detected: Make sure cables are plugged in securely at both ends. Try a different cable or a different port. Restart your computer. Use the “Detect” button in Display settings.
- Incorrect Resolution or Scaling: Make sure you are using the monitor’s native resolution and the right scaling percentage. Update your graphics drivers.
- Flickering or Display Issues: Check your cables. Make sure your graphics drivers are up to date. Try lowering the refresh rate. Some older adapters or cables might not support high resolutions or refresh rates.
- Mouse Cursor Jumps Between Screens Incorrectly: Rearrange your displays in Display settings to match their physical positions correctly.
When to Consider Upgrading Your Graphics Card
For basic tasks like web browsing, writing documents, and email, most built-in graphics (part of your CPU) or basic graphics cards will handle multiple monitors fine. However, if you plan to:
- Game on multiple monitors or at very high resolutions (like 4K).
- Do professional video editing or graphic design.
- Run multiple high-resolution monitors (e.g., three 4K displays).
…you might need a more powerful graphics card (GPU). Check your graphics card’s specifications to see how many displays it supports and its recommended resolutions.
- Can I use monitors with different resolutions or sizes? Yes, Windows 11 handles monitors of different resolutions and sizes well. You can adjust scaling and resolution separately for each monitor to make sure everything looks clear and the right size. Just make sure to arrange them correctly in Display settings.
- Do I need a special graphics card for multiple monitors? For basic use, most modern computers have enough graphics power for two or three monitors. However, for gaming, high-resolution displays, or many monitors, a dedicated graphics card with enough VRAM and multiple output ports is recommended.
- How do I make sure my mouse moves smoothly between screens? The key is to arrange the monitor icons in Windows 11 Display settings to match exactly how they are placed physically on your desk. If your mouse moves up when you expect it to go right, adjust the arrangement until it feels natural.
- What is the difference between “Duplicate” and “Extend”? “Duplicate” shows the same content on multiple screens, which is good for presentations. “Extend” spreads your desktop across all screens, creating a bigger workspace where you can open different apps on each monitor at the same time.
- Can I connect wireless monitors?
How do I display different things on two monitors in 🪟 Windows 11?
To display different things on two monitors in Windows 11, go to Settings > System > Display. Under ‘Multiple displays,’ select ‘Extend these displays.’ Then, you can drag and drop windows between your monitors to arrange them as you wish.
Do I have to configure my PC for dual monitor setup?
Yes, after physically connecting your monitors, you’ll need to configure the display settings in Windows 11. Access Settings > System > Display to choose how you want to use the monitors, such as extending or duplicating your desktop.
Can 🪟 Windows 11 handle 4 monitors?
Yes, Windows 11 can handle multiple monitors, including up to 4 displays. The exact number you can connect depends on your computer’s graphics card capabilities and the available ports. Ensure your hardware supports the desired number of displays.
How to hook up two monitors on 🪟 Windows 11?
First, connect each monitor to your PC using appropriate cables (HDMI, DisplayPort, USB-C). Once connected, Windows 11 should automatically detect them. Go to Settings > System > Display to configure them, typically by selecting ‘Extend these displays.’
Was this guide helpful?

About the Author
Richard
Tech Writer, IT Professional
Richard, a writer for Geek Rewind, is a tech enthusiast who loves breaking down complex IT topics into simple, easy-to-understand ideas. With years of hands-on experience in system administration and enterprise IT operations, he’s developed a knack for offering practical tips and solutions. Richard aims to make technology more accessible and actionable. He's deeply committed to the Geek Rewind community, always ready to answer questions and engage in discussions.


No comments yet — be the first to share your thoughts!