How to Pause and Restart BitLocker on Windows 11
If you use BitLocker on your Windows 11 PC, sometimes you might need to temporarily pause its protection. This guide will show you simple ways to pause (suspend) and restart (resume) BitLocker so you can do updates or hardware changes safely.
What is BitLocker?
BitLocker is a tool built into Windows that locks your drive to keep your files safe. Only people with permission can open your data. Any new files you save are also protected automatically.
You can use BitLocker to protect:
- Your main computer drive where Windows is installed (called the OS drive)
- Other internal drives inside your PC
- External drives like USB sticks or external hard drives
For your main Windows drive, BitLocker usually unlocks automatically when you start your PC using a special security chip called TPM.
Why Pause (Suspend) BitLocker?
Sometimes, you need to pause BitLocker temporarily. For example:
- When you change computer hardware
- When you update Windows or the operating system
Pausing BitLocker lets these changes happen without problems. But remember, while BitLocker is paused, your data isn’t fully protected. Make sure to turn it back on (resume) when you’re done.
How to Pause and Resume BitLocker Using Control Panel
- Open the Control Panel on your PC. Learn how to open Control Panel
- Click on System and Security, then choose BitLocker Drive Encryption.
- Find the drive you want to pause BitLocker on under Operating system drive or other drives.
- Click Suspend protection.
- When a pop-up appears, click Yes to confirm.
Note: For your main Windows drive, BitLocker will stay paused until you either restart your PC or manually turn BitLocker protection back on. For other drives, BitLocker stays paused until you manually resume it, even after restarting.
To Resume (Turn Back On) BitLocker Protection:
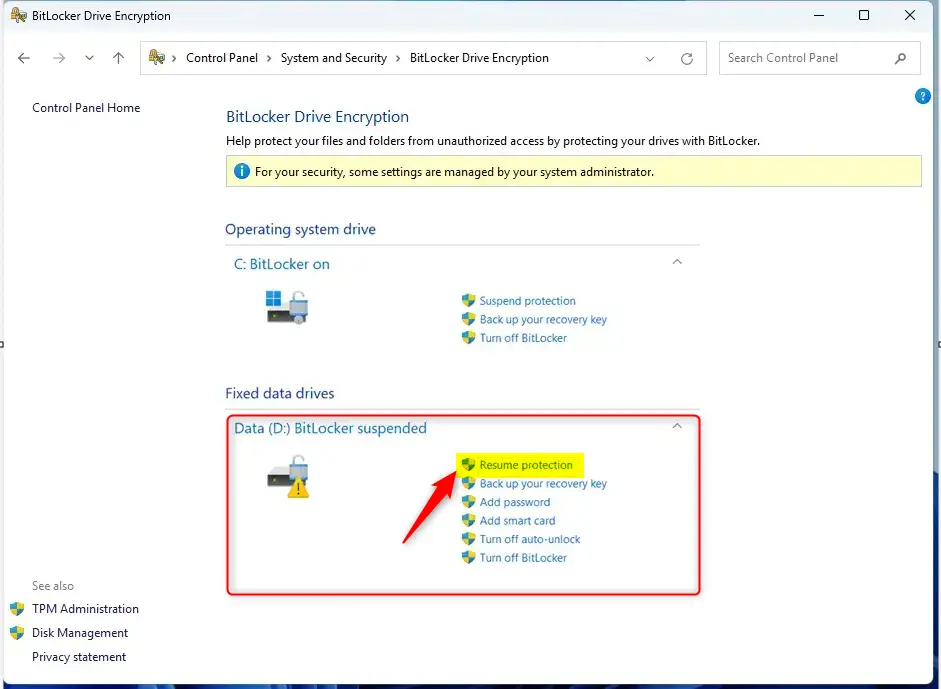
- Go back to Control Panel > System and Security > BitLocker Drive Encryption.
- Click Resume protection for the paused drive.
How to Resume BitLocker Using File Explorer
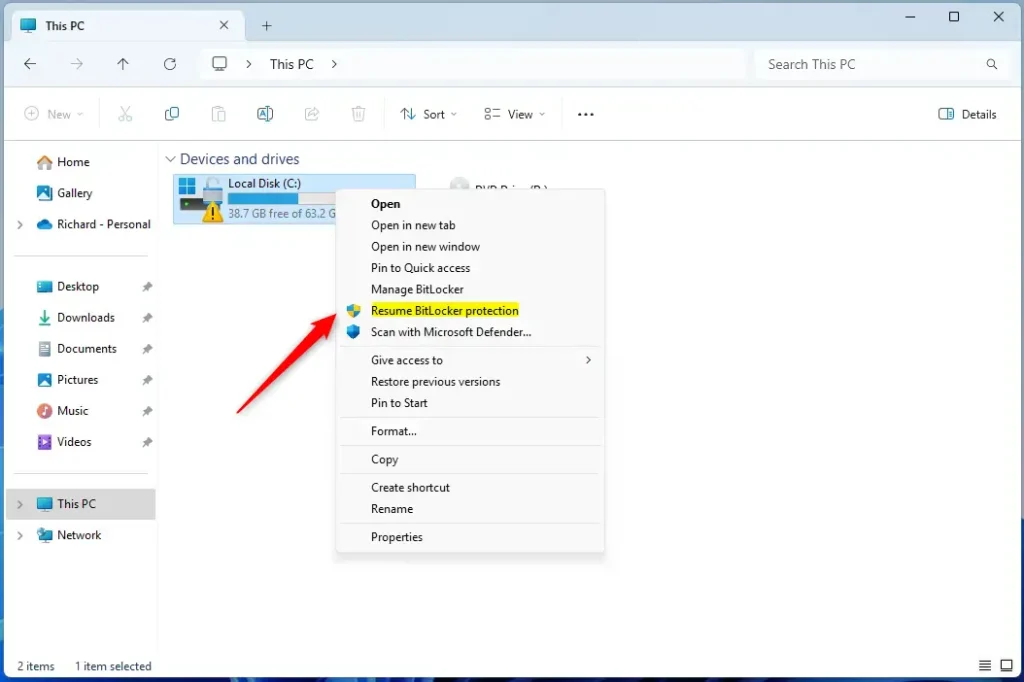
- Open File Explorer.
- Right-click on the drive that has BitLocker paused.
- Click Show more options (or press Shift+F10), then select Resume BitLocker protection.
Pause and Resume BitLocker Using PowerShell (Advanced)
If you like using commands, you can do the same with PowerShell.
- FLAG: Admin privileges required — Open Windows Terminal as administrator, then choose the PowerShell tab.
To pause BitLocker on a drive, type:
manage-bde -protectors -disable <drive letter>:Replace <drive letter> with the letter of your drive. For example:
manage-bde -protectors -disable C:To turn BitLocker back on, type:
manage-bde -protectors -enable C:You can also pause or resume BitLocker for all drives with these commands:
Get-BitLockerVolume | Suspend-BitLocker
Get-BitLockerVolume | Resume-BitLocker
Pause BitLocker for OS Drive with Automatic Resume After Restarts
When you pause BitLocker for your main Windows drive, it usually turns back on when you restart your computer. But you can tell it how many restarts to wait before turning back on automatically.
Suspend-BitLocker -MountPoint "C:" -RebootCount <number_of_restarts>Replace <number_of_restarts> with a number from 0 to 15. For example, to pause until you manually resume, use:
Suspend-BitLocker -MountPoint "C:" -RebootCount 0Summary
- BitLocker keeps your files safe by locking your drives.
- You can pause BitLocker when making system changes to avoid problems.
- Remember to resume BitLocker as soon as possible to keep your data protected.
- You can pause or resume BitLocker using Control Panel, File Explorer, or PowerShell.
- For the main Windows drive, you can control how many restarts before BitLocker turns back on automatically.
That’s it! Now you know how to safely pause and restart BitLocker on your Windows 11 PC.
Was this guide helpful?

About the Author
Richard
Tech Writer, IT Professional
Richard, a writer for Geek Rewind, is a tech enthusiast who loves breaking down complex IT topics into simple, easy-to-understand ideas. With years of hands-on experience in system administration and enterprise IT operations, he’s developed a knack for offering practical tips and solutions. Richard aims to make technology more accessible and actionable. He's deeply committed to the Geek Rewind community, always ready to answer questions and engage in discussions.


No comments yet — be the first to share your thoughts!