Share Your Screen Wirelessly: Casting to Another Windows PC
You can share your Windows 11 screen wirelessly to another PC using the built-in Connect app.
This feature lets you cast your desktop display. It’s a great way to present information or collaborate without needing any cables. Think of it like this: another Windows computer becomes a second screen for your main one.
The Connect app works with Windows 10 and Windows 11, using Miracast technology. For this to work smoothly, make sure both the computer you’re casting *from* and the one you’re casting *to* are connected to the same Wi-Fi network.
To cast your screen wirelessly to another Windows PC, first install the “Wireless Display” optional feature on the receiving PC via Settings > System > Optional features. Then, on the sending PC, press Windows key + K to open the Cast panel and select the receiving PC from the list.
Step 1Get the Receiving PC Ready
Before you can send your screen, the computer you’re sending it *to* needs to be ready to receive. Think of this as setting up the “inbox” for your screen.
Turn on the Wireless Display Feature
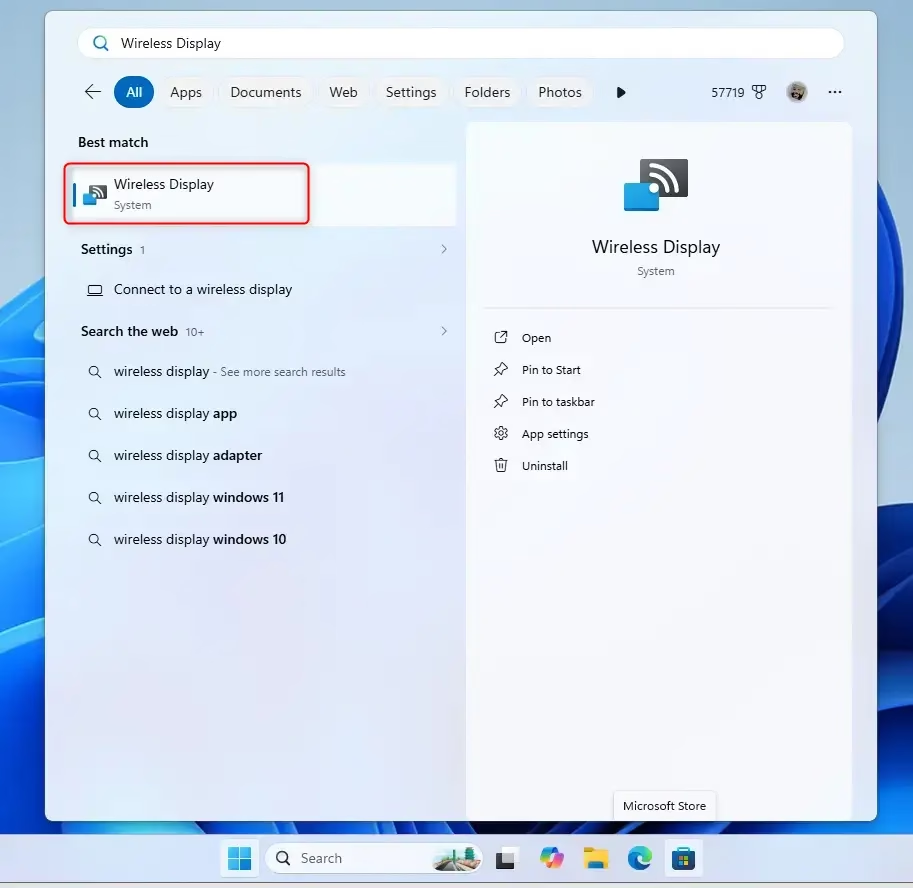
To cast your Windows screen to another PC, you first need to turn on the Wireless Display feature on the computer that will receive the cast.
- On the Windows 11 PC you want to project to, click the Start button.
- Select Settings (the gear icon).
- In Settings, click System on the left.
- Scroll down and click Optional features. This is where you add extra Windows tools.
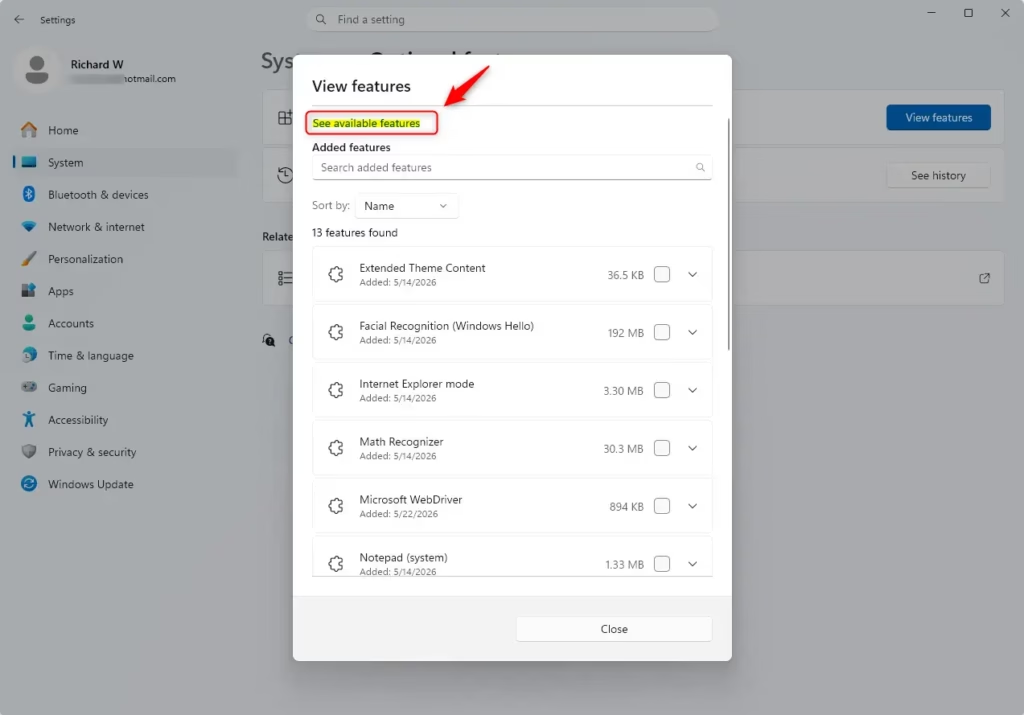
- Under “Add an optional feature,” click View features.
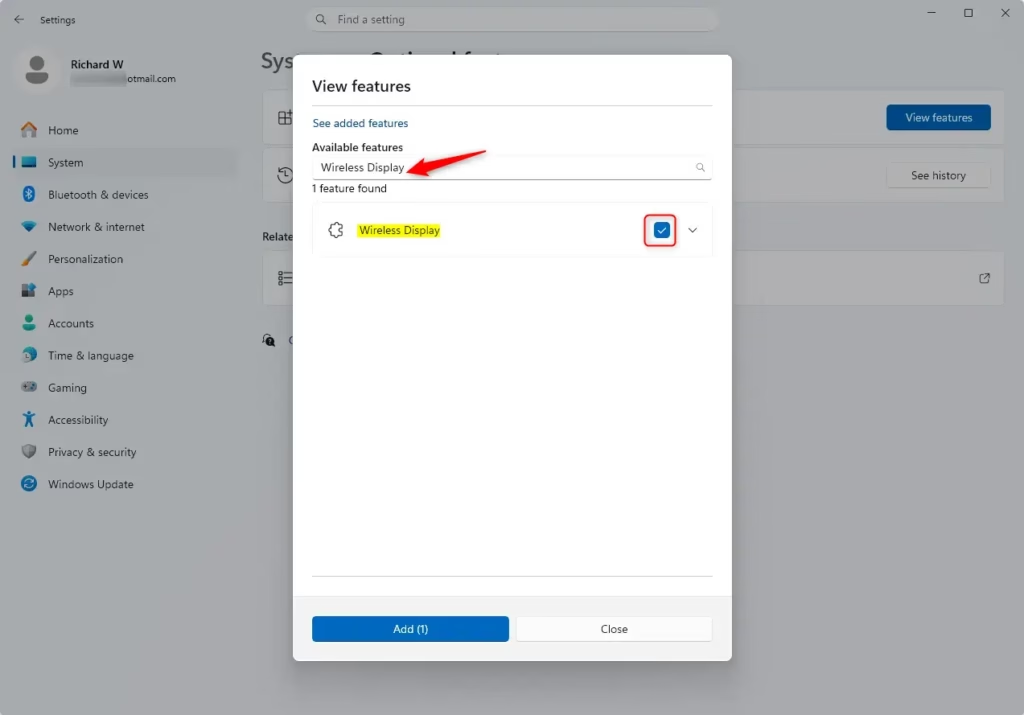
- A search box will appear. Type
Wireless Display. - You should see “Wireless Display” in the list. Put a checkmark next to it.
- Click Next, then click Install.
On the Windows 11 PC that will receive your screen, start by clicking the Start button. Then, select Settings (that’s the gear icon). In Settings, click System on the left-hand side. Scroll down and choose Optional features – this is where you can add extra Windows features and tools. Under ‘Add an optional feature,’ click View features. A search box will pop up. Type in ‘Wireless Display’ and you should see it in the list. Put a checkmark next to it, then click Next and finally Install. Windows will download and install everything needed. This process might take a minute or two, and you’ll see a progress bar.
Set Up Projection Settings
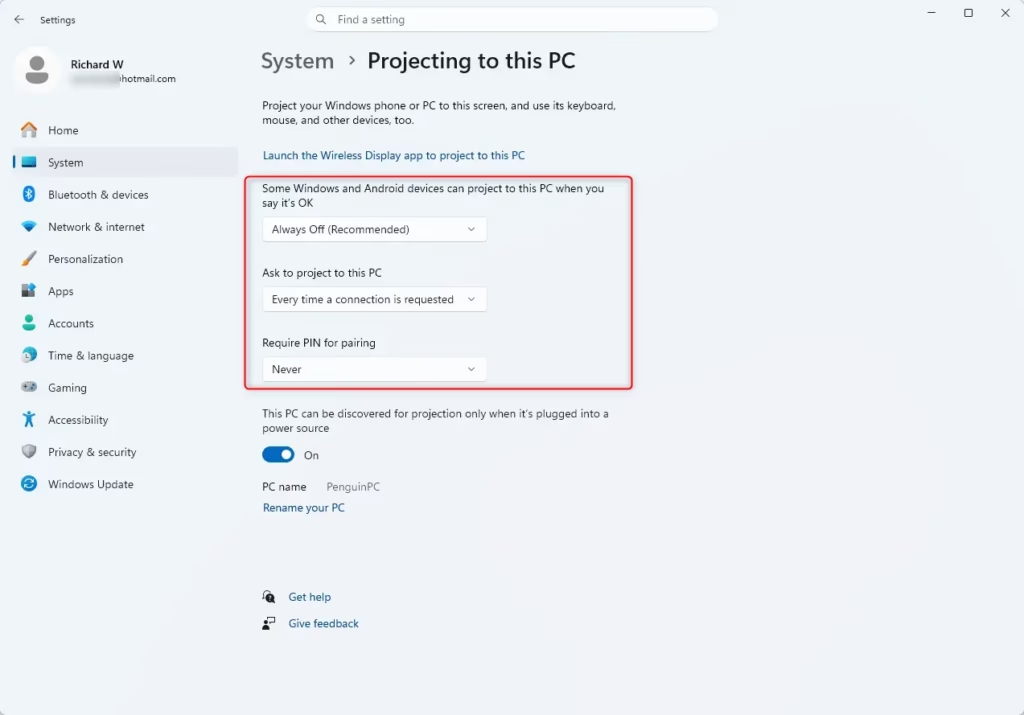
After installing the Wireless Display feature, you need to set up how your PC will accept incoming screen casts using the ‘Projecting to this PC’ settings.
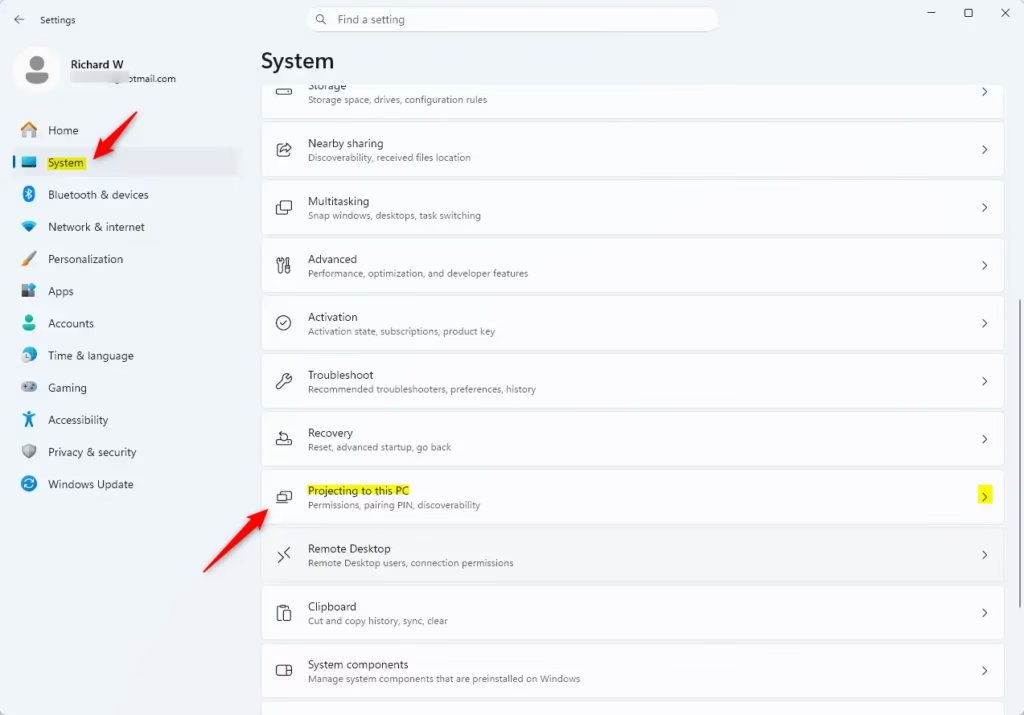
- After installation, go back to Settings > System.
- Scroll down and click Projecting to this PC.
- Here, you’ll see options. The main one is “Some Windows and Android devices can project to this PC when you tell them to.” You can choose if it’s available Everywhere or only On the same network (this is safer).
- You can also choose if your PC needs a PIN to connect. It’s a good idea to use a PIN if you’re in a public place.
Tip: For the best results, make sure both computers are on the same Wi-Fi network.
Start the Wireless Display App
To make sure your PC is ready to receive a screen cast, open the Wireless Display app on the computer you want to project to.
- On the receiving PC, click the Search icon on your taskbar (it looks like a magnifying glass).
- Type
Wireless Display. - Click on the Wireless Display app when it shows up.
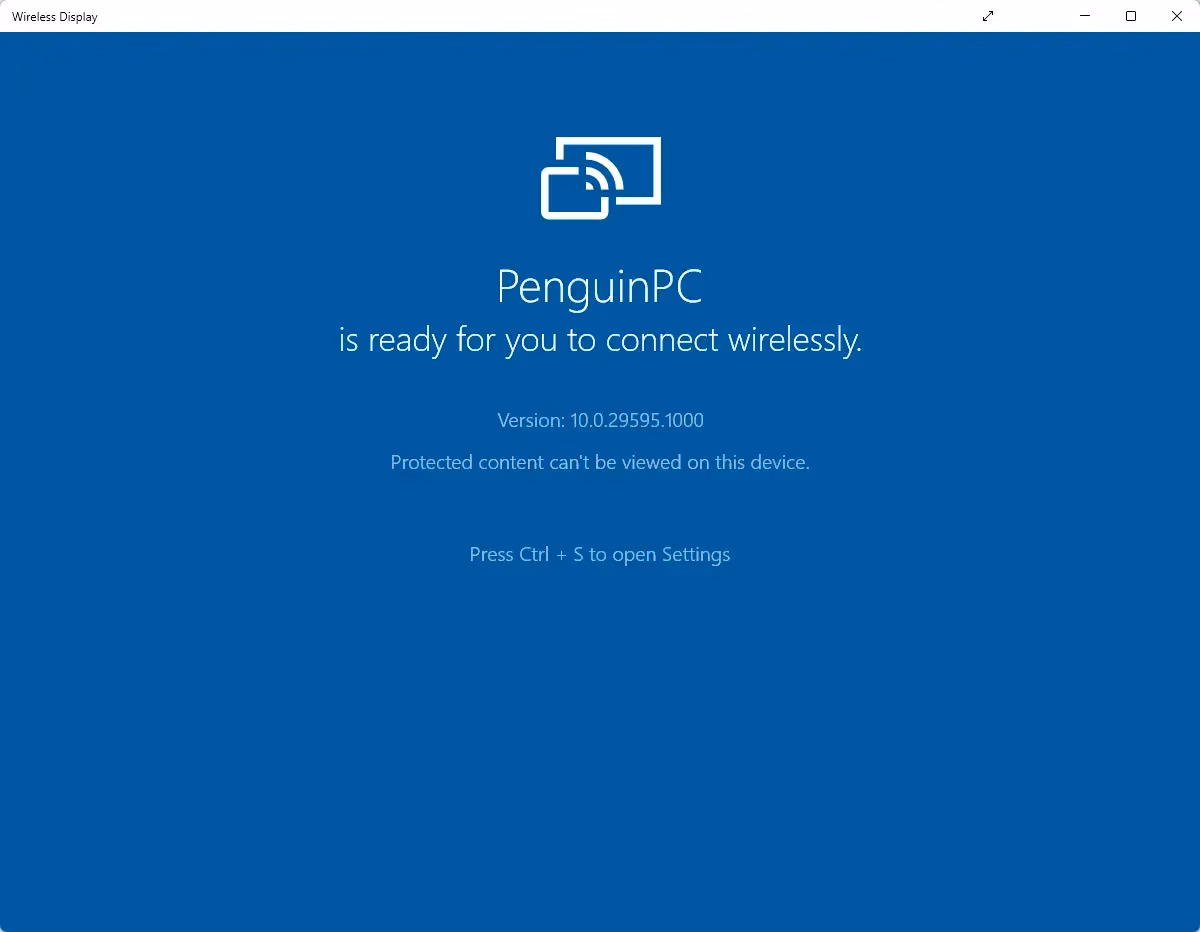
The app will open. It might say your PC is ready to connect wirelessly. It might even show your PC’s name, which is what the sending computer will look for.
Important Note: The Wireless Display app is built into Windows 11, version 22H2 and newer. If you have an older version, you might need the “Connect” app. To check your version, go to Settings > System > About and look under “Windows specifications.” If you need the Connect app, search for Connect in the taskbar search and open it.
Step 2Connect Your 🪟 Windows 11 PC
Now that the receiving PC is ready, it’s time to start sending your screen from the other PC.
Start the Cast
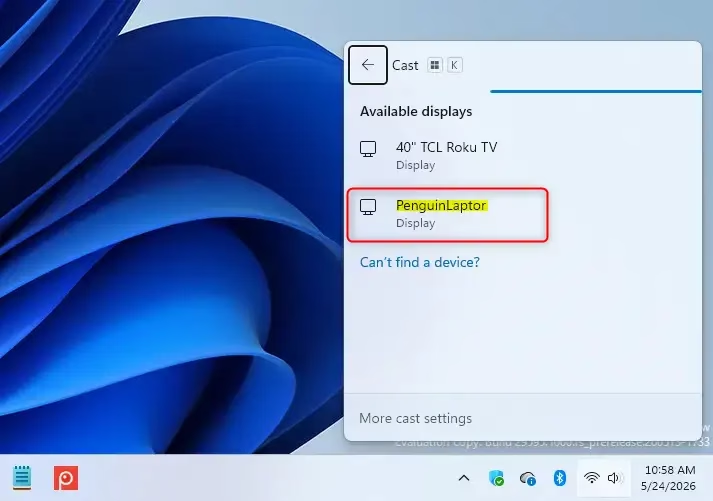
You can start casting your Windows 11 screen to another PC quickly by pressing the Windows key + K together.
- On the Windows 11 PC you want to project from, press the Windows key + K together.
- A Cast or Connect panel will slide out from the right side of your screen.
- This panel will look for wireless displays on your network.
- Find the name of the PC you set up in Step 1. It should be in the list.
- Click the name of the receiving PC.
Your PC will try to connect. You might see “Connecting…” If you set up a PIN on the receiving PC, you’ll be asked to type it in on the sending PC now.
Another Way: Use Display Settings
If the Windows key + K shortcut doesn’t work for casting, you can connect to a wireless display through your PC’s Display settings instead.
- On the PC you’re projecting from, right-click on your desktop and choose Display settings.
- Scroll down to the Multiple displays section.
- Click Connect to a wireless display.
- Windows will look for devices. Pick the name of the PC you want to connect to.
Warning: If you can’t find the PC you want to project to, check these things: Is its Wi-Fi on? Is the Wireless Display app open? Are both PCs on the same network? Sometimes, restarting the Wireless Display app on the receiving PC can help it show up.
Step 3Choose How to Show Your Screen
Once connected, your screen will appear on the other PC. But how do you want to show your screen? Windows has different ways to manage your displays.
Understanding Display Modes
When you cast your Windows screen, you can choose different display modes like duplicating your screen or extending it using the ‘Project’ menu.
- Press the Windows key + P on your keyboard.
- A menu will pop up on the right side of your screen with these options:
- PC screen only: Shows your screen only on your main monitor.
- Duplicate: Shows the same thing on both screens. Good for presentations.
- Extend: Makes the receiving PC an extra screen for your computer. You can drag windows between them.
- Second screen only: Turns off your main screen and only shows on the receiving PC.
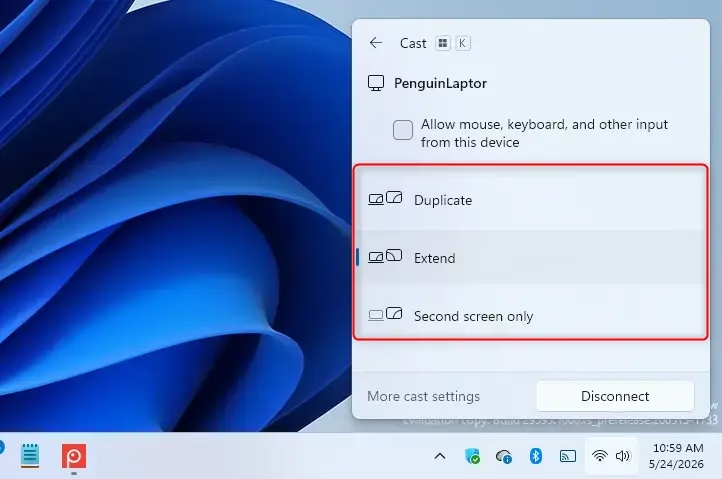
Tip: If you use “Extend,” move your mouse cursor off the edge of your main screen to control the cursor on the receiving PC. This lets you use apps or choose content on the other screen.
Step 4Stop Sharing Your Screen
To stop sharing your Windows screen, you need to disconnect from the wireless display connection properly when you are finished.
- Press the Windows key + K again.
- In the Cast panel, you’ll see the name of the PC you’re connected to.
- Click the Disconnect button next to its name.
You can also disconnect through Display settings:
- Right-click on your desktop and choose Display settings.
- Scroll down to the Multiple displays section.
- Click Disconnect next to the name of the wireless display.
The connection will end, and your screen will stop showing on the other PC.
Summary
Sharing your Windows 11 screen wirelessly to another PC is a handy way to collaborate, allowing you to easily connect, share, and disconnect your display.
How do I project to a Wireless Display in 🪟 Windows 11?
To project your screen to a Wireless Display in Windows 11, make sure both computers are on the same Wi-Fi network and install the ‘Wireless Display’ optional feature on the receiving PC.
How do I enable input Wireless Display on 🪟 Windows 11?
To enable Wireless Display input on Windows 11, navigate to Settings > System > Optional features. Click "View features," search for "Wireless Display," and install it. This allows your PC to receive screen casting from other devices using Miracast technology.
Does 🪟 Windows 11 have Miracast built in?
Yes, Windows 11 has Miracast technology built-in. You can enable the Wireless Display feature through Optional Features in Settings. Once installed, your Windows 11 PC can act as a receiver for screen casting from other Miracast-compatible devices.
Can I connect to a projector wirelessly?
Yes, you can connect to a projector wirelessly if it supports Miracast or if you use a Miracast adapter. Ensure your Windows PC is on the same Wi-Fi network as the projector or adapter. Then, use the Cast feature (Windows Key + K) to connect.
Was this guide helpful?

About the Author
Richard
Tech Writer, IT Professional
Richard, a writer for Geek Rewind, is a tech enthusiast who loves breaking down complex IT topics into simple, easy-to-understand ideas. With years of hands-on experience in system administration and enterprise IT operations, he’s developed a knack for offering practical tips and solutions. Richard aims to make technology more accessible and actionable. He's deeply committed to the Geek Rewind community, always ready to answer questions and engage in discussions.
No comments yet — be the first to share your thoughts!