Summary
Wireless projection on Windows 11 lets you easily share your screen by installing the right feature and adjusting settings.
Wireless projection on Windows 11 is a powerful tool for mirroring screens. By installing the Wireless Display feature, configuring your projection settings, and using the Windows Key + K shortcut, you can easily share content across devices. Remember to check your power settings to ensure your PC remains discoverable when you need it most.
Why is the Wireless Display option missing from my settings?
The Wireless Display option is missing in Windows 11 settings because it probably isn’t installed yet.
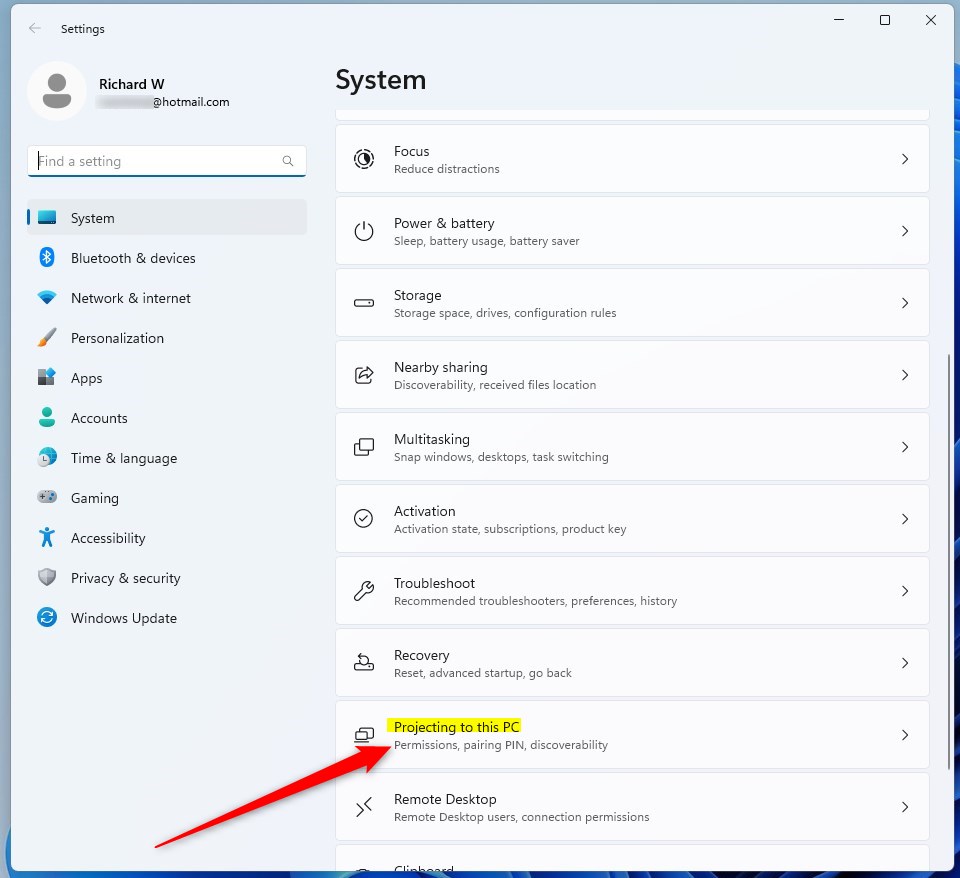
If the Wireless Display option is missing, it is likely not installed on your system. You must navigate to Settings, then Apps, and select Optional Features. From there, search for Wireless Display and install it. Once the installation completes, the Projecting to this PC menu will become available for configuration.
Can I use a wireless display to control the remote PC?
Yes, you can control the remote PC when using wireless projection by allowing mouse and keyboard input.
Yes, you can control the remote device. When you connect, look for the option that says ‘Allow mouse and keyboard input from this device’. Enabling this allows you to use your PC’s peripherals to interact with the screen being projected, effectively turning your computer into a remote control for the other device.
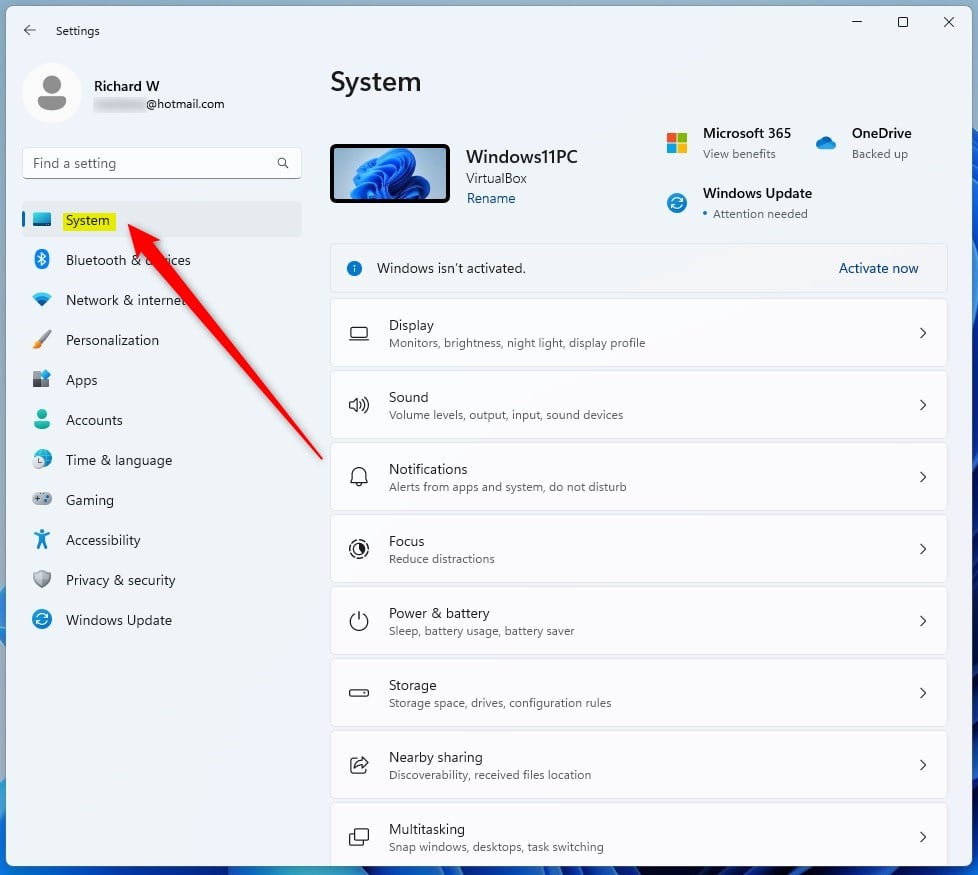
You enable wireless projection on Windows 11 by turning your PC into a wireless display receiver for other devices like phones or laptops, allowing you to mirror their screens. This built-in Windows feature commonly uses Miracast technology to stream content wirelessly from another device to your PC.
With wireless projection active, your Windows 11 computer receives and displays content from another device, effectively acting as a second screen. You can then share presentations, view videos, or even control your mirrored device using your PC’s keyboard and mouse.
This setup is perfect for easily sharing information or enhancing your multitasking capabilities. You maintain full control over who connects, ensuring your wireless display remains secure.
⚡ Quick Answer
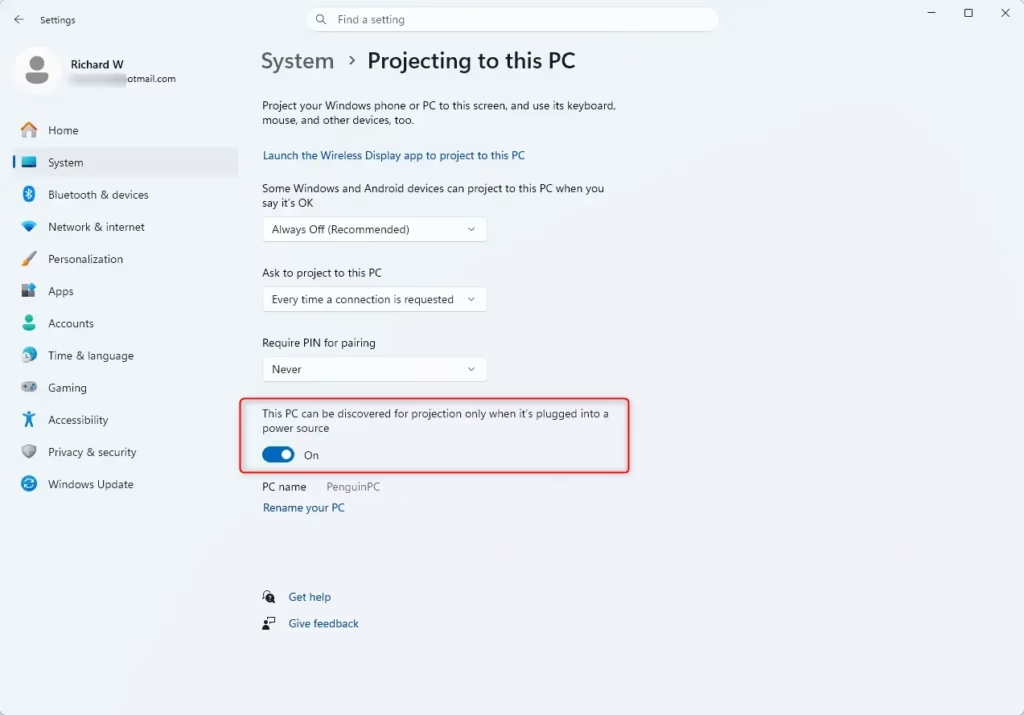
Install the Wireless Display optional feature via Settings > Apps > Optional features. Then, configure your preferences in Settings > System > Projecting to this PC. Press Windows Key + K on your sending device to connect.
Summary
Wireless projection on Windows 11 lets you easily share your screen by installing the right feature and adjusting settings.
Wireless projection on Windows 11 is a powerful tool for mirroring screens. By installing the Wireless Display feature, configuring your projection settings, and using the Windows Key + K shortcut, you can easily share content across devices. Remember to check your power settings to ensure your PC remains discoverable when you need it most.
Why is the Wireless Display option missing from my settings?
The Wireless Display option is missing in Windows 11 settings because it probably isn’t installed yet.
If the Wireless Display option is missing, it is likely not installed on your system. You must navigate to Settings, then Apps, and select Optional Features. From there, search for Wireless Display and install it. Once the installation completes, the Projecting to this PC menu will become available for configuration.
Can I use a wireless display to control the remote PC?
Yes, you can control the remote PC when using wireless projection by allowing mouse and keyboard input.
Yes, you can control the remote device. When you connect, look for the option that says ‘Allow mouse and keyboard input from this device’. Enabling this allows you to use your PC’s peripherals to interact with the screen being projected, effectively turning your computer into a remote control for the other device.

About the Author
Tech Writer, IT Professional
Richard, a writer for Geek Rewind, is a tech enthusiast who loves breaking down complex IT topics into simple, easy-to-understand ideas. With years of hands-on experience in system administration and enterprise IT operations, he’s developed a knack for offering practical tips and solutions.
Richard aims to make technology more accessible and actionable. He's deeply committed to the Geek Rewind community, always ready to answer questions and engage in discussions.

No comments yet — be the first to share your thoughts!