How to Scan for Hardware Changes in Windows 11
You scan for hardware changes in Windows 11 to force the operating system to detect new devices you’ve connected that aren’t automatically recognized.
This process, which we call “Scan for hardware changes,” makes Windows take another look at your computer’s hardware setup. It’s especially important if a new part, like a graphics card or sound card, doesn’t show up in Device Manager.
You can quickly initiate this scan through Device Manager, a tool that lists all your hardware. This ensures Windows can load the correct drivers for your peripherals. For example, if your new gaming mouse isn’t working after plugging it in, a hardware scan might be the first step to fix it.
Open Device Manager by pressing Windows key + R, typing devmgmt.msc, and pressing Enter. Then, click the “Scan for hardware changes” button in the toolbar or select Action > Scan for hardware changes. Alternatively, run the command pnputil /scan-devices in Windows Terminal.
Why Scan for Hardware Changes?
- If Windows doesn’t automatically detect your new device, scanning helps your computer find it.
- It allows Windows to install the right drivers (software that helps your device work).
- It can also find some older devices that don’t tell Windows when they’re connected.
Scanning for hardware changes in Windows helps your computer find new devices if it doesn’t see them automatically, which is useful when Windows needs a little nudge to recognize something new.
Method 1Use Device Manager to Scan for Hardware Changes
Step 1Open Device Manager
- Press Windows key + R on your keyboard.
- Type
devmgmt.mscand press Enter.
Step 2Scan for hardware changes
You can scan for hardware changes in Windows 11 using the Device Manager tool by clicking the ‘Scan for hardware changes’ button, which looks like a computer with a magnifying glass, right on the toolbar.
- Click the Scan for hardware changes button in the toolbar (it looks like a computer with a magnifying glass).
- Or, click on the top device name (like your PC name), then click Action in the menu bar, and select Scan for hardware changes.
Here’s what it looks like:
Click the Scan for hardware changes button
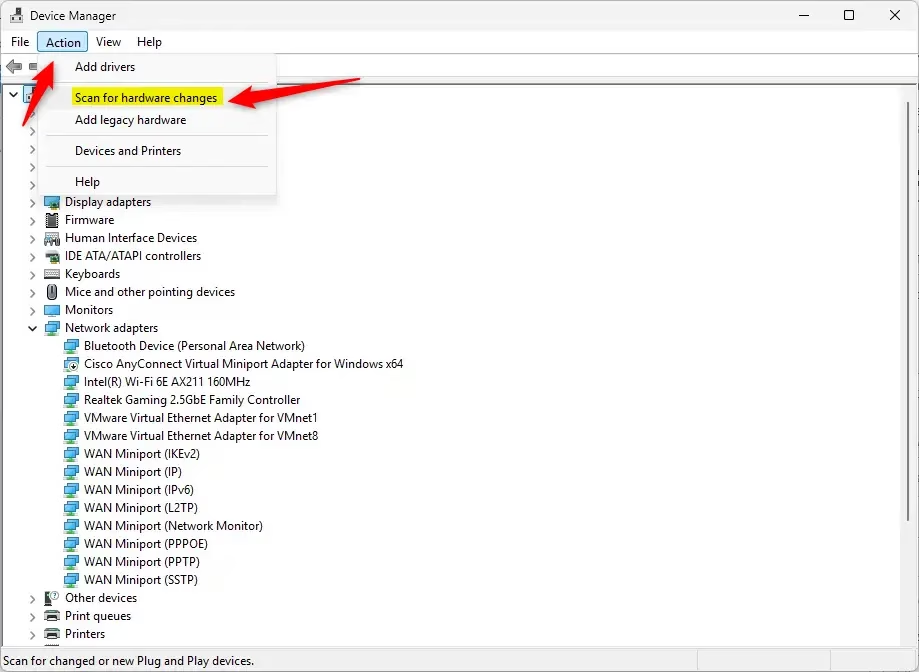
Or use the Action menu to scan
Method 2Use a Command in Windows Terminal
If you like using commands, you can do this:
Step 1Open Windows Terminal as an administrator
- Right-click the Start button and select Windows Terminal (Admin).
- ⚠️ Admin Required: If prompted by User Account Control, click Yes.
Step 2Run the scan command
In the terminal window, type or copy-paste this command and press Enter:
pnputil /scan-devices
This command tells Windows to look for new devices and install the necessary drivers (software that lets devices communicate with your computer).
Step 3Wait for it to finish
When it finishes, you can close Windows Terminal.
Learn more about this command on the official Microsoft page: PnPUtil Command Syntax – Microsoft Docs
Summary
To make sure your Windows 11 PC recognizes new hardware, you can use Device Manager’s ‘Scan for hardware changes’ button or menu option to help Windows find and set up new devices without needing to restart your computer.
- Use Device Manager’s Scan for hardware changes button or menu.
- Or run the
pnputil /scan-devicescommand in Windows Terminal. - ⚠️ Admin Required: You must be signed in as an administrator to do these steps.
- These steps help Windows find and set up new devices without you needing to restart.
Following these steps helps fix hardware detection issues fast, keeping your devices running smoothly.
How to scan a PC for hardware changes?
To scan your system for any hardware changes, you can use the command prompt. Just search for ‘cmd’ in Windows and type it in. The second method is through Device Manager.
How to action scan for hardware changes?
Click the ‘Scan for hardware changes’ button in Device Manager. You can also click on ‘Action’ in the menu bar and then select ‘Scan for hardware changes’.
Was this guide helpful?

About the Author
Richard
Tech Writer, IT Professional
Richard, a writer for Geek Rewind, is a tech enthusiast who loves breaking down complex IT topics into simple, easy-to-understand ideas. With years of hands-on experience in system administration and enterprise IT operations, he’s developed a knack for offering practical tips and solutions. Richard aims to make technology more accessible and actionable. He's deeply committed to the Geek Rewind community, always ready to answer questions and engage in discussions.


No comments yet — be the first to share your thoughts!