How to Refresh Wi-Fi Networks in Windows 11
This guide explains how to make your Windows 11 computer look for nearby Wi-Fi networks again.
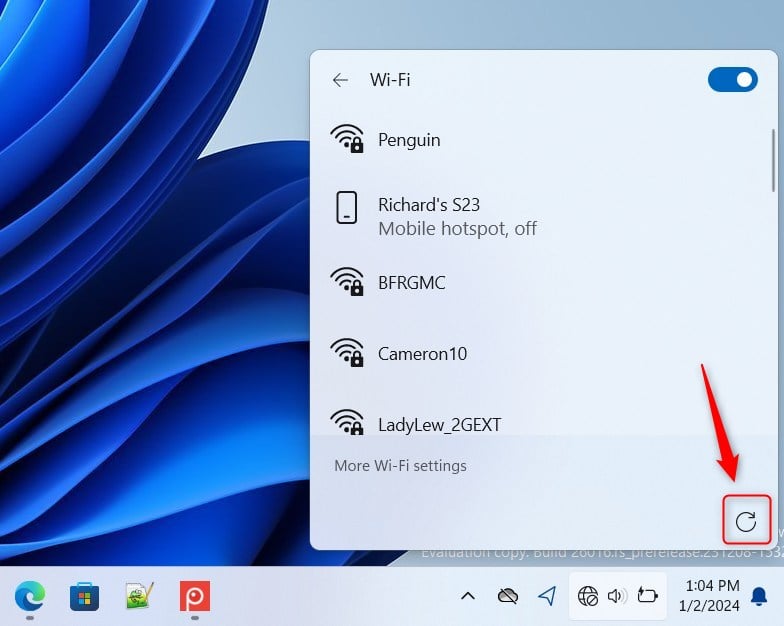
Press ⊞ Win+A to open Quick Settings, click the arrow next to the Wi-Fi icon, and then click the Refresh button. This forces Windows 11 to rescan for available Wi-Fi networks.
Why Refresh Your Wi-Fi Networks?
Wi-Fi lets you connect to the internet without wires. Sometimes, your computer fails to see your router. This happens if the signal is weak or the software gets stuck. Refreshing forces your computer to look for signals again.
What happens when done: Your computer clears its current list and scans the airwaves for new signals. This usually makes missing networks appear.
Quick Fix Table: Wi-Fi Troubleshooting
| Problem | Quick Fix |
|---|---|
| Network not in list | Use the Refresh button in Quick Settings |
| Connection drops | Forget and re-add the network |
| No Wi-Fi adapter | Check Device Manager for driver issues |
| Total network failure | Use the Network Reset feature |
Method 1Use the Quick Settings Refresh Button
Windows 11 makes it easy to scan for networks. This is the fastest way to fix simple visibility issues.
- Press ⊞ Win+A to open Quick Settings.
- Click the arrow next to the Wi-Fi icon.
- Click the Refresh button at the top.
Method 2Forget and Re-add Your Network
Sometimes the saved settings for a network are wrong. Forgetting the network clears these old settings.
- Open Settings and go to Network & internet > Wi-Fi.
- Click Manage known networks.
- Find your network and click Forget.
- Go back to your Wi-Fi list and connect to the network again.
Method 3Reset the Network Stack via Terminal
If simple refreshes fail, you might need to reset the network stack. This clears out old IP configurations and connection errors.
⚠️ Admin Required: You must run these commands as an administrator.
- Right-click the Start button and select Terminal (Admin).
- Type the following commands one by one, pressing Enter after each:
netsh winsock reset
netsh int ip reset
ipconfig /release
ipconfig /renew
ipconfig /flushdns
What happens when done: Your computer resets its network rules and clears the DNS cache. This fixes most deep connectivity issues.
Method 4Use the Network Troubleshooter
Windows has a built-in tool to find and fix problems automatically. You can find the official Windows Network Troubleshooter in Settings under System > Troubleshoot > Other troubleshooters.
Method 5Check Device Manager for Driver Issues
If your Wi-Fi adapter is missing, the driver might be broken.
- Right-click the Start button and select Device Manager.
- Expand Network adapters.
- If you see a yellow triangle, right-click the adapter and select Update driver.
Method 6The Network Reset Feature
If nothing else works, use the master reset.
⚠️ Admin Required: This will remove and reinstall all network adapters and set other networking components back to their original settings.
- Go to Settings > Network & internet > Advanced network settings.
- Click Network reset and then Reset now.
Summary
Refreshing your Wi-Fi list is the first step to fixing connection issues. Use the Quick Settings button for a simple scan. If problems persist, use the Terminal commands to reset your network stack or the Network Reset feature to start fresh. Always check your drivers if the adapter is not showing up.
Why does my Wi-Fi network disappear after a Windows update?
Updates can sometimes replace your Wi-Fi driver with a version that is incompatible with your hardware. This causes the adapter to stop working or fail to scan for networks. You can fix this by rolling back the driver in Device Manager or reinstalling the latest driver from your manufacturer’s website.
What should I do if my Wi-Fi adapter is missing from Device Manager?
If the adapter is missing, your computer does not see the hardware. Try restarting your computer first. If that fails, check if the device is disabled in your BIOS settings. You may also need to physically reseat the network card if you are using a desktop computer.
Was this guide helpful?

About the Author
Richard
Tech Writer, IT Professional
Richard, a writer for Geek Rewind, is a tech enthusiast who loves breaking down complex IT topics into simple, easy-to-understand ideas. With years of hands-on experience in system administration and enterprise IT operations, he’s developed a knack for offering practical tips and solutions. Richard aims to make technology more accessible and actionable. He's deeply committed to the Geek Rewind community, always ready to answer questions and engage in discussions.

No comments yet — be the first to share your thoughts!