How to Install Supabase with Docker on Ubuntu 24.04


Supabase with Docker on Ubuntu 24.04 turns your computer into a complete app development station by running all Supabase services inside Docker containers. Supabase gives you a ready-made app backend that includes a PostgreSQL 16 database, login tools, and instant data access.
Docker packages Supabase and all its required parts into neat, isolated boxes that run smoothly on Ubuntu 24.04 without messing up your main system files. This setup lets you build and test apps locally before you put them online for the world to see.
Install Docker Engine, then clone the Supabase repository. Navigate to the Docker directory, pull the images, and start the containers with `docker compose up -d`. Finally, configure your secrets in the `.env` file.
Install Docker Engine
Docker Engine (the software that runs containerized applications) must be installed on Ubuntu 24.04 before you can run Supabase. Update your system package list, then use the terminal to install Docker and the required tools like curl and git. This sets up the container environment needed for your Supabase Docker Ubuntu installation to function properly.
Before installing Docker, run the command below to install some prerequisite packages.
sudo apt update
sudo apt install ca-certificates curl git
Once the packages are installed, continue to install Docker below.
First, add the GPG key for the Docker Engine repository by running the command below.
sudo install -m 0755 -d /etc/apt/keyrings
sudo curl -fsSL https://download.docker.com/linux/ubuntu/gpg -o /etc/apt/keyrings/docker.asc
sudo chmod a+r /etc/apt/keyrings/docker.asc
Next, add the Docker repository to Ubuntu by running the command below.
echo
"deb [arch=$(dpkg --print-architecture) signed-by=/etc/apt/keyrings/docker.asc] https://download.docker.com/linux/ubuntu
$(. /etc/os-release && echo "$VERSION_CODENAME") stable" |
sudo tee /etc/apt/sources.list.d/docker.list > /dev/null
Once the Docker GPG key and repository have been added to Ubuntu, run the command below to install the Docker app.
sudo apt update
sudo apt install docker-ce docker-ce-cli containerd.io docker-buildx-plugin docker-compose-plugin
After installing Docker, you should run it with a non-root user account. It is recommended that a dedicated user for Supabase be created to run the app. Then, add the user to the Docker group.
Add your user to the 'docker' group with the command below.
sudo usermod -aG docker $USER
Install Supabase
Supabase installation on Ubuntu 24.04 starts by downloading the official project files from GitHub to your local machine using the terminal. Clone the repository with git, open the docker folder, and create your local environment settings file. This step prepares all the necessary configuration files for your Supabase Docker Ubuntu setup.
git clone --depth 1 https://github.com/supabase/supabase
Next, create Supabase environment config file from the example file.
cd supabase/docker/
cp .env.example .env
Then, run the command below to download Supabase images from the Docker repository.
docker compose pull
Once the process is done, execute the command below to start Supabase containers.
docker compose up -d
Docker should be started but not properly configured. The steps below walk you through configuring Supabase.
Configure Supabase
Supabase configuration requires setting up secure passwords for your PostgreSQL database and dashboard, alongside generating secret keys for security. Open your environment file in the terminal and replace the default placeholder passwords with strong, unique values. This protects your Supabase Docker Ubuntu instance from unauthorized access.
To do that, generate passwords for the PostgreSQL server, and Supabase dashboard, and then generate the JWT secret and token.
The command below can be used to generate secrets.
openssl rand -hex 16
The command should output secrets that you can use later in Supabase config file.
After that, go to the Supabase website to generate two JWT tokens for Supabase. Run this form twice to generate new anon and service API keys.
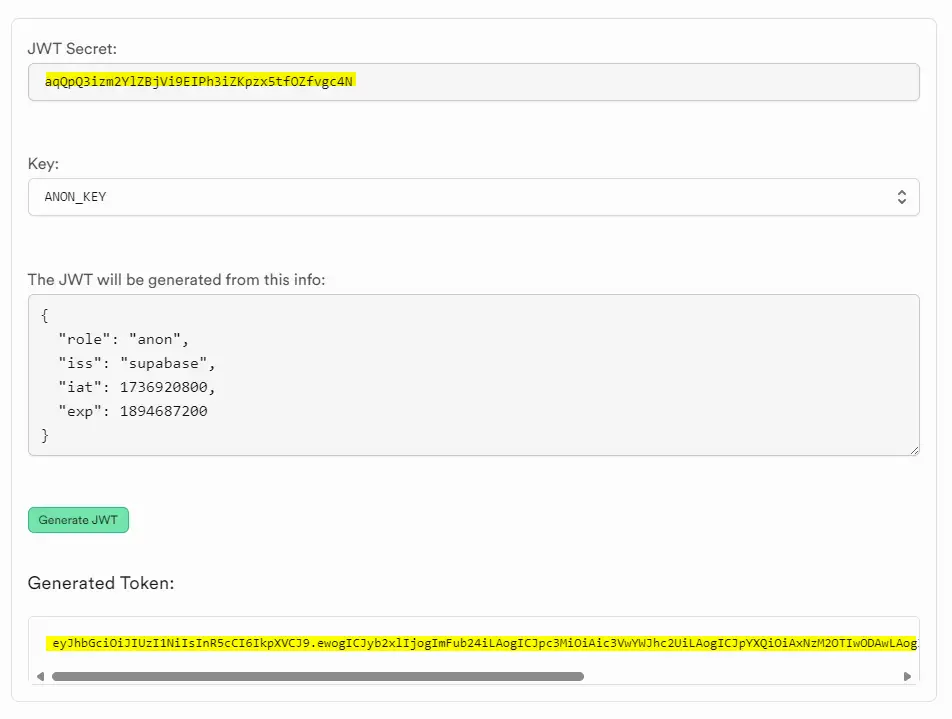
Once all the tokens and secrets are generated, open Supabase environment configuration file.
nano .env
Configure the highlighted lines with the appropriate settings.
Update the 'JWT_SECRET' with the one generated from Supabase website. Do the same for the 'ANON_KEY' and the 'SERVICE_ROLE_KEY' values.
###########
# Secrets
# YOU MUST CHANGE THESE BEFORE GOING INTO PRODUCTION
############

POSTGRES_PASSWORD=b26d8c7220e2abac6c2cb090ce9bf4a3
JWT_SECRET=3135pJUeF863MLQ8WaadlYmMW49gb5Hax8t9zEFQ
ANON_KEY=eyJhbGciOiJIUzI1NiIsInR5cCI6IkpXVCJ9.ewogICJyb2xlIjo............
SERVICE_ROLE_KEY=eyJhbGciOiJIUzI1NiIsInR5cCI6IkpXVCJ9.ewogICJ............
DASHBOARD_USERNAME=supabase
DASHBOARD_PASSWORD=75672d66af67b1565b1540f2d2ae6309
Update the URL section to enter your correct URLs.
## General
SITE_URL=http://localhost:3000
ADDITIONAL_REDIRECT_URLS=
JWT_EXPIRY=3600
DISABLE_SIGNUP=false
API_EXTERNAL_URL=http://localhost:8000
Save the file and exit the editor when finished.
Next, stop and relaunch Supabase docker container for the changes to apply.
docker compose down
docker compose up -d
You can sign in to the dashboard using the URL below:
http://localhost:8000
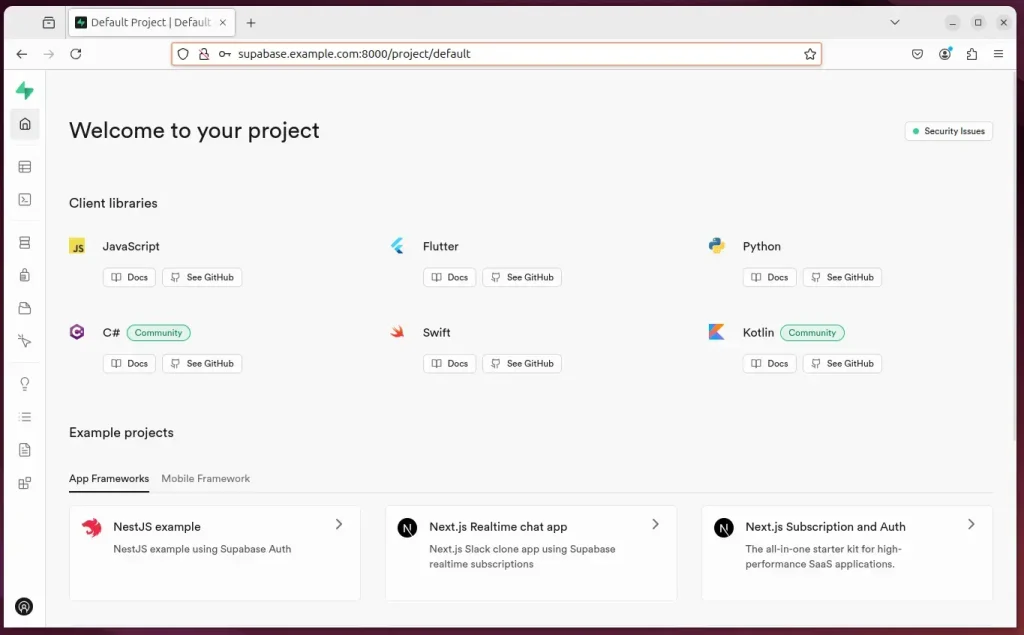
Type in the supabase account and password in the config file (.env).
Set up a reverse proxy
A reverse proxy (a server that routes web traffic to your containers) like Nginx or Apache makes your Supabase instance accessible through a custom domain name. Configure your chosen web server to forward incoming requests to the local ports used by your containers. This makes accessing your Supabase Docker Ubuntu setup much easier from the web.
The two links below show you how to set up a reverse proxy using Nginx or Apache.
Setup Let’s Encrypt SSL/TLS
Let's Encrypt provides free SSL/TLS certificates to secure your Supabase site with HTTPS encryption. Install a certificate manager like Certbot on your Ubuntu server, then generate and install the certificate for your domain name. This step secures all data traveling to and from your Supabase Docker Ubuntu deployment.
Please read the post below for additional resources on installing and creating Let’s Encrypt SSL certificates for Apache.
- How to set up Let’s Encrypt SSL certificate for Apache on Ubuntu Linux
- How to set up Let's Encrypt SSL certificate for Nginx on Ubuntu Linux
That should do it!
Conclusion:
In summary, installing Supabase on Ubuntu using Docker provides developers with a robust backend solution that simplifies app development and testing. Here are the key takeaways:
- Open-source Alternative: Supabase serves as a powerful open-source substitute for Firebase, offering similar functionalities.
- Ease of Setup: Utilizing Docker streamlines the installation process and allows for easy management of the Supabase environment.
- PostgreSQL Integration: Leveraging PostgreSQL enhances data management capabilities, ensuring data integrity and complex querying.
- Local Development: Running Supabase locally enables safe testing and development, minimizing dependency on external services.
- Security Measures: Setting up password and authentication, as well as implementing SSL/TLS with Let’s Encrypt, ensures a secure environment.
- Scalability and Flexibility: The architecture allows for easy scaling as projects grow, adapting to increasing demands.
By following the steps outlined, developers can confidently harness the potential of Supabase to build and deploy applications efficiently.
Was this guide helpful?

About the Author
Richard
Tech Writer, IT Professional
Richard is a writer at Geek Rewind who turns complex IT tasks into clear, step-by-step guides. He draws on years of hands-on experience in system administration and enterprise IT operations, focusing on Windows, Linux and WordPress: the problems people actually run into, and the fixes that work. His server and WordPress guides come from systems he runs himself. Richard builds and maintains the platform behind Geek Rewind, from its Ubuntu servers and Nginx configuration to its custom WordPress plugins. Many new tutorials start with readers' questions, and he's always glad to answer them in the comments.




No comments yet — be the first to share your thoughts!