Install Node.js and npm on Ubuntu: A Step-by-Step Guide

Node.js and npm on Ubuntu let you run JavaScript code outside of a web browser and manage project tools using the command line terminal. Node.js works as the core engine, and npm acts as an app store that downloads extra code packages for you.
Ubuntu version 20.04 or higher works best for these steps, which take just a few minutes to complete.
Install Node.js and npm from Ubuntu’s default repositories by running sudo apt update followed by sudo apt install nodejs npm. Alternatively, use Snap with sudo snap install node –classic or add the NodeSource repository and then run sudo apt install nodejs. Check the installation with node –version and npm –version.
How to install Node.js from Ubuntu repositories
You can install Node.js and npm on Ubuntu using the built-in package manager in your terminal. This method gives you a stable and tested version of Node.js for your projects without needing to add outside software sources. Open your terminal and update your package list before running the installation command to get started.
To install Node.js and npm on Ubuntu, run two commands. The first command updates the list of available software packages. The second command installs both Node.js (a JavaScript runtime) and npm (a package manager), ensuring you have version 18.10.0 or later for modern development.
sudo apt update
sudo apt install nodejs npm
Running that command installs several Node.js and npm packages. These include tools needed to compile and install native add-ons from npm.
Once the installation is complete, run the commands below to check the installed version.
nodejs --version
That outputs a line similar to the one shown below:
v10.19.0
The latest version in the default Ubuntu repository is v10.19.0. However, newer v11, v12, v13, and v14 releases also exist.
How to Install Node.js and npm from Snap
You can install Node.js and npm on Ubuntu using Snap packages, which bundle everything you need into one self-contained file. Snap handles updates automatically in the background and keeps your development environment separate from the rest of your system. Run a single command in your terminal to download and set up the package right away.
These packages run across multiple Linux distributions without extra configuration. Snaps update themselves automatically and revert to a working version if a new update causes problems.
To install via Snap, run the commands below to install Snap.
sudo apt update
sudo apt install snapd
Once Snap is installed, run the commands below to get Node.js and npm installed via Snap. Choose the correct Node.js version you want to install in Ubuntu.
For the Latest release (version 14),
sudo snap install node --channel=14/stable --classic
For version 13, run this:
sudo snap install node --channel=13/stable --classic
For the LTS (version 10)
sudo snap install node --channel=10/stable --classic
How to Install Node.js and npm from NodeSource
You can install Node.js and npm on Ubuntu using the NodeSource repository when you need a newer version than what the default package manager provides. NodeSource maintains up-to-date releases so you can access the latest features and specific version numbers required for modern web development projects.
Use the NodeSource repository to install a specific version of Node.js. Currently, the repository lists Node.js versions 14, 12, 11, 10, and 8. Version 14 appears twice because it refers to different release lines within the same major version.
To install Node.js from NodeSource, run the commands below to add the repository for the desired version.
Add the NodeSource repository for the specific release stream you want to use.
curl -sL https://deb.nodesource.com/setup_14.x | sudo -E bash -
For (version 12), run the commands below:
curl -sL https://deb.nodesource.com/setup_12.x | bash -
To install the LTS release (version 10), use this PPA
curl -sL https://deb.nodesource.com/setup_10.x | bash -
After adding the repository, install the selected Node.js version. If you add multiple repositories, your system installs the newest version of Node.js rather than the Long Term Support (LTS) version.
Install Node.js and npm
You finish the setup by running the sudo apt install nodejs command in your terminal after adding your chosen software repository. This single command downloads and installs both Node.js and npm together. Check your installed versions afterward to confirm everything works properly before you start building.
sudo apt install nodejs
After installing, both Node.js and npm modules are ready to use.
Use the commands below to view the installed version number.
node --version
npm --version
The commands list the currently installed version:
v14.0.0
6.14.4
To test whether the web server installs properly, run the commands below to create a test file called http_server.js in your home folder.
cd ~/
nano http_server.js
Copy and paste the content below into the file and save it.
const http = require('http');

const hostname = '127.0.0.1';
const port = 3000;

const server = http.createServer((req, res) => {
  res.statusCode = 200;
  res.setHeader('Content-Type', 'text/plain');
  res.end('Hello Worldn');
});

server.listen(port, hostname, () => {
  console.log(`Server running at http://${hostname}:${port}/`);
});
Save the file and run the commands below to start the server.
node http_server.js
An output appears that reads:
The server running at http://127.0.0.1:3000/
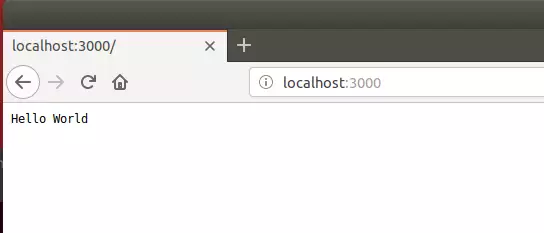
Open your browser and navigate to the server hostname or IP address followed by port 3000. A default page with Hello World appears.
http://localhost:3000
That completes the setup.
Conclusion:
This installation guide provided steps to install Node.js and npm on Ubuntu Linux. If you encounter any errors or have additional information to share, use the comment form below.
Was this guide helpful?

About the Author
Richard
Tech Writer, IT Professional
Richard, a writer for Geek Rewind, is a tech enthusiast who loves breaking down complex IT topics into simple, easy-to-understand ideas. With years of hands-on experience in system administration and enterprise IT operations, he’s developed a knack for offering practical tips and solutions. Richard aims to make technology more accessible and actionable. He's deeply committed to the Geek Rewind community, always ready to answer questions and engage in discussions.



No comments yet — be the first to share your thoughts!