How to Install Conda on Ubuntu 24.04: A Step-by-Step Guide


Installing Conda on Ubuntu 24.04 gives you a free tool to manage software packages and Python versions without breaking your computer. Conda is an open-source package manager that lets you set up separate project spaces called environments, so you can run Python 3.9 on one project and Python 3.11 on another at the same time.
The setup takes under five minutes using the terminal and an automated installer script. Once you finish, you can easily control software for Python, R, and other tools without messing up your main system settings.
Download the Miniconda installer script from the official website. Then, run the script using bash in your terminal, accepting the license terms and default installation location. Finally, initialize Conda by sourcing your .bashrc file.
Install Conda on Ubuntu
To install Conda on Ubuntu, you need to download the official Linux installation script using the command line with wget. This process sets up the package manager so you can create and manage isolated programming environments on your system without hassle.
To install the latest version, visit its package download page. Then, select the latest Conda.sh file for Linux and download it .
Using the command line, one can use wget to download the latest version. An example below.
cd /tmp
wget https://repo.anaconda.com/archive/Anaconda3-2024.10-1-Linux-x86_64.sh
Once downloaded, use the bash command to install it .
bash Anaconda3-2024.10-1-Linux-x86_64.sh
Version 4.0 | Last Modified: March 31, 2024 | ANACONDA TOS


Do you accept the license terms? [yes|no]
>>> yes

Anaconda3 will now be installed into this location:
/home/richard/anaconda3

  - Press ENTER to confirm the location
  - Press CTRL-C to abort the installation
  - Or specify a different location below

[/home/richard/anaconda3] >>>
..................................
..................................
;;;;;;;;;;;;;;;;;;;;;;;;;;;;;;;;;;

If you'd prefer that conda's base environment not be activated on startup,
   run the following command when conda is activated:

conda config --set auto_activate_base false

You can undo this by running `conda init --reverse $SHELL`? [yes|no]
[no] >>> yes

;;;;;;;;;;;;;;;;;;;;;;;;;;;;;;;
;;;;;;;;;;;;;;;;;;;;;;;;;;;;;;;

==> For changes to take effect, close and re-open your current shell. <==

Thank you for installing Anaconda3!
Initialize Conda
Initialize Conda on Ubuntu by running the bash configuration command so your terminal recognizes the software. This step connects Conda to your shell session, letting you run environment commands directly and showing the base indicator when active.
source ~/.bashrc
Conda has been activated and initialized if you see “(base)” at the start of the prompt.
(base) richard@Ubuntu:
Conda automatically starts with the "base" environment active. You can run a command to prevent Conda from activating the "base" environment automatically upon startup.
conda config --set auto_activate_base false
You can activate the Conda base environment when needed.
Get Conda details
Check your Conda setup on Ubuntu by listing all active environments to confirm the software is working correctly. Running the environment list command shows you the exact file path and status of every workspace currently installed on your computer.
Use the command below to list the Conda environment.
conda env list
The command will display all the existing Conda environments on your machine.
# conda environments:
#
base                  *  /home/richard/anaconda3

(base) richard@Ubuntu:/tmp$
Run the command below to display Conda information and version by running the command below.
conda info
conda --version
Activate/Deactivate Conda
Activate and deactivate Conda environments on Ubuntu using specific terminal commands to switch between different project workspaces. Activating loads your specific set of packages, while deactivating returns your terminal to the standard system settings.
conda activate /home/<yourUsername>/anaconda3
Replace the highlighted field with your username. You can get your Conda environment by running the conda env list command.
To deactivate, run the command below.
conda deactivate
The removal of “(base)” from the start of the prompt indicates that the Conda environment is now deactivated.
Launch Conda Navigator
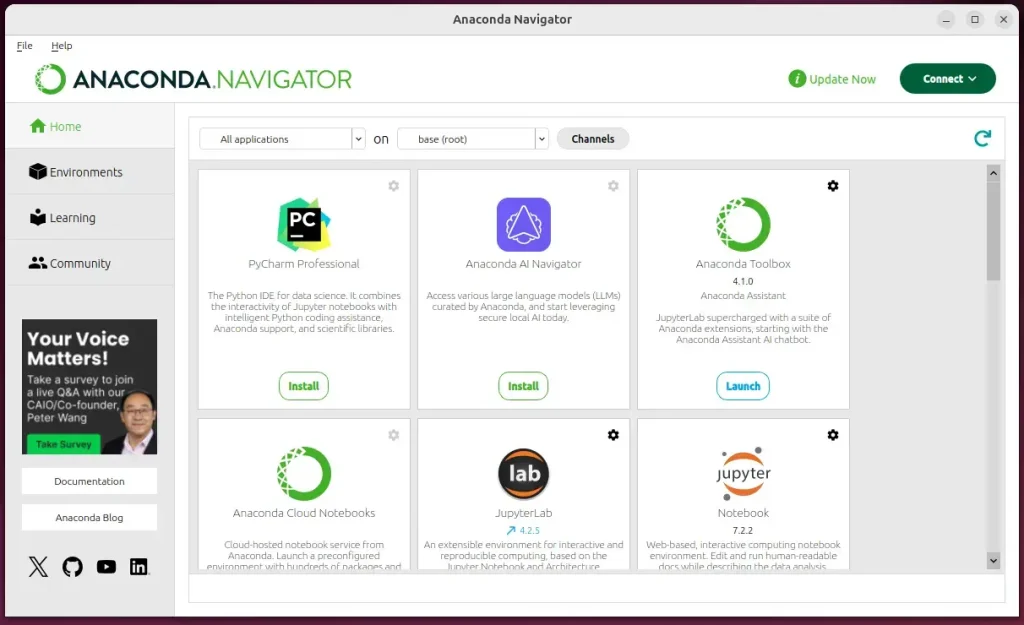
Launch Conda Navigator on Ubuntu by typing the graphical interface command directly into your terminal window. This opens the desktop dashboard, giving you an easy visual way to manage packages, update libraries, and launch applications without using the command line.
anaconda-navigator
Use Anaconda Navigator to find useful plugins and applications.
That should do it!
Conclusion:
Installing Conda on Ubuntu 24.04 provides a powerful tool for managing packages and environments in data science and scientific computing. Here are the key takeaways:
- Ease of Installation: Conda can be quickly installed via the
Conda.shscript, simplifying the setup process. - Environment Management: Users can create isolated environments to manage dependencies, minimizing project conflicts.
- Cross-Platform Compatibility: Works seamlessly on Windows, macOS, and Linux, facilitating project-sharing across different operating systems.
- User-Friendly CLI: The command-line interface makes installing, updating, and managing packages straightforward.
- Graphical Interface: Anaconda Navigator provides an easy-to-use graphical interface for accessing plugins and applications.
- Flexibility: Supports multiple programming languages, including R, Ruby, and Lua, extending its usability beyond just Python.
Conda helps you manage software and makes your development work faster. Conda, a package and environment manager, allows you to install many software tools and keep them organized in separate environments. This prevents conflicts between different software versions, ensuring your projects run smoothly.
Was this guide helpful?

About the Author
Richard
Tech Writer, IT Professional
Richard is a writer at Geek Rewind who turns complex IT tasks into clear, step-by-step guides. He draws on years of hands-on experience in system administration and enterprise IT operations, focusing on Windows, Linux and WordPress: the problems people actually run into, and the fixes that work. His server and WordPress guides come from systems he runs himself. Richard builds and maintains the platform behind Geek Rewind, from its Ubuntu servers and Nginx configuration to its custom WordPress plugins. Many new tutorials start with readers' questions, and he's always glad to answer them in the comments.


No comments yet — be the first to share your thoughts!