How to Enable or Disable Restore Pages Dialog in Microsoft Edge


The Restore pages dialog in Microsoft Edge, the built-in web browser in Windows 11, appears after Edge closes unexpectedly. It asks whether you want to bring back the tabs you had open. If you click Restore, Edge reopens everything from the session that ended badly.
Some people would rather Edge start with a fresh tab page every time. You can turn the prompt off in the Registry Editor, the Windows tool for changing advanced settings. With the prompt disabled, Edge stops offering to recover lost tabs and opens a clean window after a crash. The change takes a few minutes, and you can undo it later.
Open Registry Editor and navigate to 🗝️HKEY_LOCAL_MACHINE\
How to Turn the “Restore pages” Dialog On or Off
To disable the Restore pages prompt, you add a policy value to the Edge policies key in the Registry Editor. This stops Edge from asking whether to reopen your tabs after a crash or unexpected closure. To turn the prompt back on, delete the registry value you create.
The Registry Editor is available in both Windows 11 Home and Pro, and the steps are the same in each. You need to be signed in with an administrator account, because policy keys are protected. Edge will also show a “Managed by your organization” notice once a policy is set. That is normal on a personal PC and does not mean anyone else controls your browser.
In the Registry Editor, use File Export, choose All as the export range, and save the file somewhere safe.
- [Admin Required] Open the Windows Registry on your computer. If Windows asks Do you want to allow this app to make changes to your device?, click Yes. The Registry Editor window opens with a folder tree on the left and values on the right.
- Navigate to this folder path:
HKEY_LOCAL_MACHINE\SOFTWARE\Policies\Microsoft\Edge
You can expand each folder in the left pane one at a time. You can also copy the path, click the address bar at the top of the window, paste it, and press Enter. The right pane then shows whatever values are stored in that location. - If you don’t see an
Edgefolder, right-click on theMicrosoftfolder and create a new subfolder calledEdge. Use New Key from the right-click menu , type the name, and press Enter. The new folder appears under the parent folder. Click it so it is selected before you go on.

- Right-click inside the empty space in the
Edgefolder's right panel. Click empty space rather than an existing value, or the menu will not show the options you need. A context menu appears. - Select
Newand thenDWORD (32-bit) Value. A new value appears in the right panel with its name highlighted and ready to edit. - Name the new item:
HideRestoreDialogEnabled
Type the name exactly as shown and press Enter. If the name is wrong, Edge ignores the policy. To fix a typo, right-click the value, choose Rename, and enter the name again. - Double-click on the item you just created. The Edit DWORD (32-bit) Value box opens.
- Make sure the
Baseis set toDecimal. The default is usually correct, but check it so the number you type in the next step is read the right way. - Set the
Value datato one of these options. To turn the dialog off, enter 1.- Leave blank or delete: The "Restore pages" dialog stays enabled (default).
- Type 1: The "Restore pages" dialog will be disabled for all users in Edge.
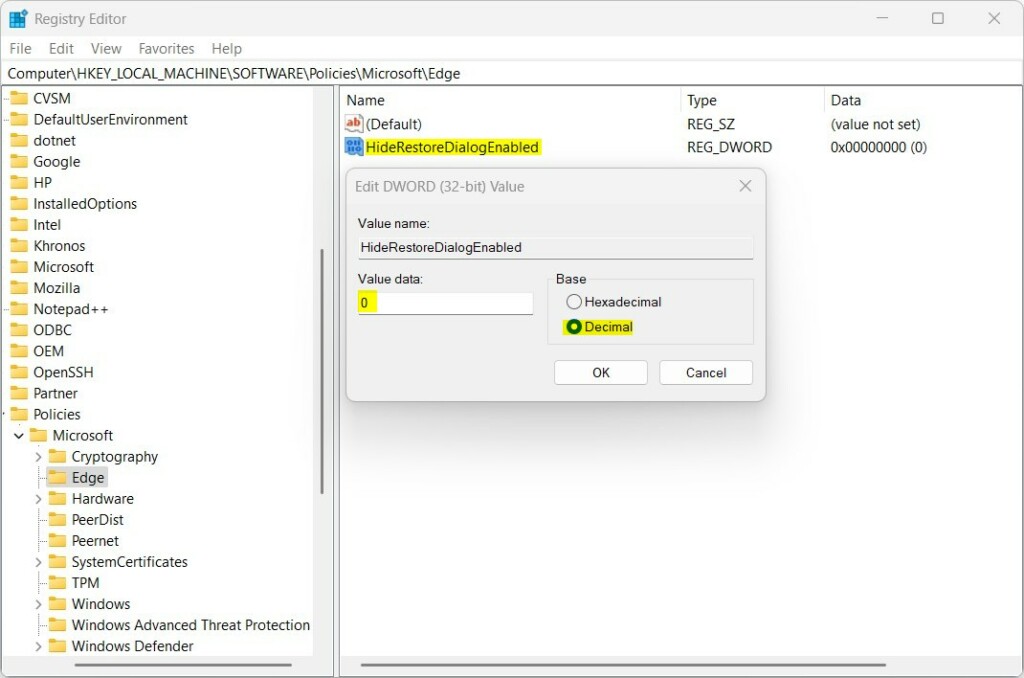
- Click
OKto save your changes. The box closes, and the value in the right panel now shows the data you entered. - Restart your computer for the changes to take effect. Close the Registry Editor first, and save any open work before you restart.
That's it! Your setting will now be applied. To undo it, go back to the same folder in the Registry Editor and delete the value you created, or clear its Value data. Then restart the PC. Edge goes back to its default behavior and offers to restore your tabs after a crash again.
Summary
The "Restore pages" dialog in Microsoft Edge helps you reopen tabs after a crash, but you can disable it if you find it annoying. Create the policy value, set it to 1, and restart. To bring the dialog back, delete the value.
Have a question about this guide?
Answered by AI from this guide. Good questions may be added to this page — please don't include personal details.
Did this guide fix your problem?

About the Author
Richard
Tech Writer, IT Professional
Richard is a writer at Geek Rewind who turns complex IT tasks into clear, step-by-step guides. He draws on years of hands-on experience in system administration and enterprise IT operations, focusing on Windows, Linux and WordPress: the problems people actually run into, and the fixes that work. His server and WordPress guides come from systems he runs himself. Richard builds and maintains the platform behind Geek Rewind, from its Ubuntu servers and Nginx configuration to its custom WordPress plugins. Many new tutorials start with readers' questions, and he's always glad to answer them in the comments.
No comments yet — be the first to share your thoughts!