How to Turn On or Off File History in Windows 11
How Does File History Work?
File History in Windows 11 automatically saves copies of your important files, like those in Documents and Desktop, to a separate drive you pick, such as a USB stick or network location. It saves these copies from your user folder (typically found at 📁C:\Users\YourName) and tracks file changes to speed up backups.- It saves copies of files inside your user folder:
C:\Users\YourName. - It uses a special system called the change journal to track which files have changed. This makes backups quick and doesn’t slow down your PC.
- You need to choose where your backups will be saved. This can be an external USB drive or a network location (like a shared drive on your home network).
- If your backup drive isn’t connected (like if you unplug a USB drive), File History will save backups temporarily on your PC. It will copy them over once the drive is back.
Before You Start
Before starting File History, ensure the `WMPNetworkSvc` (Windows Media Player Network Sharing Service) and `RemoteRegistry` (Remote Registry) services are running. These are background programs that help File History function correctly.
- File History Service
- Windows Search Service
Option 1Turn On or Off File History for Your Account (Using Control Panel)
- Open the Control Panel. You can find it by typing “ Control Panel” in the Start menu search.
- Switch the view to Small icons or Large icons if it’s not already.
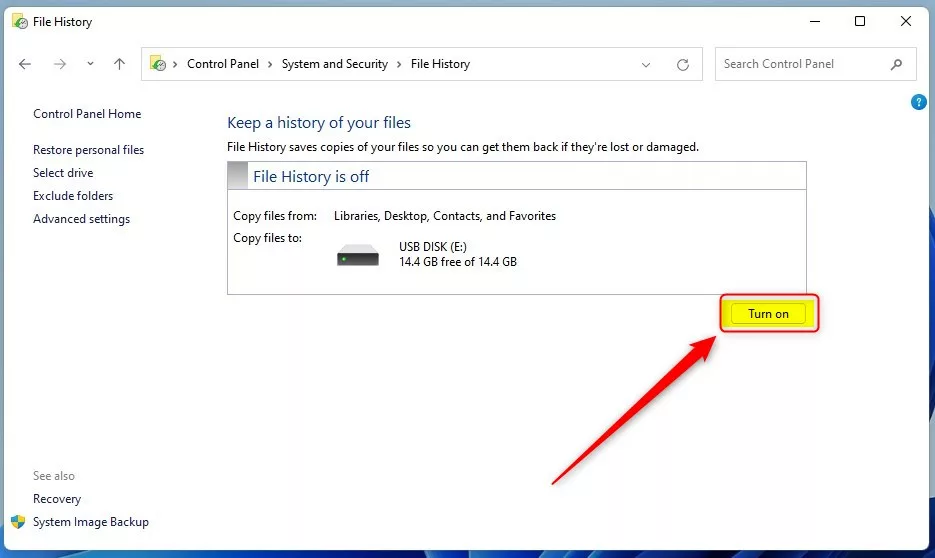
- Click on File History.
- Click Turn on to start backing up your files or Turn off to stop.
- Close the Control Panel when done.
File History is a handy Windows 11 feature you can control for your account. To adjust its settings, start by opening the Control Panel. You can find it by typing “Control Panel” in the Start menu search. Once open, switch the view to either Small icons or Large icons. Then, click “File History” to choose whether to turn it on or off.
Option 2Enable or Disable File History for All Users (Using Local Group Policy Editor)
If you’re using Windows 11 Pro, Enterprise, or Education, you can enable or disable File History for everyone on your computer using the Local Group Policy Editor. Access this tool by pressing ⊞ Win+R, typing gpedit.msc, and then navigating to Computer Configuration > Administrative Templates > Windows Components > File History.
- Press ⊞ Win+R, type
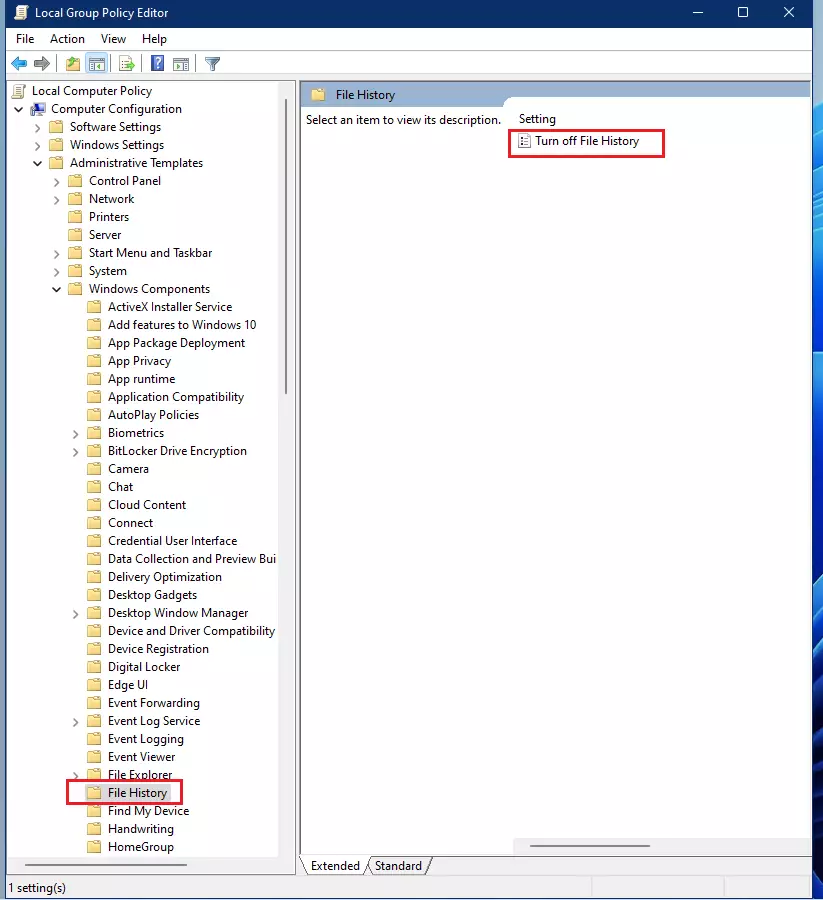
gpedit.msc, and press Enter to open the Local Group Policy Editor. - In the left panel, go to: Computer Configuration > Administrative Templates > Windows Components > File History
- In the right panel, double-click Turn off File History.
- Choose:
- Not configured or Disabled to allow File History (default setting).
- Enabled to turn off File History for all users.
- Click OK and close the editor.
Option 3Turn On or Off File History for All Users (Using Registry Editor)
You can turn File History on or off for all users in Windows 11 by carefully editing the Registry Editor. This requires administrator privileges. To turn it on, you’ll need to use a specific command in the Command Prompt: `reg delete “🗝️HKEY_LOCAL_MACHINE\SOFTWARE\Policies\Microsoft\Windows\FileHistory” /v Disabled /f`. To turn it off, the command is: `reg add “🗝️HKEY_LOCAL_MACHINE\SOFTWARE\Policies\Microsoft\Windows\FileHistory” /v Disabled /t REG_DWORD /d 1 /f`.
You need to be signed in as an administrator to do this.
To Turn On File History:
reg delete "HKEY_LOCAL_MACHINE\SOFTWARE\Policies\Microsoft\Windows\FileHistory" /v Disabled /fTo Turn Off File History:
reg add "HKEY_LOCAL_MACHINE\SOFTWARE\Policies\Microsoft\Windows\FileHistory" /v Disabled /t REG_DWORD /d 1 /fSummary
File History in Windows 11 is a helpful tool that automatically backs up your important files to a location you choose, like an external drive or network. It keeps your files safe by backing up only changed items, making recovery effortless if something happens to your computer.- File History keeps your important files backed up automatically.
- It uses a smart system to back up only changed files, so it runs smoothly.
- You choose where your backups are saved — an external drive or network location works best.
- If your backup drive isn’t available, File History saves backups temporarily on your PC.
- Services like File History Service and Windows Search need to be running.
- You can control File History for just your user or for everyone on the PC.
- It’s easy to restore lost or earlier versions of your files when needed.
- By setting up File History, you’ll have peace of mind knowing your files are regularly saved and safe from accidental loss.
Open Control Panel, click File History, then select Turn on or Turn off . This feature automatically backs up your files to an external drive or network location.
What is File History?
Ever worried about losing important files? File History in Windows 11 is a built-in tool that automatically saves copies of your documents and pictures, giving you peace of mind if something gets lost or damaged.

Learn more about backing up and restoring files on Microsoft Support
How Does File History Work?
File History in Windows 11 automatically saves copies of your important files, like those in Documents and Desktop, to a separate drive you pick, such as a USB stick or network location. It saves these copies from your user folder (typically found at 📁C:\Users\YourName) and tracks file changes to speed up backups.- It saves copies of files inside your user folder:
C:\Users\YourName. - It uses a special system called the change journal to track which files have changed. This makes backups quick and doesn’t slow down your PC.
- You need to choose where your backups will be saved. This can be an external USB drive or a network location (like a shared drive on your home network).
- If your backup drive isn’t connected (like if you unplug a USB drive), File History will save backups temporarily on your PC. It will copy them over once the drive is back.
Before You Start
Before starting File History, ensure the `WMPNetworkSvc` (Windows Media Player Network Sharing Service) and `RemoteRegistry` (Remote Registry) services are running. These are background programs that help File History function correctly.
- File History Service
- Windows Search Service
Option 1Turn On or Off File History for Your Account (Using Control Panel)
- Open the Control Panel. You can find it by typing “Control Panel” in the Start menu search.
- Switch the view to Small icons or Large icons if it’s not already.
- Click on File History.
- Click Turn on to start backing up your files or Turn off to stop.
- Close the Control Panel when done.
File History is a handy Windows 11 feature you can control for your account. To adjust its settings, start by opening the Control Panel. You can find it by typing “Control Panel” in the Start menu search. Once open, switch the view to either Small icons or Large icons. Then, click “File History” to choose whether to turn it on or off.
Option 2Enable or Disable File History for All Users (Using Local Group Policy Editor)
If you’re using Windows 11 Pro, Enterprise, or Education, you can enable or disable File History for everyone on your computer using the Local Group Policy Editor. Access this tool by pressing ⊞ Win+R, typing gpedit.msc, and then navigating to Computer Configuration > Administrative Templates > Windows Components > File History.
- Press ⊞ Win+R, type
gpedit.msc, and press Enter to open the Local Group Policy Editor. - In the left panel, go to: Computer Configuration > Administrative Templates > Windows Components > File History
- In the right panel, double-click Turn off File History.
- Choose:
- Not configured or Disabled to allow File History (default setting).
- Enabled to turn off File History for all users.
- Click OK and close the editor.
Option 3Turn On or Off File History for All Users (Using Registry Editor)
You can turn File History on or off for all users in Windows 11 by carefully editing the Registry Editor. This requires administrator privileges. To turn it on, you’ll need to use a specific command in the Command Prompt: `reg delete “🗝️HKEY_LOCAL_MACHINE\SOFTWARE\Policies\Microsoft\Windows\FileHistory” /v Disabled /f`. To turn it off, the command is: `reg add “🗝️HKEY_LOCAL_MACHINE\SOFTWARE\Policies\Microsoft\Windows\FileHistory” /v Disabled /t REG_DWORD /d 1 /f`.
You need to be signed in as an administrator to do this.
To Turn On File History:
reg delete "HKEY_LOCAL_MACHINE\SOFTWARE\Policies\Microsoft\Windows\FileHistory" /v Disabled /fTo Turn Off File History:
reg add "HKEY_LOCAL_MACHINE\SOFTWARE\Policies\Microsoft\Windows\FileHistory" /v Disabled /t REG_DWORD /d 1 /fSummary
File History in Windows 11 is a helpful tool that automatically backs up your important files to a location you choose, like an external drive or network. It keeps your files safe by backing up only changed items, making recovery effortless if something happens to your computer.- File History keeps your important files backed up automatically.
- It uses a smart system to back up only changed files, so it runs smoothly.
- You choose where your backups are saved — an external drive or network location works best.
- If your backup drive isn’t available, File History saves backups temporarily on your PC.
- Services like File History Service and Windows Search need to be running.
- You can control File History for just your user or for everyone on the PC.
- It’s easy to restore lost or earlier versions of your files when needed.
- By setting up File History, you’ll have peace of mind knowing your files are regularly saved and safe from accidental loss.
Was this guide helpful?

About the Author
Richard
Tech Writer, IT Professional
Richard, a writer for Geek Rewind, is a tech enthusiast who loves breaking down complex IT topics into simple, easy-to-understand ideas. With years of hands-on experience in system administration and enterprise IT operations, he’s developed a knack for offering practical tips and solutions. Richard aims to make technology more accessible and actionable. He's deeply committed to the Geek Rewind community, always ready to answer questions and engage in discussions.


No comments yet — be the first to share your thoughts!