How to Enable or Disable AI-generated Watermark in Paint App in Windows 11

The AI-generated watermark in Paint is a small marker added to pictures you create with artificial intelligence features in Windows 11 version 23H2 and later. It appears automatically on images you save after using tools like Cocreator or generative fill.
Paint has a setting that lets you turn this watermark off so your exported files stay clean. You change it inside the app, and you can switch it back whenever you want. No restart is needed, and it works the same on Windows 11 Home and Pro.
Open Paint, click the gear icon in the top right corner, scroll to the artificial intelligence section, and choose your watermark preference: Never to disable it, Always to include it always, or Ask every time to decide per image. Your choice applies to all images you save going forward.
What is the AI-Generated Watermark?
The Paint AI watermark is a small symbol added automatically to images you create or edit with the AI features in the Windows 11 Paint app. It tells people that AI tools helped make the picture. If you would rather have clean images with no extra markings, Windows 11 lets you turn it off.
The setting only affects images you save from Paint. It does not change pictures that are already saved on your PC.
How to Control the AI Watermark in Paint
You change the AI-generated watermark setting inside the Paint app. You don’t need to dig through the Windows Settings app or the Registry Editor. The control sits in Paint’s own settings, so it is easy to find and easy to change back.
Step 1Open the Paint App
- Click the Start button on your taskbar .
- Type Paint in the search bar.
- Click the Paint app when it shows up in the search results. A blank canvas opens with the toolbar across the top.
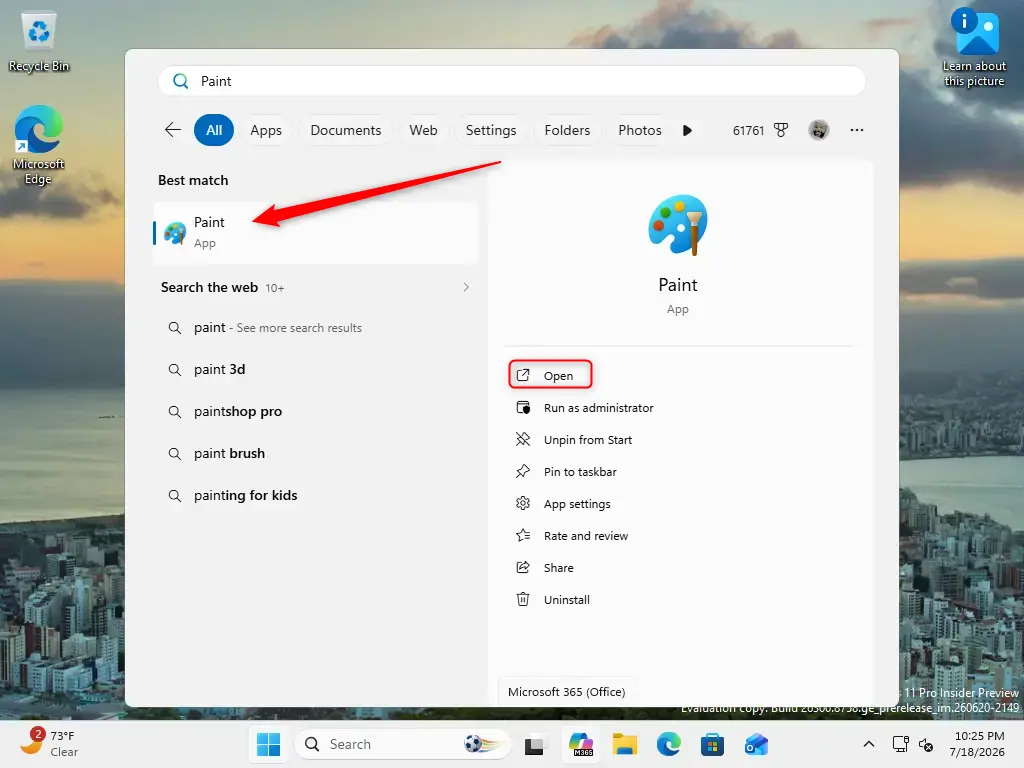
If Paint is pinned to the taskbar or the Start menu , you can open it from there instead. It is the same app either way.
Step 2Access Paint's Settings
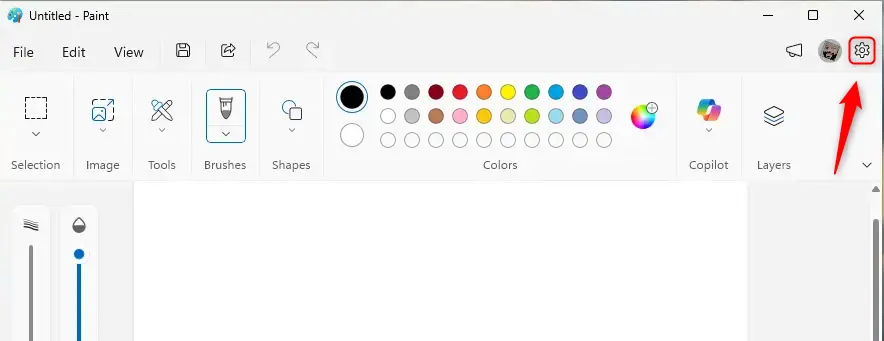
- With Paint open, look at the top right corner of the window for the gear icon.
- Click the gear icon. The Settings page for Paint opens.
If you can't see the gear icon, make the Paint window larger or maximize it. A small window can hide parts of the toolbar. Also check that Paint is up to date in the Microsoft Store, because older versions have a different layout.
Step 3Find the Watermark Option
- In the Paint Settings page, scroll down until you reach the controls for artificial intelligence features.
- Find the watermark option in that group. This is the toggle that controls the AI watermark.
The AI tools depend on your Windows and Paint version, and they may not be available on every device or in every region. Install any pending Windows and Microsoft Store updates, then check again.
Step 4Choose Your Watermark Preference
Paint adds the watermark whenever it detects that AI was used to create or significantly change an image. The setting decides what happens when you save such an image. There are three choices:
- Never: Paint never adds an AI watermark to your images automatically. Pick this if you want your creations to carry no AI marks.
- Always: Paint adds the AI watermark every time it detects that AI was used to create or significantly change an image. This is the most open option.
- Ask every time: A middle option. Each time you save an image made with AI, Paint asks whether you want to include the watermark, so you decide image by image.
Think about where the image will go before you choose. If you share AI-made pictures publicly, Always or Ask every time makes it clear how the image was made. Never suits private or personal use.
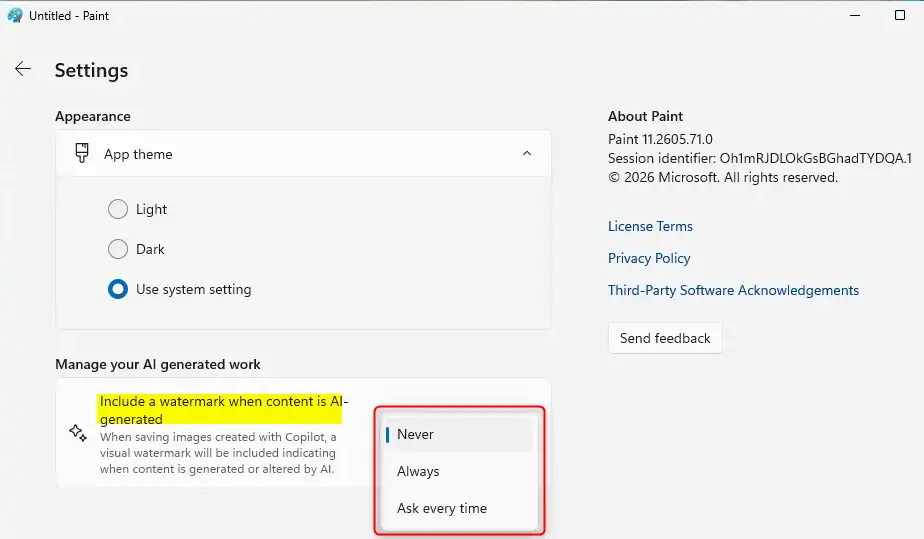
- Select the option that best fits your workflow: Never, Always or Ask every time.
- Check that your choice now shows as selected. The setting is usually saved right away.
To undo the change, return to the same place and pick a different option. The new choice applies to images you save from then on.
Step 5Close Settings and Keep Creating
- Close the settings panel once you have made your selection.
- Go back to your canvas and keep working in Paint.
You usually won't see a Save button for this setting, because your preference is applied immediately. Your chosen watermark setting is active for the next AI image you save.
Summary
Managing the AI watermark in Paint takes only a few seconds. Open Paint, click the gear icon for Settings, find the watermark option, and select Never, Always or Ask every time. Because the setting lives inside Paint, you can change it quickly whenever your needs change.
Did this guide fix your problem?

About the Author
Richard
Tech Writer, IT Professional
Richard is a writer at Geek Rewind who turns complex IT tasks into clear, step-by-step guides. He draws on years of hands-on experience in system administration and enterprise IT operations, focusing on Windows, Linux and WordPress: the problems people actually run into, and the fixes that work. His server and WordPress guides come from systems he runs himself. Richard builds and maintains the platform behind Geek Rewind, from its Ubuntu servers and Nginx configuration to its custom WordPress plugins. Many new tutorials start with readers' questions, and he's always glad to answer them in the comments.
No comments yet — be the first to share your thoughts!