How to Use CHKDSK in Windows 11
You use the CHKDSK command in Windows 11 to scan and repair hard drive errors.
CHKDSK, short for “Check Disk,” is a powerful built-in Windows utility that diagnoses and fixes file system errors and bad sectors on your storage drives.
This tool is essential for maintaining your drive’s integrity, especially if you encounter issues like data corruption or slow performance. CHKDSK can resolve problems on drives formatted with file systems like NTFS, and a full scan might take anywhere from minutes to over an hour depending on your drive’s size and condition.
You can scan and repair your hard drive in Windows 11 using CHKDSK. Open Command Prompt as administrator and type ‘chkdsk C: /f’, replacing C: with your drive letter, or use the graphical method via File Explorer by right-clicking a drive, selecting Properties, then Tools, and clicking Check.
Run CHKDSK from File Explorer
You can easily run CHKDSK in Windows 11 using File Explorer by clicking through menus instead of typing commands.
- Open File Explorer or press the Windows key + E on your keyboard.
- Select This PC from the left sidebar.
- Right-click on the drive you want to check and select Properties.
- Go to the Tools tab.
- Click the Check button.
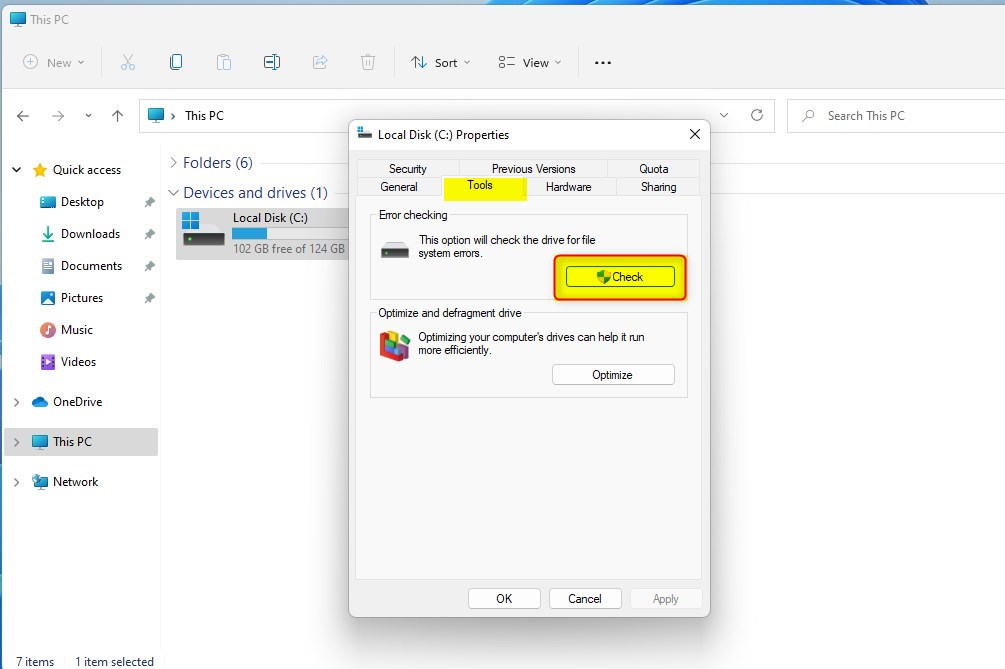
A window will pop up asking if you want to scan the drive. Follow the on-screen prompts to start the process.

Run CHKDSK from Command Prompt (Admin)
For more control, you can use the command line. Note: This requires admin privileges.
- Click the Start button and type
cmd. - Right-click Command Prompt and select Run as administrator.
- Type the following command to check and fix errors (replace
C:with your actual drive letter):
chkdsk C: /f
Understanding CHKDSK Parameters
CHKDSK uses special codes, called parameters, to tell it exactly what to do when checking your Windows 11 drive for problems.
/f: Fixes errors on the disk./r: Locates bad sectors and recovers readable information. This includes the/ffunction./x: Forces the volume to dismount first if necessary./scan: Runs an online scan on NTFS drives.
Troubleshooting and Logs
If you need to see the results of a previous scan, you can check the Event Viewer. Look under Windows Logs > Application and filter for the source Chkdsk. This helps you understand if the tool found logical file system errors or physical bad sectors.
Summary
CHKDSK in Windows 11 is a useful tool for finding and fixing problems with your drive’s file system.
How long does CHKDSK take to run on 🪟 Windows 11?
How long CHKDSK takes to run on Windows 11 depends on your drive’s size, how fast it is, and how many errors it finds.
Is it safe to interrupt CHKDSK?
It is generally not recommended to interrupt the process once it has started. Stopping it abruptly while it is writing to the file system metadata could potentially lead to further corruption or data loss. If possible, let the process complete fully before turning off or restarting your computer.
Can I run CHKDSK on an SSD?
Yes, you can run CHKDSK on an SSD. However, it is usually unnecessary to run the /r parameter on an SSD, as SSDs handle bad sectors differently than traditional hard drives. Running a basic scan for logical file system errors is perfectly safe and helpful for maintaining system health.
Was this guide helpful?

About the Author
Richard
Tech Writer, IT Professional
Richard, a writer for Geek Rewind, is a tech enthusiast who loves breaking down complex IT topics into simple, easy-to-understand ideas. With years of hands-on experience in system administration and enterprise IT operations, he’s developed a knack for offering practical tips and solutions. Richard aims to make technology more accessible and actionable. He's deeply committed to the Geek Rewind community, always ready to answer questions and engage in discussions.


No comments yet — be the first to share your thoughts!