How to Change Your Network Profile in Windows 11
Windows 11 asks you to choose a network-public-or-private-in-windows-11/" class="sal-link" rel="noopener" target="_blank" data-sal-id="25326">network profile when you first set up your computer. You can choose between a private network or a public network. This choice changes how your computer talks to other devices-and-printers-in-windows-11/" class="sal-link" rel="noopener" target="_blank" data-sal-id="37666">devices and how safe it stays while connected to the internet.
Why change your network profile?
You should use a private profile at home or work so you can easily share files and printers with other devices you trust. You should use a public profile at places like coffee shops or airports to keep your computer hidden from strangers.
What happens when done?
Once you change your settings, Windows will immediately update your security rules for that network connection. Your computer will either become visible to other devices or lock itself down for better privacy.
If you need to change your settings later, follow these steps:
- Open Settings by pressing the Windows key + I or by clicking Start then Settings.
- Click on Network & internet in the menu on the left.
- Select either Wi-Fi or Ethernet depending on how you connect to the internet.
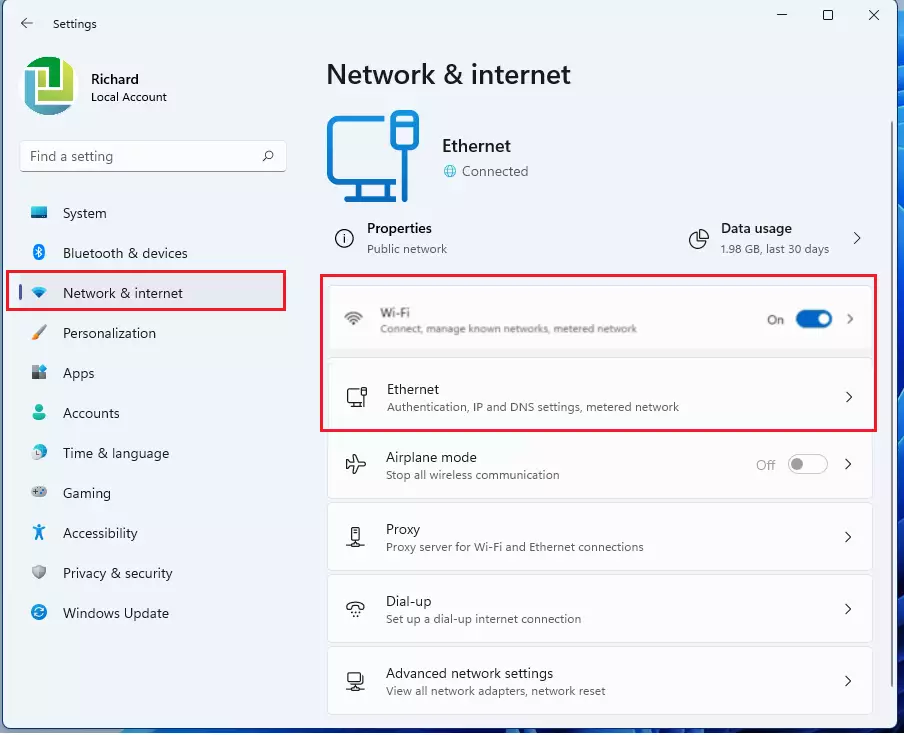
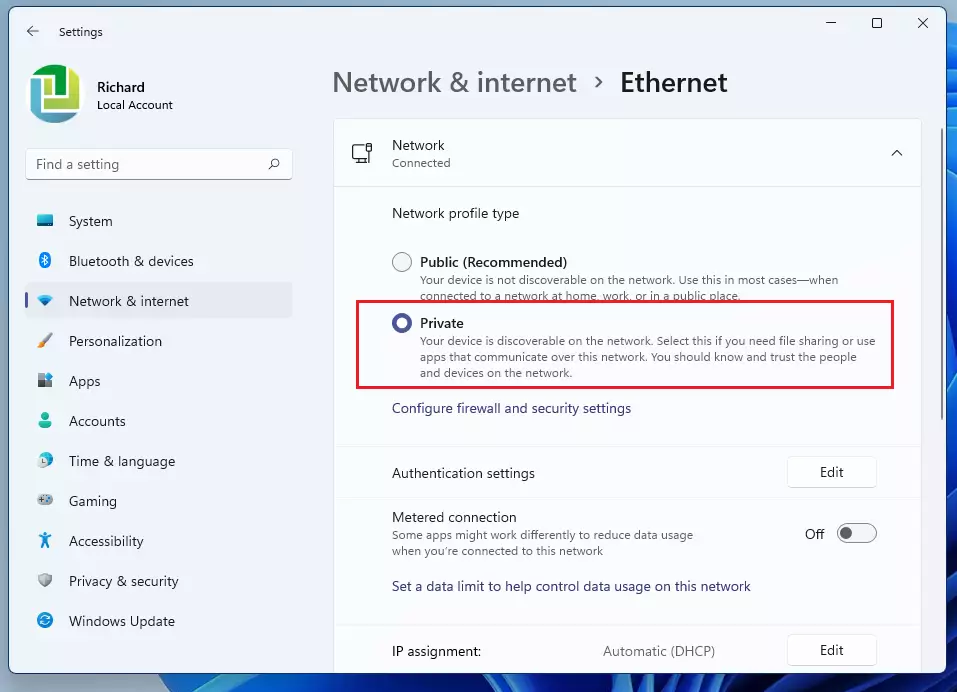
- Click on your current network name to see its settings.
- Under Network profile type, choose between Public or Private.
Note: You may need administrative rights to change these network settings on some work or school computers. If you do not see these options, please contact your IT administrator.
If you prefer to use the command line to check your connection details, you can run this command in a terminal:
Get-NetConnectionProfileSummary
Changing your network profile is a simple way to keep your data safe. Use Private when you are in a trusted location to share files easily. Use Public when you are out in the world to keep your computer invisible to others. You can always switch these settings back and forth in the Network & internet section of your Windows Settings menu.
Was this guide helpful?

About the Author
Richard
Tech Writer, IT Professional
Richard, a writer for Geek Rewind, is a tech enthusiast who loves breaking down complex IT topics into simple, easy-to-understand ideas. With years of hands-on experience in system administration and enterprise IT operations, he’s developed a knack for offering practical tips and solutions. Richard aims to make technology more accessible and actionable. He's deeply committed to the Geek Rewind community, always ready to answer questions and engage in discussions.


Option is not there. Domain computer, and the private/public does not show up per your instructions. Win 11
[…] Windows creates a separate network profile for each active Network. For example, users can turn on or off File and printer sharing separately for a Private or Public network profile. […]
[…] Windows creates a separate network profile for each active Network. Users can turn on or off network discovery separately for each Private or Public network profile. […]
[…] data they used in the last 30 days. The data usage is separated by network adapter types (Wi-Fi and Ethernet) and […]
[…] be able to customize your device exactly how you want it. You can adjust display, sound, network, privacy, updates, and […]