
If you have devices like LED keyboards, mice, or case lights that support Windows Dynamic Lighting, you can easily adjust their brightness. This guide will show you simple steps to make your LED lights brighter or dimmer using Windows 11.
What is Windows Dynamic Lighting?
Windows Dynamic Lighting lets you control the lighting on your compatible devices, either one by one or all at once, through the Windows Settings app. Once your devices are connected, they show up as cards at the top of the settings page, where you can choose each device and adjust its light settings.
Why Adjust LED Brightness?
- Make your lights softer to reduce eye strain, especially in dark rooms.
- Make your lights brighter if you prefer more glow or want to see better.
- Customize the look of your computer setup to match your style.
How to Change LED Brightness Step-by-Step
- Open the Settings app:
You can do this by clicking the Start menu and selecting Settings, or by pressing Windows key + I on your keyboard.
- Go to Personalization:
In the Settings window, click Personalization on the left side menu.

Click on Personalization in Windows Settings - Find and click Dynamic Lighting:
On the right side, look for the Dynamic Lighting tile and click it.

Dynamic Lighting tile inside Personalization - Adjust the brightness:
Inside the Dynamic Lighting settings, select the Brightness option. Use the slider to set the brightness between 0 (very dim) and 100 (very bright).
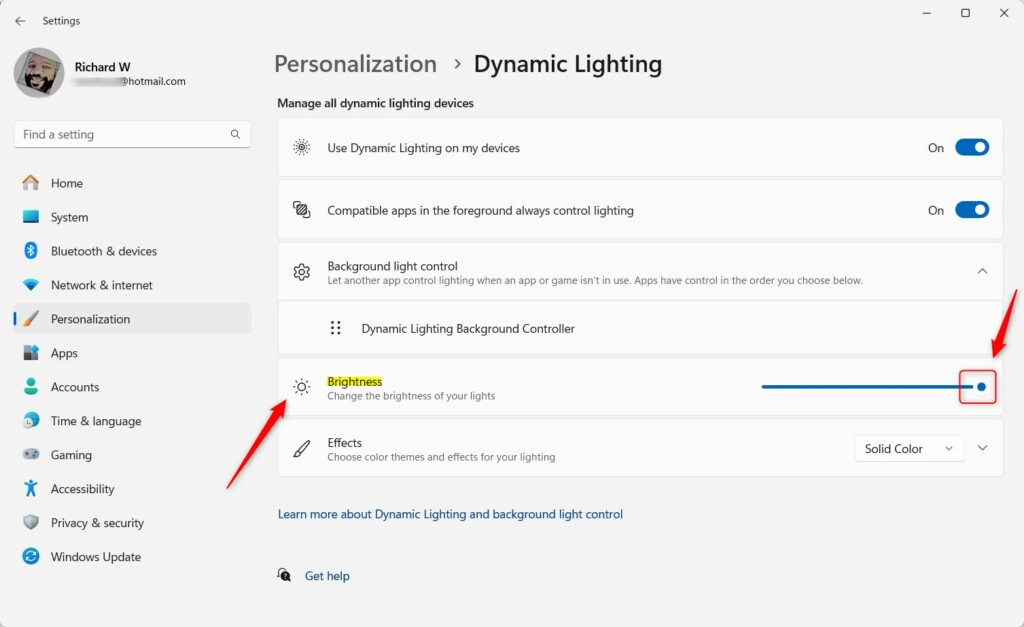
Use the slider to change LED brightness - Reset if needed:
If you want to go back to the default brightness for all devices, click Reset for all devices. - Close the Settings app:
Once you’re happy with the brightness, just close the window. Your changes will be saved automatically.
Bonus: Change Brightness Using Windows Registry (Advanced Users)
If you want, you can also change the brightness by editing the Windows Registry. This is for users comfortable with advanced settings.
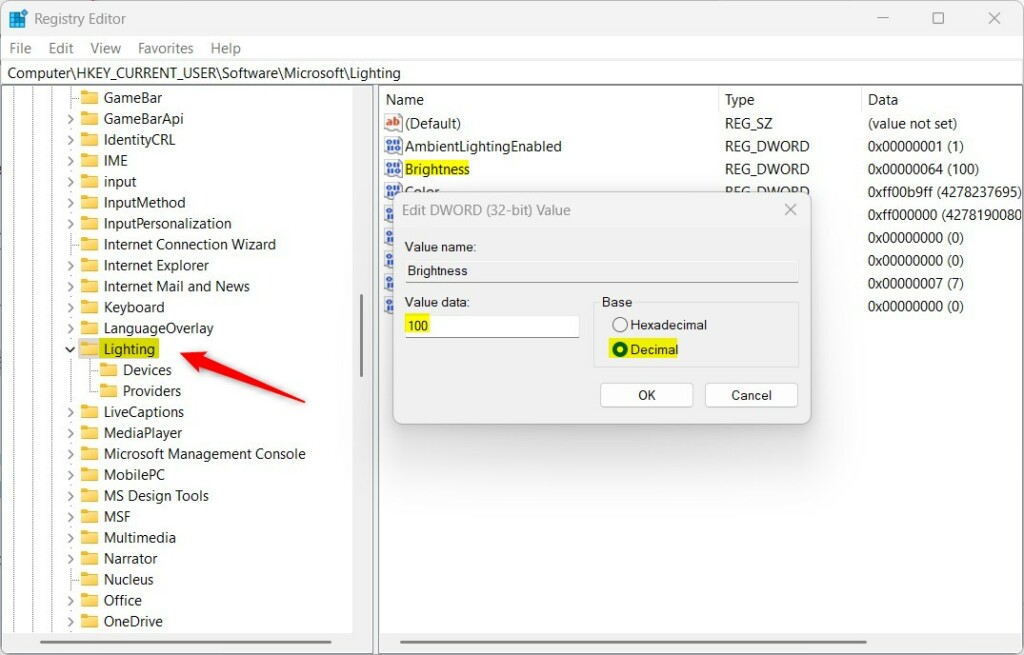
- Open the Registry Editor by searching regedit in the Start menu and clicking it.
- Go to this folder/key:
HKEY_CURRENT_USER\Software\Microsoft\Lighting
- Double-click the Brightness value on the right.
- Type a number between
0and100to set your brightness level. - Click OK to save.
Note: Be very careful when using the Registry Editor. Changing the wrong setting can affect your PC.
Summary
- You can easily change the brightness of your LED lights on devices that support Windows Dynamic Lighting.
- Use the Settings app for a quick and safe way to adjust brightness with a slider.
- If you’re experienced, you can also change brightness directly via the Registry Editor.
- Adjusting brightness helps reduce eye strain and lets you customize your computer’s look.
Try different brightness levels to find what feels best for your eyes and your room!
Leave a Reply