How to Hide Last User Sign-In on Windows 11
If you share your computer with others or want more privacy, hiding the last person’s name on the Windows 11 sign-in screen is a smart move. This guide shows you how to do it in simple steps.
What is the Lock Screen and Sign-In Screen?
When you start your computer or lock it using Windows key + L, you first see the Lock Screen. Think of it like a welcome curtain. After you click or swipe it away, the Sign-In Screen appears. That’s where you type your password or PIN.
By default, Windows shows the full name and picture of the last person who signed in. You can also choose other users if you want to switch accounts.
Why Hide the Last Signed-In User?
Showing the last user’s name is convenient for you, but it can be a privacy problem. This is especially true on shared or public computers. Windows lets you hide this information so no one can see who last used the PC. Why do this? It keeps your computer more private and secure.
How to Hide or Show the Last Signed-In User Name
You can change this setting two easy ways: using the Local Security Policy Editor or the Windows Registry Editor. Pick the method that works best for you.
Method 1Using Local Security Policy Editor
Open Local Security Policy Editor:
- Press Windows key + S, type
secpol.msc, and press Enter. - If you don’t see it, your version of Windows might not have this tool. This is common in Home editions.
- In the window, on the left side, click the arrow next to Local Policies to expand it. Then click Security Options.
- On the right side, scroll down and double-click Interactive logon: Don’t display last signed-in.
- In the window that pops up, choose:
- Enabled to hide the last signed-in user’s name.
- Disabled to show the last signed-in user’s name (this is the default).
- Click OK to save. ⚠️ Admin privileges required for this step.
- Restart your computer to apply the change.
Method 2Using Windows Registry Editor
If you can’t use the Local Security Policy Editor, try this method. Be careful and follow each step exactly:
Open the Registry Editor:
- Press Windows key + R, type
regedit, then press Enter. - If prompted by User Account Control, click Yes. ⚠️ Admin privileges required for this step.
- In the Registry Editor, go to this folder:
HKEY_LOCAL_MACHINE\SOFTWARE\Microsoft\Windows\CurrentVersion\Policies\System - If you don’t see the System folder, create it:
- Right-click CurrentVersion, choose New > Key, and name it System.
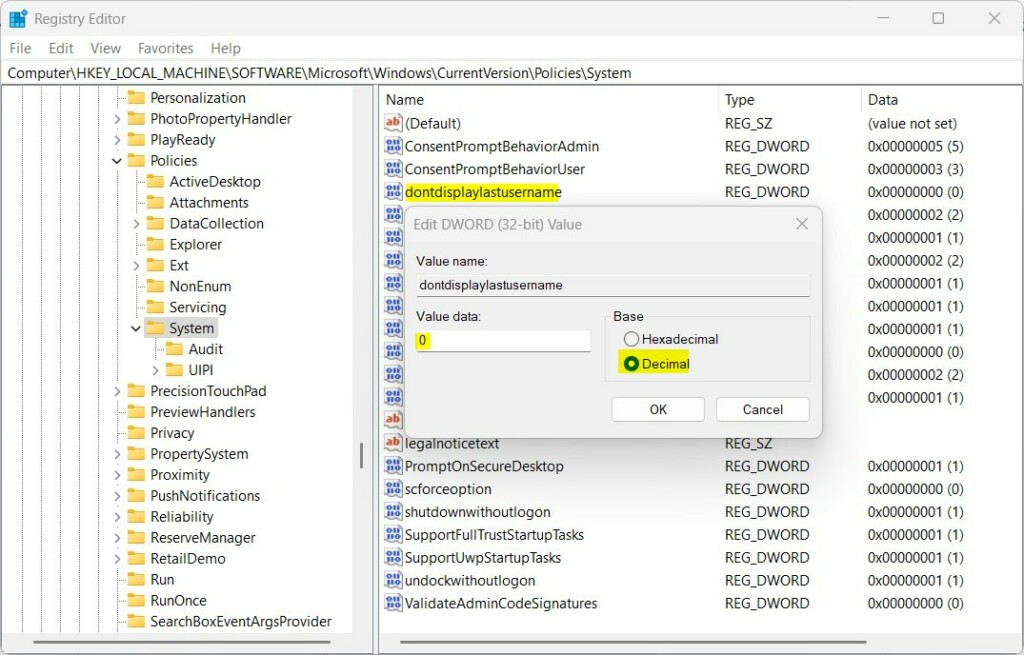
- Click the System folder. On the right side, right-click and choose New > DWORD (32-bit) Value.
- Name the new value:
dontdisplaylastusername - Double-click this new value. Set the Base to Decimal. Then set the Value data to:
1to hide the last signed-in user name.
- Delete the
dontdisplaylastusernamevalue to show the last signed-in user name again. - Click OK, close the Registry Editor, and restart your computer.
Important: Be careful when changing the registry. Making wrong changes can cause problems. It’s a good idea to back up your registry before you start.
Summary
- You can hide the last signed-in user’s name on the Windows 11 sign-in screen to protect your privacy.
- The easiest way is through the Local Security Policy Editor. If that’s not available, use the Registry Editor instead.
- After making changes, always restart your PC to see the effect.
- These settings help keep your computer more secure and private.
- For more details, check the official Microsoft page: Interactive logon: Do not display last user name – Microsoft Docs
Do you have questions or want to share your experience? Feel free to leave a comment below!
Was this guide helpful?

About the Author
Richard
Tech Writer, IT Professional
Richard, a writer for Geek Rewind, is a tech enthusiast who loves breaking down complex IT topics into simple, easy-to-understand ideas. With years of hands-on experience in system administration and enterprise IT operations, he’s developed a knack for offering practical tips and solutions. Richard aims to make technology more accessible and actionable. He's deeply committed to the Geek Rewind community, always ready to answer questions and engage in discussions.
No comments yet — be the first to share your thoughts!