

This article explains how to turn on or off “Shield up” in Windows Firewall. This feature blocks all incoming connections on Windows 11, even if you’ve allowed certain apps in the past.
The Windows Firewall blocks everything by default unless you create an exception rule. “Shield up” is an important Windows Firewall feature you can use during an active attack.
Why use Shield up? When someone attacks your computer, they might use multiple ports and services to get in. Instead of turning off individual firewall rules, you can turn on “Shield up” mode. This blocks all incoming connections and overrides any exceptions you’ve created.
What happens when you enable Shield up? All incoming connections get blocked. Even apps you’ve allowed before—like Remote Desktop—won’t be able to receive incoming connections.
How to Turn On or Off “Shield up” Mode in Windows Firewall
Enable or disable Shield Up in Windows Firewall by opening the Windows Security app, selecting Firewall & network protection, choosing your network profile, and toggling the “Block all incoming connections” option to activate maximum protection mode. Here’s how to enable or disable this feature:
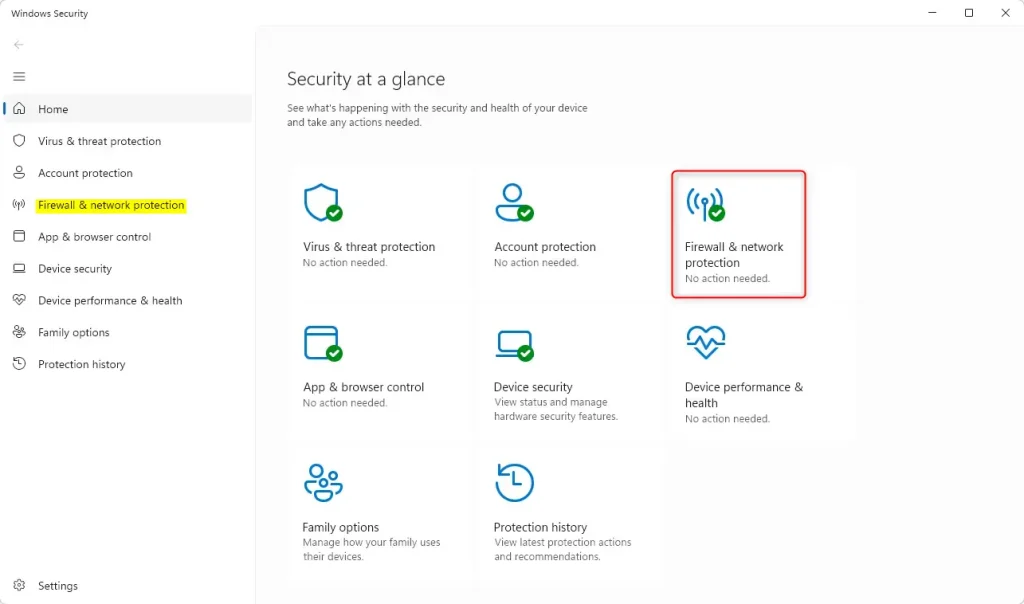
- Open the Windows Security app.
Alternatively, select Start > Settings > Update & Security > Windows Security > Open Windows Security.
- In the Windows Security app, select “Firewall & network protection.”
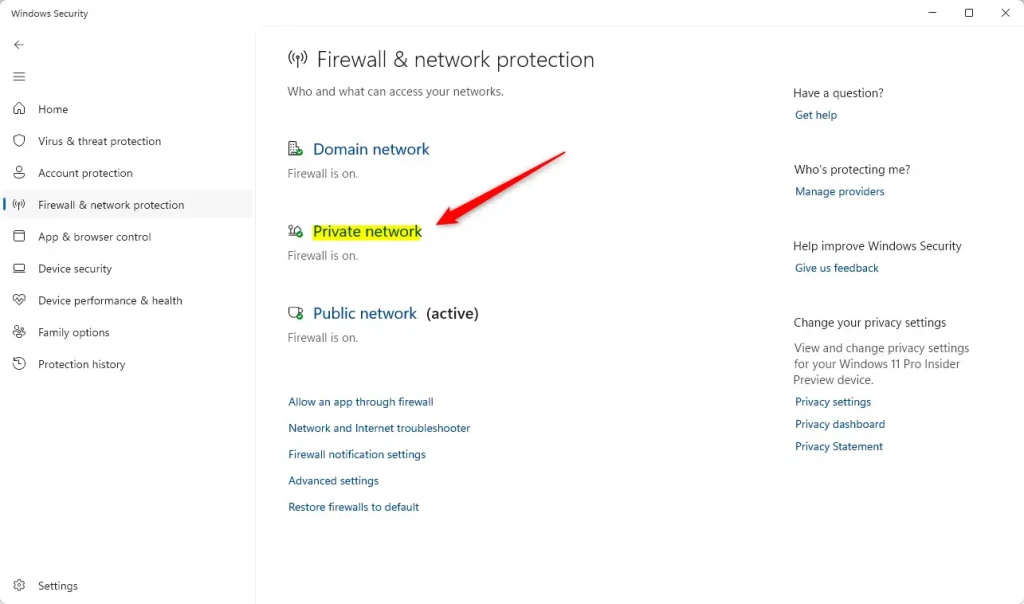
- Select the “Private network” profile.
- Check the box next to “Block all incoming connections, including those in the list of allowed apps” to turn on “Shield up” mode.
To turn it off, uncheck the box.
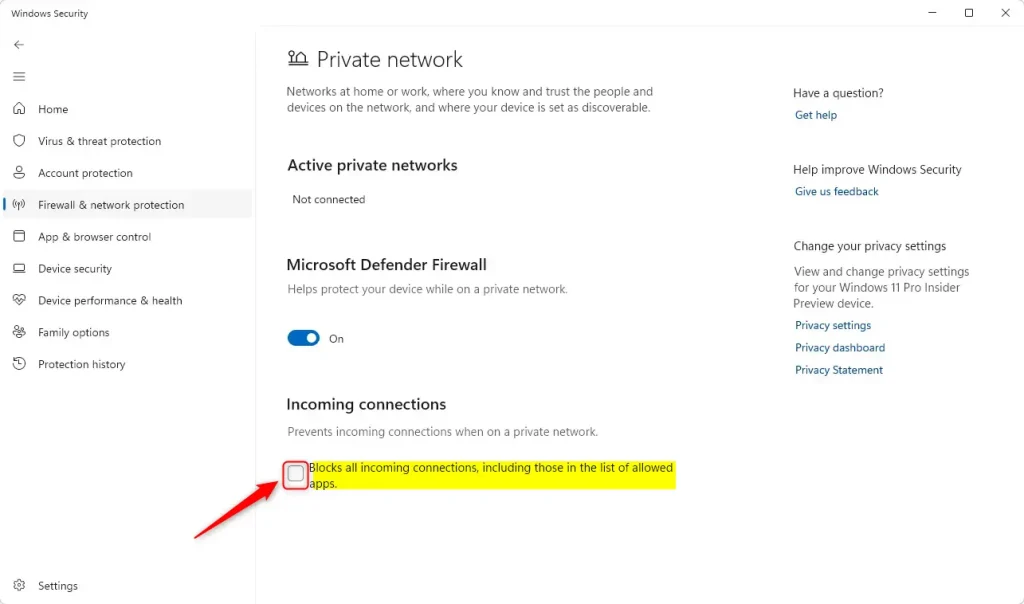
- When prompted, click the Yes button to confirm the changes.
- Close the Windows Security app when done.
Use Control Panel to Block All Incoming Connections
You can also use the Control Panel to make these changes:
- Open the Control Panel.
Then, select System and Security > Windows Defender Firewall.
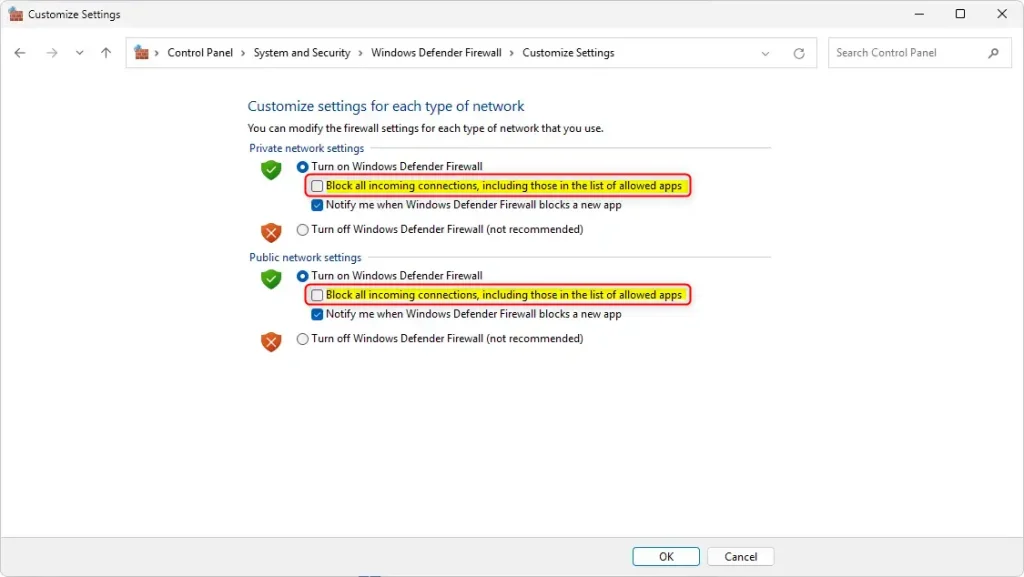
- Click the “Turn Windows Firewall on or off” link on the Windows Defender Firewall settings page.

- Check or uncheck the box next to “Block all incoming connections, including those in the list of allowed apps” to turn it on or off.
- Close the Control Panel when you are done.
Turn On or Off Shield Up Mode Using the Windows Registry
⚠️ Admin required: You need admin privileges to edit the registry.
Another way to enable or disable the “Shield up” feature is to use the Windows Registry editor.
- Open the Windows Registry and navigate to the folder key path below:
Computer\HKEY_LOCAL_MACHINE\SYSTEM\CurrentControlSet\Services\SharedAccess\Parameters\Firewall\StandardProfile - Right-click StandardProfile > New > DWORD (32-bit) Value and name the new DWORD
DoNotAllowExceptions. - Double-click
DoNotAllowExceptionsand change the value to1to block all incoming connections in the “Private network” profile.Enter
0to turn it off and allow connections.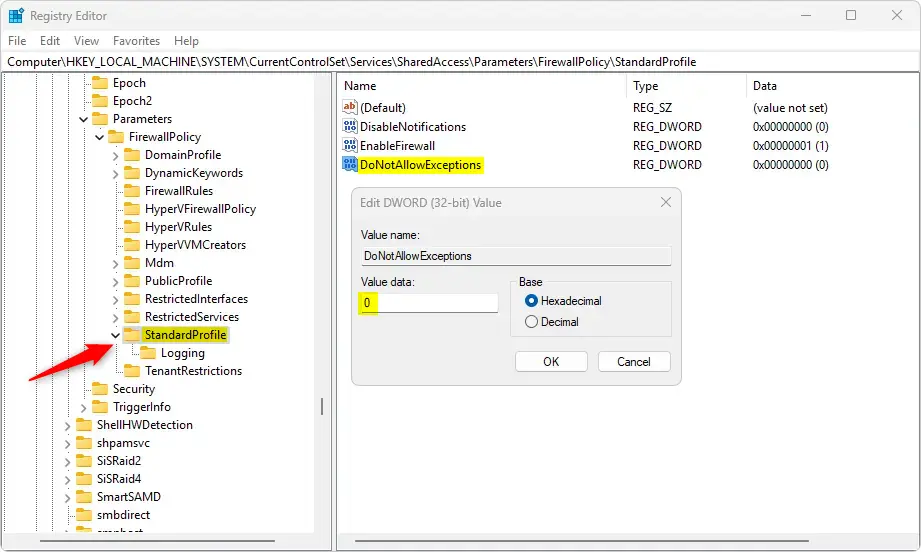
- To do the same for the “Public network” profile, use this registry path:
Computer\HKEY_LOCAL_MACHINE\SYSTEM\CurrentControlSet\Services\SharedAccess\Parameters\Firewall\PublicProfileThen block or unblock all incoming connections using the
DoNotAllowExceptionsvalue name and enter1or0. - For the “Domain network” profile, use this path:
Computer\HKEY_LOCAL_MACHINE\SYSTEM\CurrentControlSet\Services\SharedAccess\Parameters\Firewall\DomainProfileThen block or unblock all incoming connections using the
DoNotAllowExceptionsvalue name and enter1or0. - Save your changes and restart your computer.
Summary
Enabling or disabling “Shield up” mode in Windows Firewall is a simple process that makes your computer more secure. Here are the key points:
- Multiple ways to do it: You can enable or disable “Shield up” mode through the Windows Security app, Control Panel, or Windows Registry.
- Complete protection: When you turn on this mode, it blocks all incoming connections. It overrides any apps you’ve previously allowed.
- Easy to use: The steps are simple and take just a few minutes to complete.
- Different network types: You can apply these settings to Private, Public, or Domain networks based on what you need.
- Easy to change back: You can turn “Shield up” off anytime if you need to allow incoming connections again.
By following the steps in this article, you can keep your Windows 11 device safer and protect it from unauthorized access.
Frequently Asked Questions
What is Shield Up mode in Windows Firewall?
How do I enable Shield Up in Windows 11?
Can I disable Shield Up mode once it's enabled?
Is there an alternative way to enable Shield Up mode?
What happens to my allowed apps when Shield Up is enabled?
Reference: Microsoft


Leave a Reply