How to Change Start Menu Size in Windows 11

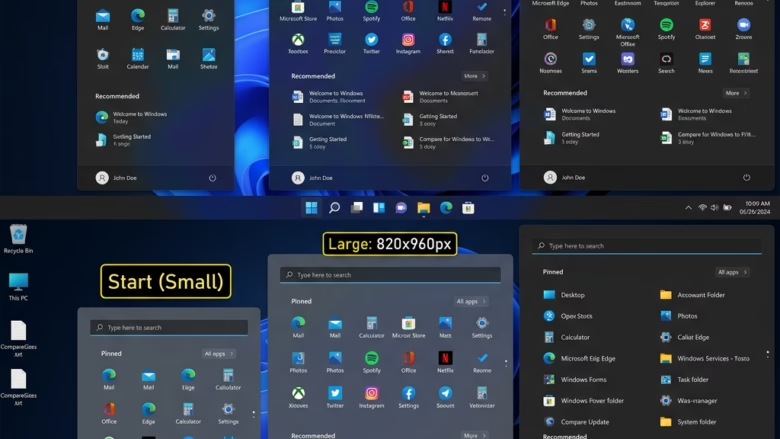
You can change your Windows 11 Start Menu size to a compact or expanded view.
The Start Menu in Windows 11 typically displays your pinned apps, a list of all installed applications, and recently opened items.
As of Windows 11 Insider Preview build 26300.8553, you gain direct control over its dimensions, allowing you to select between a small and large size, or even let Windows manage it automatically.
Option 1Change Start Menu Size in Settings
Changing the Start Menu size through Settings is the most direct method.
- Open Settings. You can press the Windows key and the I key together.
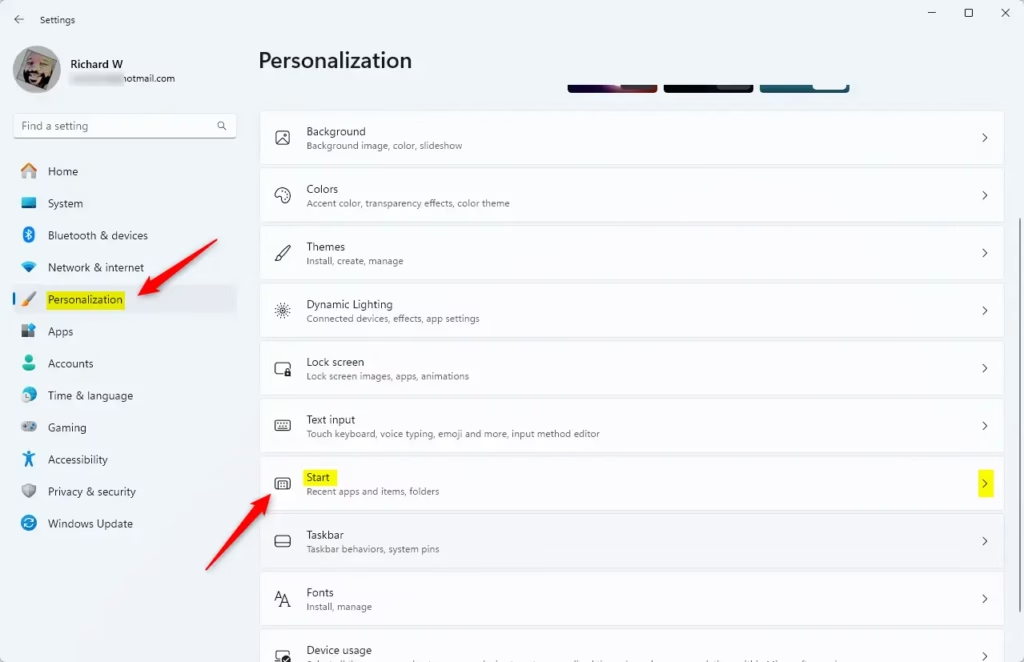
- On the left side, click Personalization. Then, on the right side, click Start.
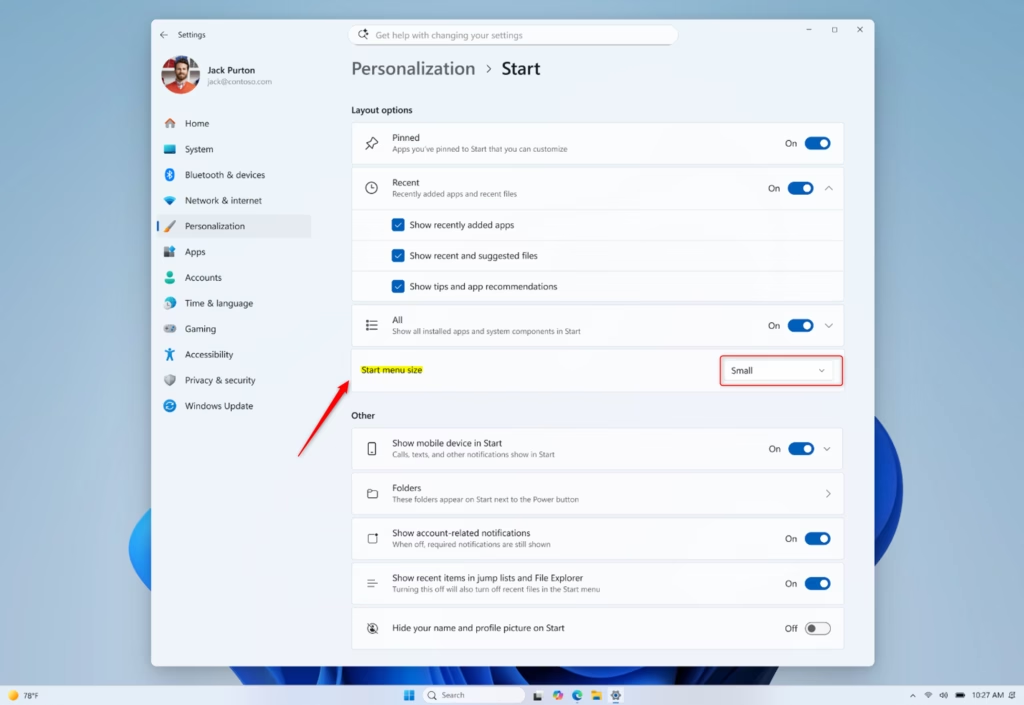
- Look for Start menu size. Click the box next to it.
- You can choose Automatic (this is the default), Small, or Large. Pick the size you want.
- You can now close the Settings window.
Option 2Change Start Menu Size using the Registry
This method is for users who are comfortable tweaking advanced settings. You’ll be making changes within the Windows Registry (a central database for system settings), so proceed with caution as errors can cause issues.
Why bother with the Registry? It lets you adjust settings not found in the standard Settings app. This can be a great way to try out new features or customize your system even further.
What happens when done? Your Start Menu will change its size based on the setting you choose in the Registry. You might need to restart your computer for the changes to take full effect.
Note: This guide uses the graphical interface to access Registry settings, which is safer than directly editing the Registry editor.
Step 1Open Registry Editor
Note: This step requires administrator privileges.
Press the Windows key and type regedit. Then, right-click on Registry Editor in the search results and select Run as administrator.
Click Yes if a User Account Control prompt appears.
Step 2Navigate to the correct Registry key
In the Registry Editor, go to the following path:
HKEY_CURRENT_USER\Software\Microsoft\Windows\CurrentVersion\Explorer\Advanced
You can copy and paste this path into the address bar at the top of the Registry Editor window and press Enter.
Step 3Create or Modify the ‘StartMenuSize’ DWORD value
In the right-hand pane of the Advanced folder, right-click on an empty space. Select New, then click on DWORD (32-bit) Value.
Name the new value StartMenuSize.
Double-click on the newly created StartMenuSize value to edit it.
Step 4Set the Value Data for your desired size
A new window will pop up. In the Value data field, enter one of the following numbers:
- 0 for “Automatic” (default)
- 1 for “Small”
- 2 for “Large”
Step 5Apply the changes
Click OK to save the change.
Close the Registry Editor.
To see the changes, you might need to restart your computer or restart Windows Explorer. To restart Windows Explorer: Press Ctrl+Shift+Esc to open Task Manager. Find Windows Explorer in the list, right-click it, and select Restart.
Summary
You can change your Windows 11 Start Menu size using the Settings app by going to Personalization > Start and selecting your preferred layout option (Automatic, Small, or Large). For more advanced control, you can manually edit the Windows Registry, but remember to be careful and have administrator rights.
Was this guide helpful?

About the Author
Richard
Tech Writer, IT Professional
Richard, a writer for Geek Rewind, is a tech enthusiast who loves breaking down complex IT topics into simple, easy-to-understand ideas. With years of hands-on experience in system administration and enterprise IT operations, he’s developed a knack for offering practical tips and solutions. Richard aims to make technology more accessible and actionable. He's deeply committed to the Geek Rewind community, always ready to answer questions and engage in discussions.
No comments yet — be the first to share your thoughts!