Setting Up Apache with PHP-FPM on Ubuntu 24.04

Running Apache with PHP-FPM on Ubuntu 24.04 makes your websites load faster by handling PHP code separately from normal web pages. PHP-FPM (FastCGI Process Manager, a tool that handles dynamic script requests) acts like a background helper. It processes heavy script requests so your server does not slow down when many visitors open your site at the same time.
This setup uses fewer system resources than older methods like mod_php, which loads PHP inside every Apache process. That keeps your server running smoothly even during traffic spikes. You can connect Apache to PHP-FPM using a Unix socket or a local network port (TCP). A socket is slightly faster on a single machine. A TCP port is the better choice if PHP-FPM ever runs on another host. Either way, it speeds up page delivery for blogs, online stores, and other web projects.
Before you start, you need an Ubuntu 24.04 server, a user account with sudo rights, and Apache already installed. Take a backup or snapshot of the server first if it hosts live sites. You will edit configuration files, and a typo there can stop Apache from starting.
Apache runs PHP through PHP-FPM on Ubuntu 24.04 by installing the php8.3-fpm package, enabling the proxy_fcgi and setenvif modules with a2enmod, and enabling the php8.3-fpm configuration with a2enconf. Then restart php8.3-fpm and apache2 with systemctl. PHP-FPM then processes your PHP scripts separately from Apache, so busy sites load faster.
Install PHP
Installing PHP on Ubuntu 24.04 takes two terminal steps. First refresh the package list. Then install PHP from the Ubuntu repositories. The package manager downloads PHP and the other packages it depends on.
- Open a terminal on the server.
- Run the package manager update command, then the PHP installation command. Both need sudo. When the install finishes, you are returned to the prompt with no errors.
- Run the version check command to see which PHP version is active.
The exact build number and date may differ on your server, because Ubuntu ships security fixes for PHP 8.3 as updates. What matters is that the major version is 8.3 and the command does not return an error.
sudo apt update
sudo apt install php8.3 php-mbstring php-pear
Next, confirm the installation details by running the command below. It lists what was installed, so you can check that the packages are present and see their exact versions.
php -i | head
Successful execution generates output matching these lines. If the package is missing, go back and re-run the update and install commands. Check that they did not stop on a network or repository error.
phpinfo()
PHP Version => 8.3.6

System => Linux Ubuntu 6.11.0-17-generic #17~24.04.2-Ubuntu SMP PREEMPT_DYNAMIC Mon Jan 20 22:48:29 UTC 2 x86_64
Build Date => Dec  2 2024 12:36:18
Build System => Linux
Server API => Command Line Interface
Virtual Directory Support => disabled
Configuration File (php.ini) Path => /etc/php/8.3/cli
Loaded Configuration File => /etc/php/8.3/cli/php.ini
Install and enable PHP-FPM
Now add PHP-FPM and connect it to Apache. This takes three actions: install the package, enable the Apache module that hands PHP requests to FPM, and restart the services. Run each one in the terminal with sudo.
- Install the PHP-FPM package alongside Apache by running the terminal command below. Wait until the prompt returns.
sudo apt install php8.3-fpm
- Enable the required PHP-FPM module next. This lets Apache pass PHP requests to the FPM service. Apache prints a short message saying the module is enabled and that a restart is needed. That is expected.
sudo a2enmod proxy_fcgi setenvif
sudo a2enconf php8.3-fpm
- Restart both Apache and PHP-FPM services. The restart applies the module change. A restart briefly drops active connections, so on a busy production server do it at a quiet time.
sudo systemctl restart php8.3-fpm apache2
If a command reports an error here, read the message before moving on. The usual causes are a mistyped package name or a service that failed to start. Fix that first, because the next section depends on a working install.
Use PHP-FPM with Apache
You use PHP-FPM with Apache on Ubuntu 24.04 by editing the main pool configuration file, which controls how the web server passes processing requests. The key setting is the listen directive. It tells PHP-FPM where to wait for requests, and Apache must point at that same address. If the two do not match, visitors see a 503 or "Service Unavailable" error instead of your page.
Make a copy of the file before you change anything. If something goes wrong, you can put the copy back and restart the service.
- Open the primary PHP-FPM configuration file in a text editor, using the command below. Use sudo, because the file is owned by root.
sudo nano /etc/php/8.3/fpm/pool.d/www.conf
- Locate the active listen directive and comment out the current line by putting a semicolon at the start. Reference the listen directive configured with [127.0.0.1:9000]. That value tells PHP-FPM to listen on the local TCP port 9000, reachable only from the server itself. Edit the lines as shown below.
; Note: This value is mandatory.

;listen = /run/php/php8.3-fpm.sock
listen = 127.0.0.1:9000
- Save the changes and close the editor.
- Restart PHP-FPM so it reads the new setting. If the service fails to restart, you most likely have a typo in the file. Check the spelling and that the line you meant to comment out is the only one changed.
- Insert the highlighted code block into the virtual host configuration to route PHP requests through FPM. The address in this block must match the listen value you set in the pool file. Save the file, then restart Apache so the change takes effect.
<VirtualHost *:80>
  ServerName example.com
  ServerAdmin admin@example.com
  DocumentRoot /var/www/example.com

  <Directory /var/www/example.com/>
       Options FollowSymlinks
       AllowOverride All
       Require all granted
  </Directory>

  <FilesMatch ".php$">
       SetHandler "proxy:fcgi://127.0.0.1:9000/"
  </FilesMatch>

       ErrorLog ${APACHE_LOG_DIR}/error.log
       CustomLog ${APACHE_LOG_DIR}/access.log combined
</VirtualHost>
The check below confirms the configuration is valid and that PHP requests are handled by FPM rather than by mod_php. If you test with a small PHP info page, delete it afterward. It exposes details about your server.
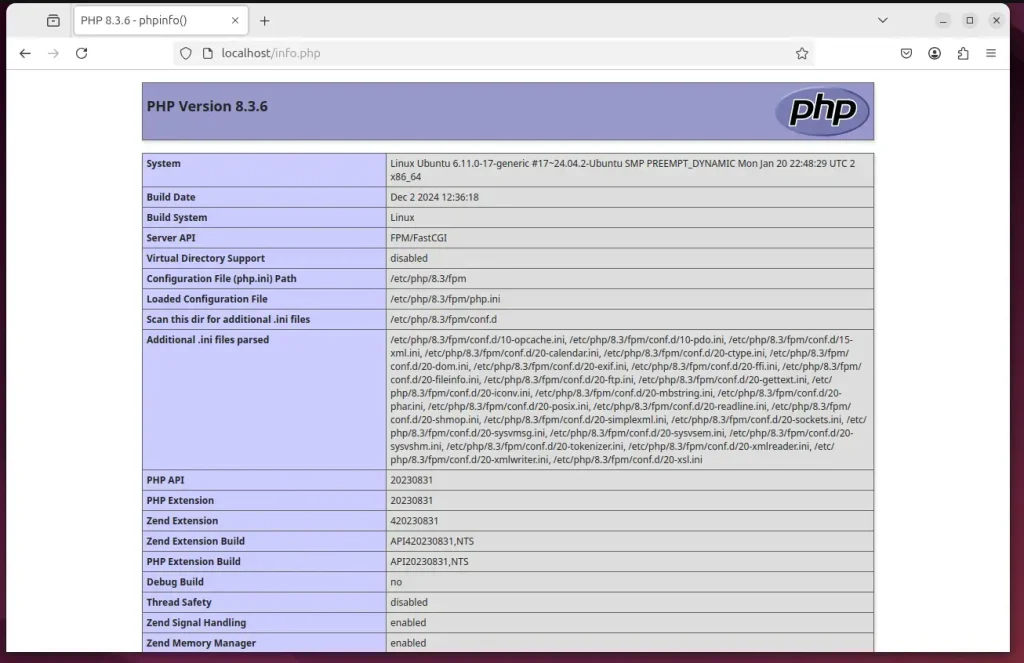
Configuration is complete. To undo it, remove the code block from the virtual host, restore the backed-up pool file, and restart both services.
Integrating PHP-FPM with Apache boosts overall application performance and reliability. The main benefits are:
- Improved Performance: PHP-FPM allows simultaneous handling of multiple requests, leading to faster response times.
- Efficient Resource Management: It manages PHP worker pools, optimizing server resource utilization.
- Enhanced Reliability: With the ability to manage multiple PHP processes, applications become more robust and less prone to failures.
- Easy Installation: The installation and configuration process is straightforward, allowing for quick setup.
- Future-Proofing: Keeping PHP and its components updated ensures your server remains secure and efficient.
Separating PHP processing from core Apache threads allows web servers to handle higher request volumes simultaneously. Independent process management reduces load times and improves overall site responsiveness. It also lets you restart or tune PHP on its own without taking Apache down for static content.
Have a question about this guide?
Answered by AI from this guide. Good questions may be added to this page — please don't include personal details.
Did this guide fix your problem?

About the Author
Richard
Tech Writer, IT Professional
Richard is a writer at Geek Rewind who turns complex IT tasks into clear, step-by-step guides. He draws on years of hands-on experience in system administration and enterprise IT operations, focusing on Windows, Linux and WordPress: the problems people actually run into, and the fixes that work. His server and WordPress guides come from systems he runs himself. Richard builds and maintains the platform behind Geek Rewind, from its Ubuntu servers and Nginx configuration to its custom WordPress plugins. Many new tutorials start with readers' questions, and he's always glad to answer them in the comments.
No comments yet — be the first to share your thoughts!