Select Secure DNS Provider in Google Chrome
You select a secure DNS provider in Google Chrome by enabling Enhanced Protection or manually entering your chosen provider’s server addresses in the browser’s settings.
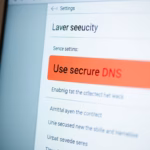
Open Chrome settings, navigate to Privacy and security > Security, and toggle “Use secure DNS” on. You can then select a provider from the list or enter a custom one.
DNS (Domain Name System) translates website names, like google.com, into IP addresses computers understand. Using a secure DNS provider, specifically with DNS-over-HTTPS (DoH), encrypts this lookup process.
This encryption prevents your ISP or network eavesdroppers from seeing the websites you visit, boosting your online privacy and security. Chrome versions 90 and later offer robust DoH support.
Enabling Enhanced Protection automatically uses a curated list of secure DNS providers. Alternatively, you can manually configure Chrome to use a specific provider by entering their server details.
Was this guide helpful?

About the Author
Richard
Tech Writer, IT Professional
Richard, a writer for Geek Rewind, is a tech enthusiast who loves breaking down complex IT topics into simple, easy-to-understand ideas. With years of hands-on experience in system administration and enterprise IT operations, he’s developed a knack for offering practical tips and solutions. Richard aims to make technology more accessible and actionable. He's deeply committed to the Geek Rewind community, always ready to answer questions and engage in discussions.


No comments yet — be the first to share your thoughts!