

This simple guide will help you turn off facial recognition sign-in on your Windows 11 computer.
What is Windows Hello?
Windows Hello is a safe and quick way to sign into your computer. You can use your face, fingerprint, or a PIN. When you set up face or fingerprint sign-in, you also create a PIN. You can always use just your PIN if you prefer.
These sign-in options are faster and safer. Your PIN only works on your device. It’s connected to your Microsoft account. This means you won’t lose access to your computer.
Your computer’s built-in camera or an external infrared camera can set up facial recognition sign-in.
Why Remove Facial Recognition?
Some people prefer to use only their PIN. Others have privacy concerns. Whatever your reason, removing facial recognition is easy.
How to Remove Facial Recognition Sign-in
- Press the
Windows key + Ion your keyboard to open Settings. - Click Accounts on the left side.
- Click Sign-in options on the right side. You can also use this link to open Sign-in options directly: Open Sign-in options settings
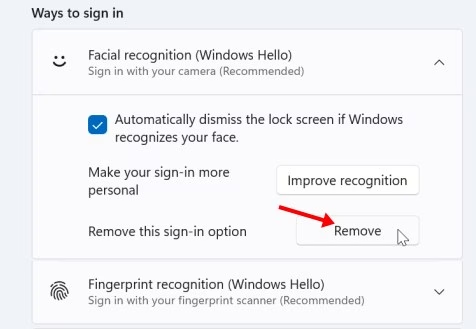
- Find Facial recognition (Windows Hello) under Ways to sign in. Click on it to open its options.
- Click the Remove button next to “Remove this sign-in option.”
- Close the Settings window when you’re done.

What Happens Next?
Facial recognition is now removed from your Windows 11 sign-in options. You can still sign in using your PIN or other methods you have set up.
Summary
Removing facial recognition from Windows 11 takes just a few clicks. Open Settings, go to Accounts, then Sign-in options. Find Facial recognition (Windows Hello) and click Remove. Your PIN will still work perfectly for signing in.
Windows Hello face authentication
Windows Hello biometric requirements
Windows Hello biometrics in the enterprise


Leave a Reply