Mount Remote Directories with SSHFS on Ubuntu 24.04

SSHFS on Ubuntu 24.04 lets you open folders from a remote computer and work with them as if they were stored on your own desktop. SSHFS (Secure Shell File System) uses an encrypted connection to link your PC to another server over the network or the internet.
You can browse, open, and edit files on that remote machine with your usual programs, such as LibreOffice or a text editor. You no longer have to download and upload files by hand. Every transfer runs through SSH encryption, so your data stays protected while you work.
Before you start, you need three things: an Ubuntu 24.04 client, a remote server that already runs SSH, and a user account on that server. You also need an account with sudo rights on your local machine to install software. You only see what the remote account is allowed to see, so file permissions on the server still apply.
Install SSHFS via `sudo apt install sshfs`, create a mount point with `mkdir ~/sshmnt`, and then mount the remote directory using `sshfs user@remote_host:/remote/path ~/sshmnt`. Unmount with `fusermount -u ~/sshmnt`.
Install SSHFS on the client
Installing SSHFS on Ubuntu 24.04 lets you securely mount remote directories on your local computer over an SSH connection. The whole job takes three parts. You add the tool from the terminal, create an empty local folder to act as the doorway to the remote files, and connect to your server with a single command.
SSHFS comes from the standard Ubuntu package sources, so you don’t need to add any extra repositories. You only need to install it on the client, the machine where you want to see the remote files. The server just needs a working SSH service.
- Press Ctrl+Alt+T to open a terminal.
- Run the command below. Enter your password if Ubuntu asks for it.
You should see the package manager download and set up SSHFS and anything it depends on. When it finishes, the prompt returns. If the package manager reports it is already installed, you can go straight to the next step.
sudo apt install sshfs
The mount point is an ordinary local folder. While the remote share is connected, this folder shows the remote files. Create it on the client computer before you mount anything.
- In the same terminal, run the command below to create the mount point.
- Check that the folder exists in your home folder. Ubuntu prints nothing when the command works.
Keep the folder empty. Use a name that tells you what it holds, because you can create as many mount points as you have remote directories.
mkdir ~/sshmnt
Now connect the remote directory to the mount point. The SSHFS command takes the remote user and server, the remote path, and your local mount point, in that order. The structure is shown below.
- Replace the example values with your own user name, server, remote directory, and mount point.
- Run the command in the terminal.
- If this is your first connection to that server, SSH asks you to confirm its fingerprint. Type yes and press Enter.
- Enter the remote user's password when prompted. If you use SSH key authentication, SSHFS skips this prompt.
If the connection works, the command returns to the prompt without printing anything. The mount stays active until you unmount it or restart the computer. After a reboot, repeat this step.
sshfs svr1.example.com:/home/richard/october ~/sshmnt
The parts of the command in this example mean the following:
- svr1.example.com => the remote server with SSH running. You can use a host name or an IP address here.
- /home/richard/october => the remote directory you want to mount. Use a path that exists on the server and that your remote account can read.
- ~/sshmnt => the local mount point you created on the client. The ~ stands for your home folder.
Check that the mount worked before you start editing files. If the mount fails, the empty local folder just stays empty, and it is easy to save work in the wrong place.
- Run the command below in the terminal.
- Look through the output for a line that shows the remote server and path next to your mount point.
df -hT
Output like the example below confirms the remote directory is mounted. If you see no such line, the mount did not succeed. Recheck the user name, server address, and remote path, and make sure the SSH service on the server is running.
ilesystem                             Type        Size  Used Avail Use% Mounted on
tmpfs                                  tmpfs       336M  2.0M  334M   1% /run
/dev/sda2                              ext4         49G  9.2G   38G  20% /
tmpfs                                  tmpfs       1.7G     0  1.7G   0% /dev/shm
tmpfs                                  tmpfs       5.0M  8.0K  5.0M   1% /run/lock
svr1.example.com:/home/richard/october fuse.sshfs   40G  9.7G   28G  27% /home/richard/sshmnt
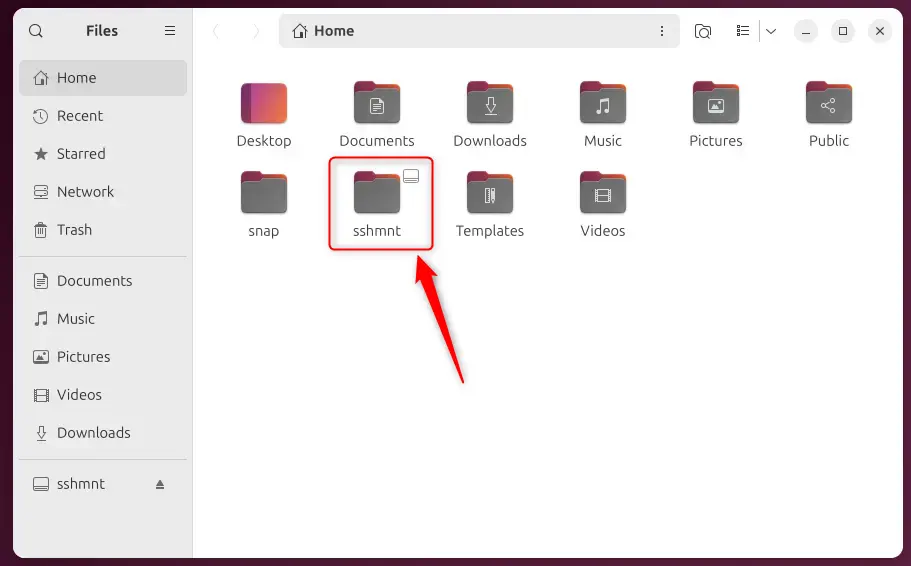
The mount point also appears inside the File Manager. Open it and look in your home folder for the mount point folder. Open that folder to see the remote files. You can then copy, rename, and edit them as you would local files, and any change you save is written to the remote server.
Unmount
Unmounting an SSHFS directory safely disconnects the remote files from your Ubuntu 24.04 system once you finish working. Before you run the fusermount command, close any open files and make sure your terminal is not inside the mounted folder. Otherwise the unmount fails.
- Save and close every document or program that uses files from the mount point.
- In the terminal, move out of the mounted folder to another location, such as your home folder.
- Run the fusermount command shown below, using your own mount point.
If the command succeeds, it prints nothing, and the mount point folder is empty again. If you get a message that the device or resource is busy, something is still using the mount. Close that program, or leave the folder in the terminal, and run the command again.
fusermount -u ~/sshmnt
You must leave the mount point before you unmount the remote directory. A terminal that is still inside the folder keeps it busy, even if no files are open. Unmounting does not delete anything on the server. The remote files stay where they are, and you can mount them again at any time with the same command.
That completes the setup process. You installed SSHFS, created a mount point, mounted a remote directory, checked it, and unmounted it.
Conclusion:
SSHFS provides a reliable and secure way to access remote directories directly from a local Ubuntu system. The main points to remember are below.
- Easy Setup: SSHFS installs quickly with a single command and needs minimal configuration. The server only needs SSH running.
- Direct Access: Once mounted, you can work with remote files as if they were local, which makes everyday tasks easier.
- Secure Connection: SSHFS relies on SSH, so your data transfer stays safe and encrypted.
- Flexible Usage: It suits many jobs, such as document editing, data processing, and file management.
- Simple Unmounting: You can disconnect from the remote directory when you are done, which keeps your system clean.
Any workflow that involves remote servers benefits from SSHFS, because it makes file access both efficient and secure.
Have a question about this guide?
Answered by AI from this guide. Good questions may be added to this page — please don't include personal details.
Did this guide fix your problem?

About the Author
Richard
Tech Writer, IT Professional
Richard is a writer at Geek Rewind who turns complex IT tasks into clear, step-by-step guides. He draws on years of hands-on experience in system administration and enterprise IT operations, focusing on Windows, Linux and WordPress: the problems people actually run into, and the fixes that work. His server and WordPress guides come from systems he runs himself. Richard builds and maintains the platform behind Geek Rewind, from its Ubuntu servers and Nginx configuration to its custom WordPress plugins. Many new tutorials start with readers' questions, and he's always glad to answer them in the comments.
No comments yet — be the first to share your thoughts!