
This article explains how to use the Live Captions feature in with microphone audio in Windows 11.
Live captioning is a new feature released with Windows 11 build 22557 that will help everyone, including people who are deaf or hard of hearing, better understand audio by viewing captions of spoken content.
Live captions can be turned on with the WINDOWS + CTRL + L keyboard shortcut or from the Accessibility flyout under Quick Settings.
With Live Captions, you can enable or disable it, move the Live Captions bar, enable Live Captions in different languages, switch languages, and more.
Another feature you can use with Live captions is to include your device’s microphone audio. Any audio captured by your microphone will be captioned, provided that no other audio on your device is being captioned.
Include microphone audio with Live Captions in Windows
As mentioned above, users can include their device’s microphone with Live Captions on Windows.
Here’s how to do it.
First, turn on Live Captions by pressing the Windows logo key + Ctrl + L. In the Live captions window, select the Settings button, choose Preferences, and turn on or off the Include microphone audio option.
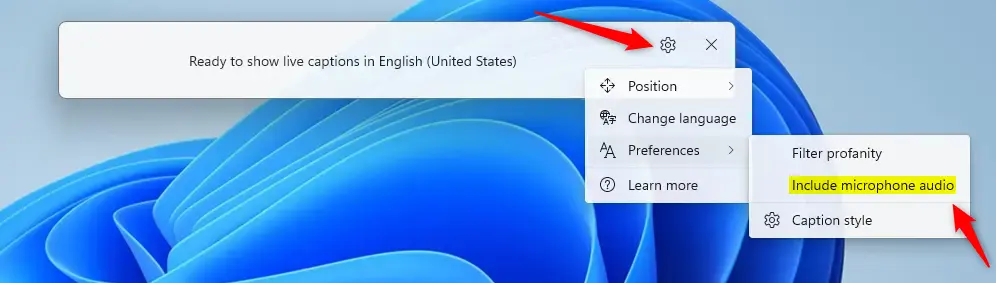
This will allow any audio captured by your microphone to be captioned.
That should do it.
Reference:
Conclusion:
- Live Captions in Windows 11 make audio content more accessible to everyone, including the deaf or hard of hearing.
- Including microphone audio with Live Captions enhances the overall experience by captioning any audio captured by the device’s microphone.
- The ability to enable, disable, and customize Live Captions, including multiple language support, offers a personalized and inclusive captioning experience.
- Windows 11 users can easily manage Live Captions through keyboard shortcuts or the Accessibility flyout under Quick Settings, providing convenience and accessibility in using this feature.
Leave a Reply