
Recall is a new smart feature in Windows 11 that works like a photo memory for your computer. It takes snapshots (pictures) of what’s on your screen while you work. Later, you can search through these snapshots to quickly find things you’ve seen before on your PC.
Why would you want this? Imagine you saw something important on your screen yesterday but can’t remember where. With Recall, you can search for it instead of hunting through your files.
This feature started appearing on newer Windows 11 versions (build 26120.2415 and later) and is mainly available on special Windows devices called Copilot+ PCs (powered by Snapdragon processors).
Before you can use Recall, you need to turn on snapshot saving. Snapshots are saved safely and only on your device. They’re protected by Windows security features like Device Encryption or BitLocker.
How to Enable or Disable Recall for Users
If you want to let users turn Recall on or off, you can use a Windows tool called the Local Group Policy Editor. This is useful for computers in workplaces or schools.
Step-by-Step to Enable or Disable Recall with Group Policy Editor
- Click the Start button and type
gpedit.msc, then press Enter to open the Local Group Policy Editor. ⚠️ Requires admin privileges - In the window, go to this folder path:
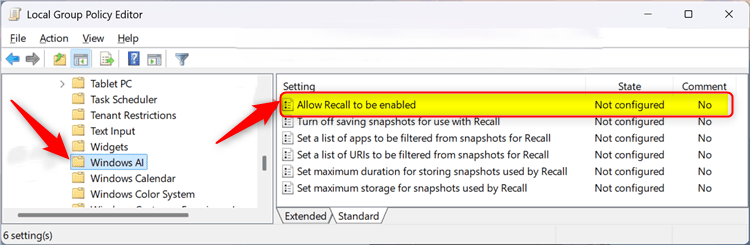
User Configuration > Administrative Templates > Windows Components > Windows AI - On the right side, find and double-click
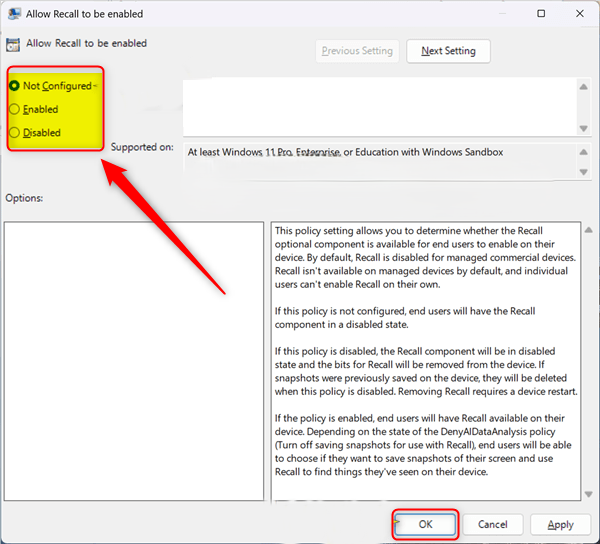
Allow Recall to be enabled. - In the window that opens, choose one of the options:
- Not Configured – Recall will be turned off for users.
- Enabled – Users can turn Recall on their device.
- Disabled – Recall will be completely turned off and removed.
- Click
OKto save your choice. - Restart your computer to make sure the setting works.
Here’s what the setting looks like:
And here are the options you can select:
How to Enable or Disable Recall Using the Windows Registry
If you prefer, you can also turn Recall on or off by editing the Windows Registry. What happens when you edit the Registry? Changes take effect immediately and can affect your system. It’s a good idea to back up your Registry first.
Steps to Enable or Disable Recall via Registry
- Press Windows + R, type
regedit, and press Enter to open the Registry Editor. ⚠️ Requires admin privileges - Go to this path:
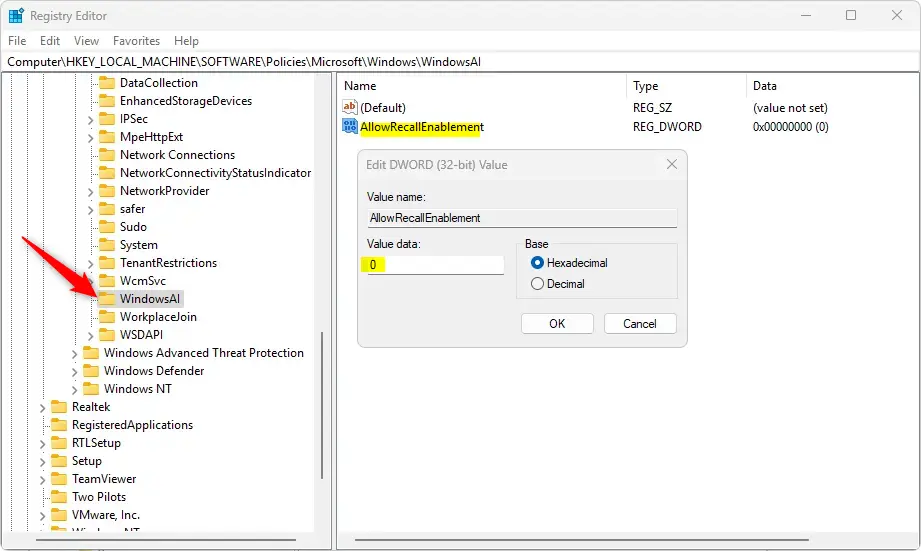
HKEY_LOCAL_MACHINE\SOFTWARE\Policies\Microsoft\Windows\WindowsAI - If you don’t see
WindowsAI, right-click onWindowsfolder, selectNew > Key, and name itWindowsAI. ⚠️ Requires admin privileges - Right-click inside the
WindowsAIfolder, selectNew > DWORD (32-bit) Value, and name itAllowRecallEnablement. ⚠️ Requires admin privileges - Double-click
AllowRecallEnablementand set the value to:1to enable Recall for managed users.0to disable Recall for everyone.
- If you want to allow Recall on Home devices, just delete the
AllowRecallEnablementvalue. ⚠️ Requires admin privileges - Close Registry Editor and restart your PC.
Summary
- Recall saves snapshots of your screen to help you find things faster later.
- You can turn Recall on or off using the Group Policy Editor or Registry Editor.
- On work or school devices, Recall is off by default and needs admin permission to turn on.
- Make sure your Windows 11 is updated to build 26120.2415 or newer to use Recall.
- Want to learn more? Check the official Microsoft page about Recall here.

Leave a Reply