
This article explains how to turn Camera access for apps On or Off in Windows 11.
If your Windows device has a built-in camera or one attached, you can make Teams video calls, take pictures, record videos, and more. Many apps and services may request access to the device’s Camera. However, Windows gives users control over which apps and how apps can use the Camera or webcam.
Access to the Camera can be granted or denied per app or all Windows device apps.
There are three types of cameras that apps and services may have access to, depending on what type of cameras come with or are installed on your device:
- A color camera is used for taking traditional color photos or videos.
- An infrared camera takes a grayscale (black and white) photo or video based on infrared intensity.
- A depth camera can see the shapes of items in front of it and how far they are from the device.
Suppose you are worried about unknown apps using your device’s Camera or webcam without knowing. In that case, the light will turn on so you know when the Camera or webcam is in use.
Restrict or allow apps access to the Camera
As mentioned, Windows allows users to control how apps request or access their device’s Camera.
When your Camera is in use, the light will turn on so you know when the Camera or webcam is in use.
Here are some steps to restrict or allow an app access to the Camera in Windows 11.
First, open the Windows Settings app.
You can do that by clicking on the Start menu and selecting Settings. Or press the keyboard shortcut (Windows key + I) to launch the Settings app.
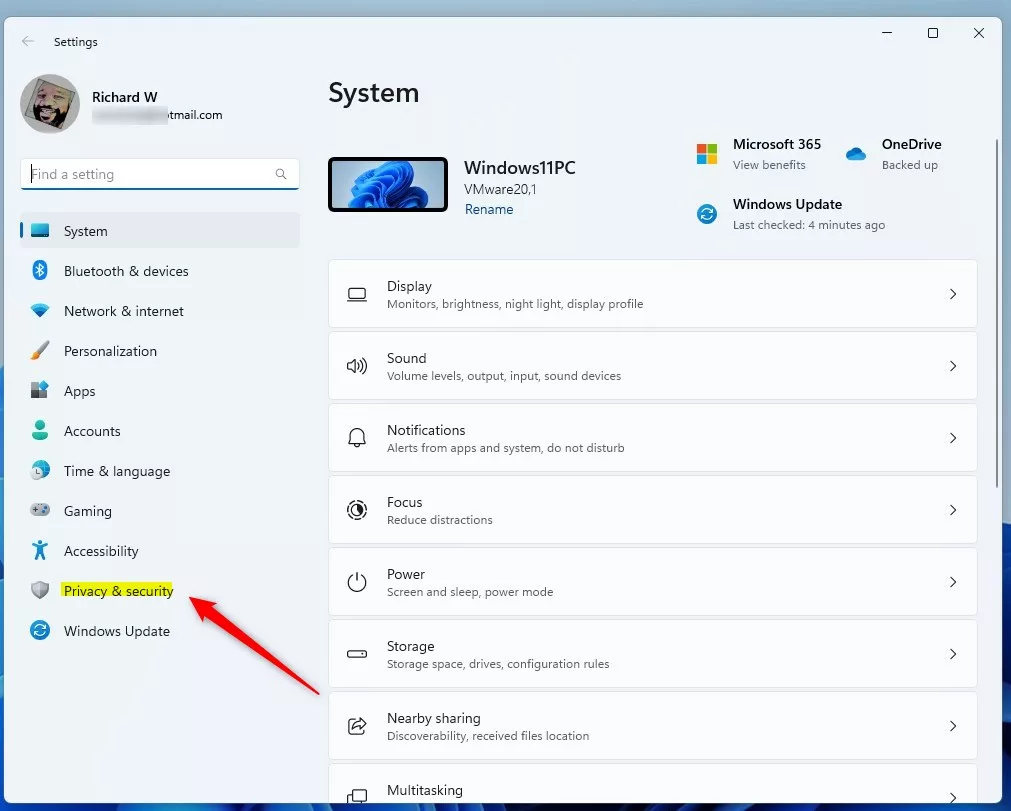
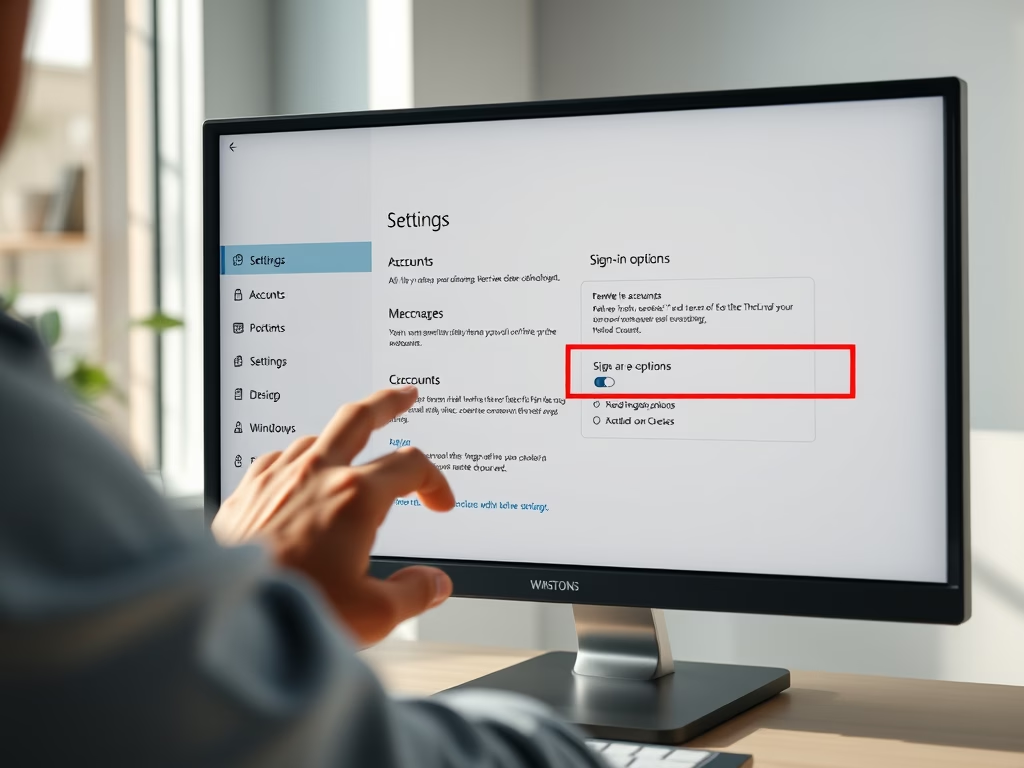
When the Setting app opens, click the Privacy & security button on the left.
Select the Camera tile on the right to expand it.

On the Privacy & security -> Camera setting pane, select the “Camera access” tile.
Then, toggle the switch button to the On position to enable camera access on the device.
To disable camera access, toggle the switch to the Off position.
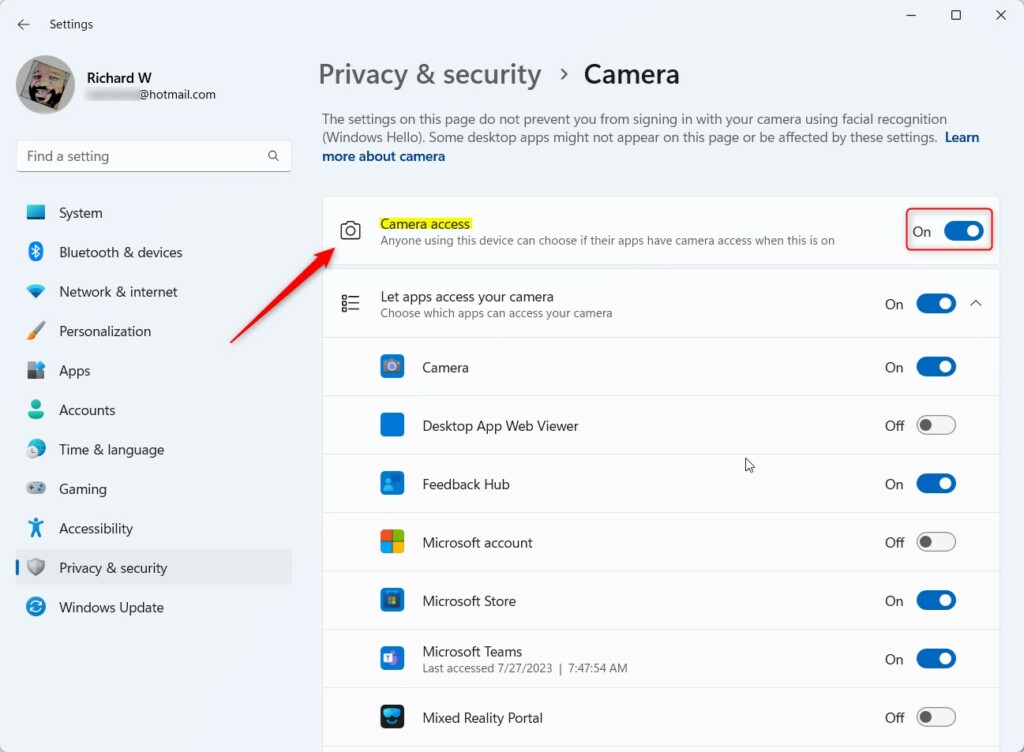
The steps above turn on or off camera access for all apps.
To Selectively deny or allow camera access for individual apps, ensure that Camera access and Let apps access your Camera, and the individual app you wish to allow or deny.
Close the Settings app when you are done.
Allow or deny apps access to the Camera via the Local Group Policy Editor
Controlling app access to the device’s Camera can also be done using the Local Group Policy Editor.
To do that, first, open the Local Group Policy editor app.
In the left pane of Local Group Policy Editor, expand the tree: Computer Configuration -> Administrative Templates -> Windows Components -> App Privacy.
Computer Configuration -> Administrative Templates -> Windows Components -> App Privacy
In the App Privacy details pane on the right, double-click the policy setting “Let Windows app access the camera” to open it.
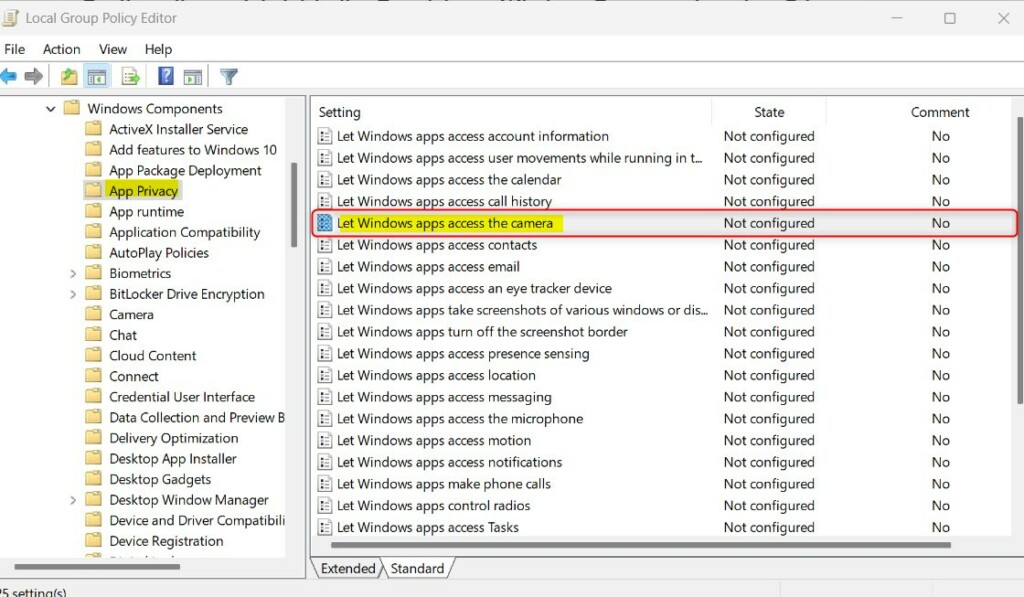
On the setting window, choose one of the options below:
- Not Configured – Same as Disabled. Users can decide whether apps can access the Camera in the Settings app.
- Enabled – When this policy is enabled, you can choose”
Force Allow“or”Force Deny“users changing app access settings to the Camera in the Settings app. - Disabled – Users can decide whether apps can access the Camera in the Settings app.
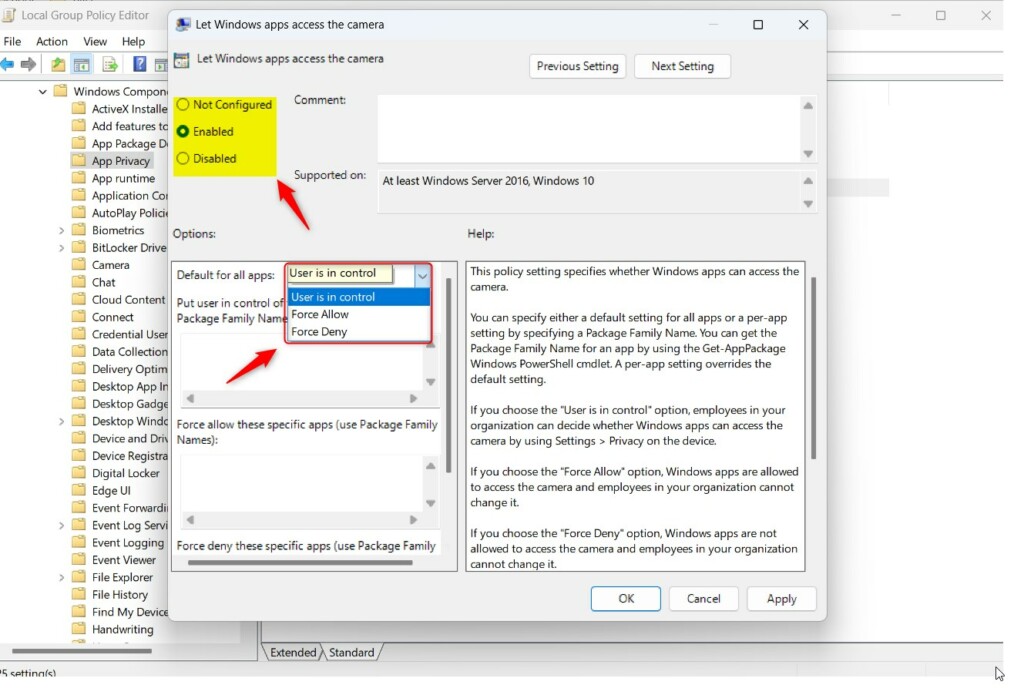
Select OK.
Close Local Group Policy Editor.
Enable or disable Camera access for apps using the Registry Editor
Another way to turn Camera access for apps on or off is to use the Windows Registry editor.
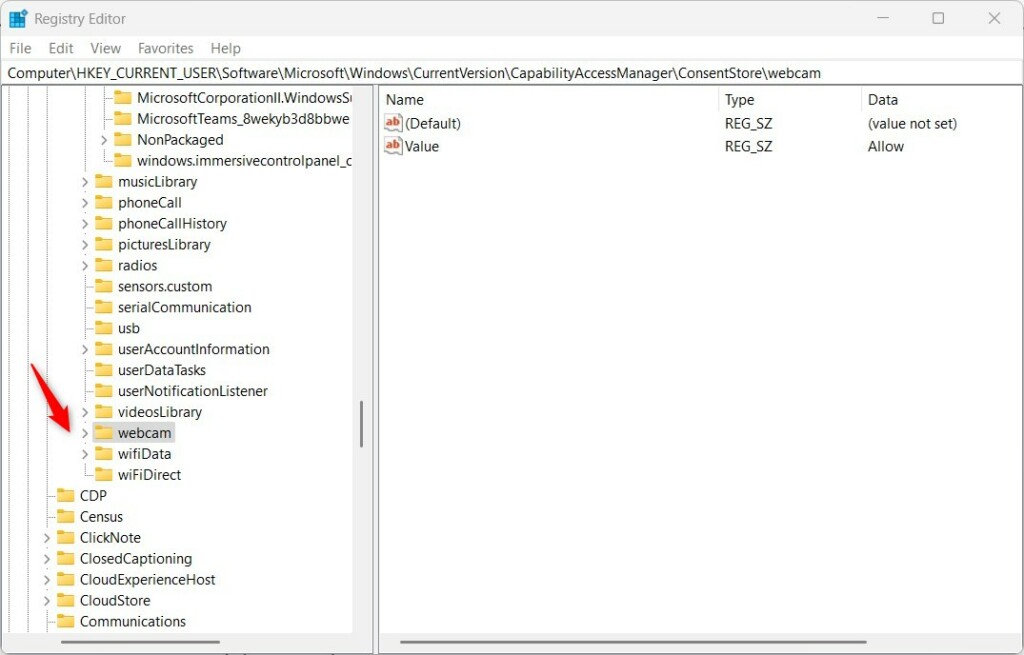
To do that, open the Windows Registry editor and navigate to the folder key below.
Use the HKEY_CURRENT_USER settings to apply this change to your desktop background.
HKEY_LOCAL_MACHINE settings will apply the change to all users on the system.
HKEY_LOCAL_MACHINE\SOFTWARE\Microsoft\Windows\CurrentVersion\CapabilityAccessManager\ConsentStore\webcam
HKEY_CURRENT_USER\Software\Microsoft\Windows\CurrentVersion\CapabilityAccessManager\ConsentStore\webcam
If you don’t see the webcam folder key, right-click on the ConsentStore parent key, then create the subkey (webcam) folder.
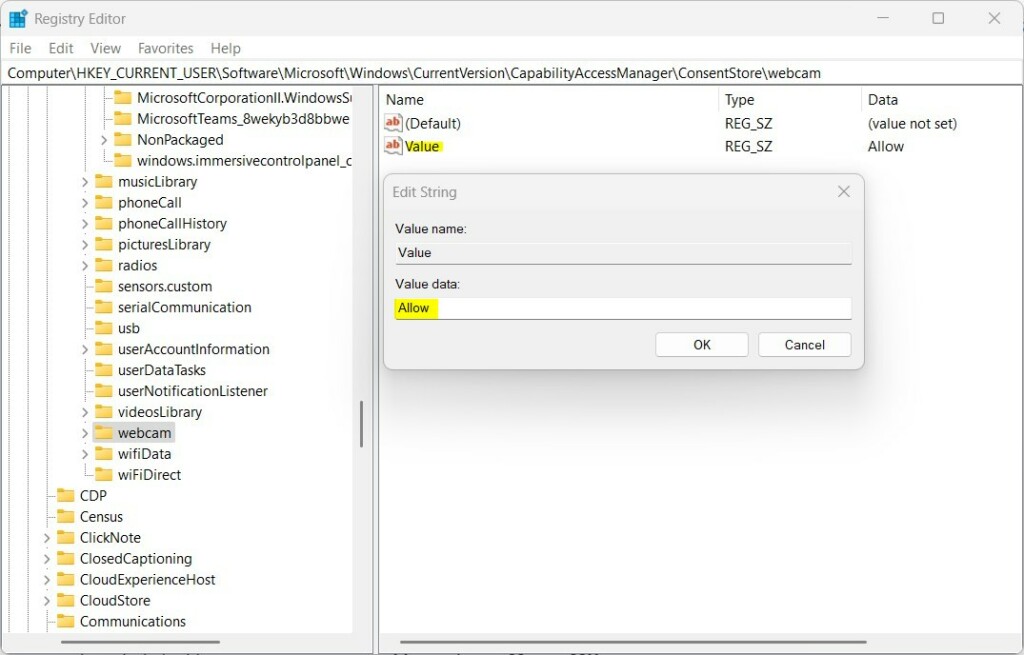
Right-click the webcam folder key’s right pane and select New -> String Value. Type a new item named Value.
Double-click the new item you created (Value) and update the Value data:
- To allow camera access for all apps, type Allow.
- To deny camera access for all apps, type Deny.
Turn Let desktop apps access your Camera On or Off.
If you do not want to disable or enable all app access to the Camera, use the “Let desktop apps access your camera” option.
First, ensure that “Camera access” and “Let apps access your camera” are turned on.
Go to Start -> Settings -> Privacy & security -> Camera and toggle the switch to On.
To turn it off, toggle the switch to Off.

Once turned on, you can selectively allow or deny apps’ access to your device’s Camera.

Turn Let apps access your Camera using the Registry Editor
Another way to turn “Let apps access your camera” is to use the Windows Registry Editor.
Note: You must first ensure that the option above that enables”Camera access“is turned on before continuing below.
Use the HKEY_CURRENT_USER settings to apply this change to your desktop background.
HKEY_LOCAL_MACHINE settings will apply the change to all users on the system.
HKEY_LOCAL_MACHINE\Software\Microsoft\Windows\CurrentVersion\CapabilityAccessManager\ConsentStore\webcam\NonPackaged
HKEY_CURRENT_USER\Software\Microsoft\Windows\CurrentVersion\CapabilityAccessManager\ConsentStore\webcam\NonPackaged
If you don’t see the NonPackaged folder key, right-click on the ConsentStore parent key, then create the subkey (NonPackaged) folder.
Right-click the NonPackaged folder key’s right pane and select New -> String Value. Type a new item named Value.
Double-click the new item you created (Value) and update the Value data:
- To allow apps to access your Camera, type Allow.
- To deny apps accessing your Camera, type Deny.
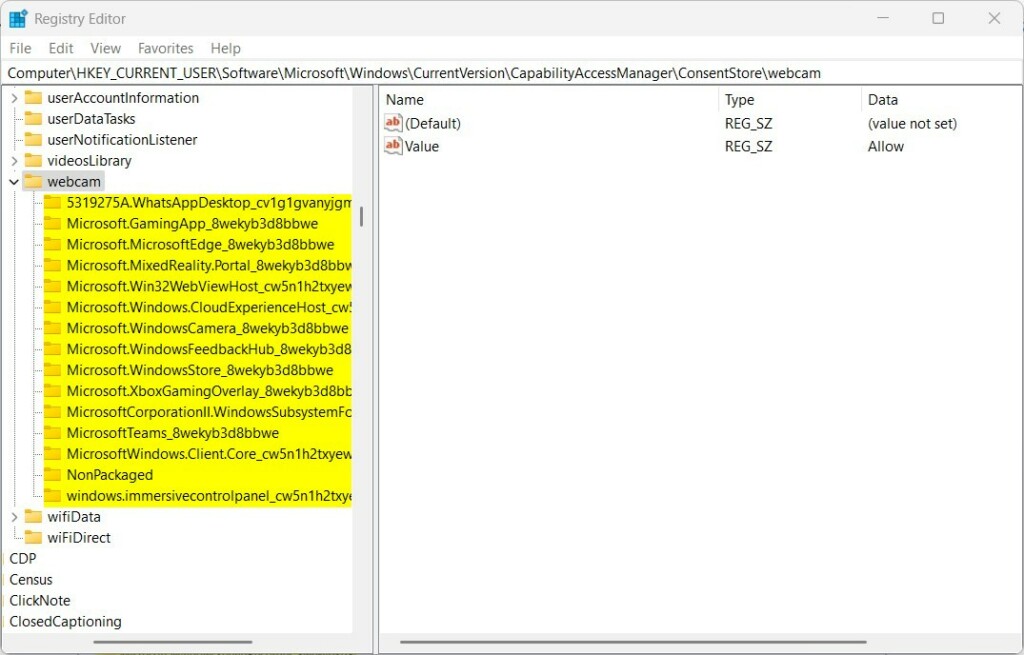
Once enabled, you can selectively allow or deny apps access to the Camera at the registry location below.
HKEY_CURRENT_USER\Software\Microsoft\Windows\CurrentVersion\CapabilityAccessManager\ConsentStore\webcam
That should do it. Restart your computer to apply the changes.
Reference:
Conclusion:
- Users can easily control app access to the camera on Windows 11, allowing or denying camera access for individual or all apps.
- Windows provides multiple methods to manage camera access, including through the Settings app, Local Group Policy Editor, and Registry Editor.
- By following the steps outlined in this post, users can enhance their privacy and security by monitoring and controlling app access to the camera in Windows 11.

Leave a Reply