How to Set up OpenSSH Password Authentication in Ubuntu 26.04

OpenSSH is a tool that lets you control another computer from a distance through a secure connection. On Ubuntu 26.04, the OpenSSH server accepts password logins once the openssh-server package is installed. From a Windows 11 PC, you connect with the built-in ssh command, such as ssh USERNAME@192.0.2.10.
This page covers setup on both machines. The Ubuntu side turns on the server and checks that password logins are allowed. The Windows side uses the ssh command in Command Prompt or PowerShell to connect.
To turn on password logins for SSH on Ubuntu 26.04, install the server with sudo apt install openssh-server, then create /etc/ssh/sshd_config.d/01-password-auth.conf containing PasswordAuthentication yes and restart the ssh service with sudo systemctl restart ssh. From Windows 11, connect with ssh USERNAME@192.0.2.10 using the built-in OpenSSH Client.
What you need before you start
- An Ubuntu machine (physical, virtual or cloud) with a user account that can run
sudo(administrator-level commands). - The Ubuntu machine’s IP address. This article uses 192.0.2.10 as an example.
- A Windows 11 PC on the same network, or with a route to the server.
Password authentication means the server checks who you are by asking for the account password. It works immediately, but it is weaker than SSH keys. Read the security section before you expose a server to the internet.
Install and start the OpenSSH server on Ubuntu
Do this on the Ubuntu machine. Every step that uses sudo requires an account with administrator rights.
Install the package
This installs the SSH server and confirms it is running.
- Open a terminal on the Ubuntu machine.
- Refresh the package list (administrator rights required):Bash / Shell
sudo apt update
- Install the server (administrator rights required):Enter your password when prompted. Confirm with Y if asked.Bash / Shell
sudo apt install openssh-server
- Check that the service is running:The output should showCode
systemctl status ssh
active (running), oractive (listening)on releases that start SSH on demand. Press Q to leave the status view.
Find the server’s IP address
You need this address to connect from Windows. Run this command on the Ubuntu machine:
ip -br address
Find the address next to your active network adapter, such as 192.0.2.10/24. Use only the number before the slash as the IP address. The part after the slash describes the size of the network, so you can ignore it when you connect from Windows.
Allow SSH through the firewall
Skip this section if UFW (Ubuntu's firewall tool) is not enabled. Check with sudo ufw status.
- Allow SSH traffic, which uses TCP port 22 (administrator rights required):Bash / Shell
sudo ufw allow ssh
- Confirm the rule:The list should showBash / Shell
sudo ufw status
22/tcpasALLOW.
Confirm that password authentication is on
Ubuntu normally allows passwords by default, but cloud images and hardened setups often switch them off. This check shows the setting the server is actually using.
Run this on the Ubuntu machine:
sudo sshd -T | grep -i passwordauthentication
passwordauthentication yes means passwords are allowed, so you can move on to connecting. passwordauthentication no means you need the next section.
Turn password authentication on
OpenSSH uses the first value it finds for a setting. Ubuntu reads the files in /etc/ssh/sshd_config.d/ in alphabetical order, so a low-numbered file takes priority over one such as 50-cloud-init.conf. Leave the main file alone when a drop-in file does the job. A drop-in file (a small separate config file that adds to or overrides the main one) is easier to undo.
- Create a new configuration file (administrator rights required):Bash / Shell
sudo nano /etc/ssh/sshd_config.d/01-password-auth.conf
- Type this single line:Code
PasswordAuthentication yes
- Press Ctrl+O, then Enter to save. Press Ctrl+X to exit.
- Test the configuration for mistakes:No output means the syntax is valid.Bash / Shell
sudo sshd -t
- Restart the SSH service so it reads the change (administrator rights required):Bash / Shell
sudo systemctl restart ssh
- Run the check from the previous section again. It should now report
passwordauthentication yes.
If another file or the main sshd_config still overrides your setting, find the conflicting line with sudo grep -ri passwordauthentication /etc/ssh/.
Connect from 🪟 Windows 11
Windows 11 includes the OpenSSH Client, so you need no extra software. You do not need administrator rights on Windows for the connection itself.
Check that the OpenSSH Client is installed
- Right-click Start and select Terminal.
- Type
ssh -Vand press Enter. A version number means the client is ready. - If Windows reports that the command is not recognized, open Settings System Optional features
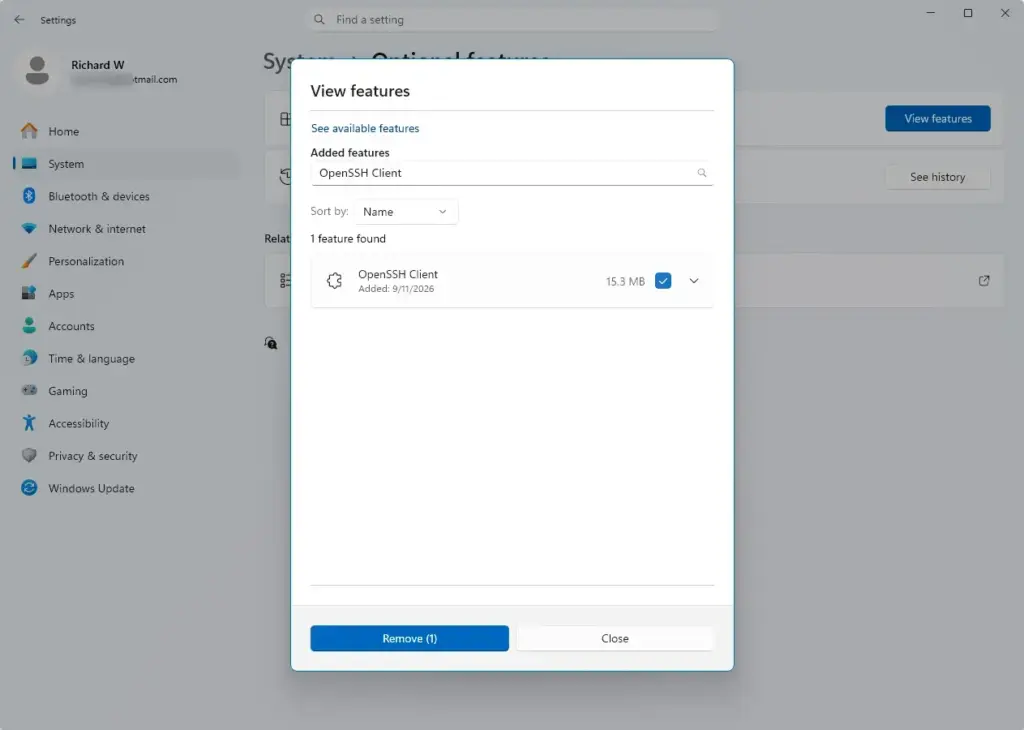
- Select View features next to Add an optional feature.
- Search for OpenSSH Client, tick it, then select Next and Add. This step needs administrator rights.
Log in to the Ubuntu server
- In Terminal, run the command with your Ubuntu username and the server's address:Code
ssh USERNAME@192.0.2.10
- Type yes when Windows asks whether you trust the host's fingerprint (a unique ID for the server). This prompt appears only on the first connection.
- Type the account password and press Enter. No characters appear and the cursor does not move while you type. This is normal.
- Look for the Ubuntu shell prompt, such as
USERNAME@COMPUTER-NAME:~$. It means you are logged in. - Type
exitto close the session.
If the server uses a port other than 22, add -p and the number, for example ssh -p 2222 USERNAME@192.0.2.10.
Fix common connection problems
Connection timed out or refused
- In Terminal on Windows, test whether port 22 is reachable:Code
Test-NetConnection 192.0.2.10 -Port 22
- Check the
TcpTestSucceededline.Falsemeans something blocks the path: a wrong IP address, a UFW rule, a router, or an SSH service that is not running. - On Ubuntu, confirm the service with
systemctl status sshand the firewall withsudo ufw status.
Permission denied
- Retype the password carefully. Keyboard layout differences between Windows and the Ubuntu account can change special characters.
- Check that the username is the Ubuntu account name, not your Windows name.
- On Ubuntu, read the log for the exact reason: Bash / Shell
sudo journalctl -u ssh -n 50
Host key warning after reinstalling the server
Continue only if you know why it changed.
- Remove the old entry:Code
ssh-keygen -R 192.0.2.10
- Connect again and accept the new fingerprint.
Reduce the risk of password logins
Automated bots scan the internet for open SSH ports and try to guess passwords all day and night. If the server is reachable from outside your home or office network, take these precautions:
- Use long, unique passwords on every account that can log in over SSH.
- Block direct root logins by adding
PermitRootLogin noto a file in/etc/ssh/sshd_config.d/, then runsudo sshd -tandsudo systemctl restart ssh. This needs administrator rights. - Keep a second session open while you change SSH settings. If you make a mistake, you can still fix it without being locked out.
- Limit who can reach port 22 with a firewall rule or your router settings.
- Switch to SSH keys when you can, then turn passwords off.
What to do next
/etc/ssh/sshd_config.d/01-password-auth.conf (or set it to PasswordAuthentication no), run sudo sshd -t, and restart the ssh service.Confirm that key-based login works first, or you lock yourself out. Setting up an SSH key pair from Windows 11 with ssh-keygen is the natural next task, and it lets you retire password logins for good.
What is an SSH password?
An SSH password is the account password you type when you log in to a computer over SSH. The remote server checks it against the user account on that machine, so it is usually the same password you use to sign in at that computer. Password logins are convenient, but SSH keys are more secure.
How to set up OpenSSH?
To set up OpenSSH on Ubuntu, install the openssh-server package with sudo apt install openssh-server, then start it with sudo systemctl enable --now ssh. On Windows 11, the ssh command is already built in, so you connect from Command Prompt or PowerShell with ssh USERNAME@IP-ADDRESS. Check that password logins are allowed in the sshd_config file.
How to change Ubuntu password via terminal?
To change your Ubuntu password in the terminal, run passwd. Type your current password, then enter the new one twice. To change another account's password, run sudo passwd USERNAME. Nothing appears on screen while you type, so that is normal.
How to login SSH without password in Ubuntu?
To log in over SSH without a password, create a key pair with ssh-keygen on your Windows PC. Then add the public key to the file ~/.ssh/authorized_keys on the Ubuntu machine. After that, ssh logs in with the key and skips the password prompt. Protect the private key file, since anyone who has it can log in.
Was this guide helpful?

About the Author
Richard
Tech Writer, IT Professional
Richard is a writer at Geek Rewind who turns complex IT tasks into clear, step-by-step guides. He draws on years of hands-on experience in system administration and enterprise IT operations, focusing on Windows, Linux and WordPress: the problems people actually run into, and the fixes that work. His server and WordPress guides come from systems he runs himself. Richard builds and maintains the platform behind Geek Rewind, from its Ubuntu servers and Nginx configuration to its custom WordPress plugins. Many new tutorials start with readers' questions, and he's always glad to answer them in the comments.

No comments yet — be the first to share your thoughts!