How to Remove a Language in Windows 11
You remove an unwanted language in Windows 11 by uninstalling its language pack through the Settings app.
A language pack in Windows 11 brings display language, typing, and speech recognition for a specific language.
Deleting a language pack prevents it from appearing in your system’s options and frees up disk space. This is especially useful if you’ve installed multiple language packs.
For example, if you no longer need French for typing or display, you can fully uninstall it.
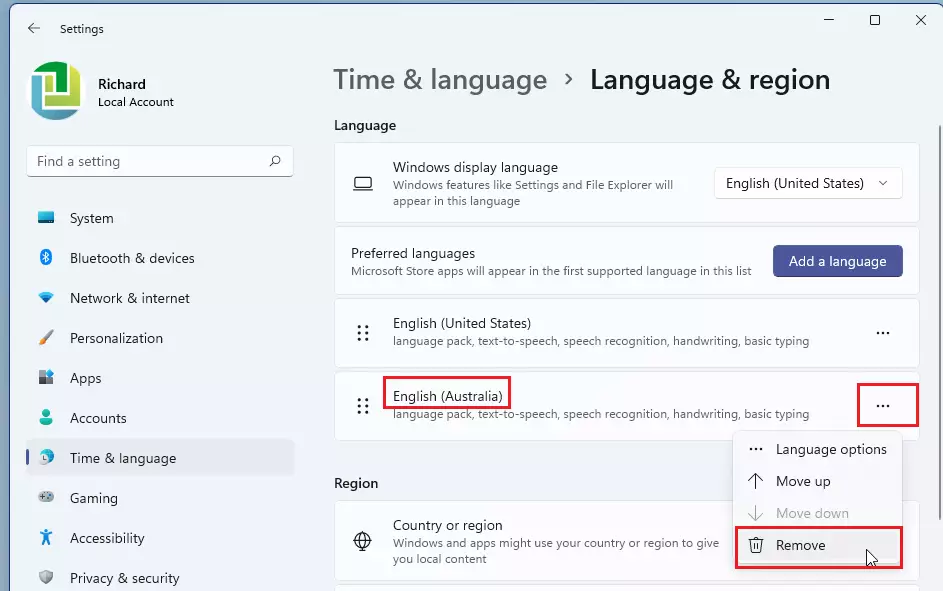
Uninstall a language pack via Settings > Time & language > Language & region. Click the three dots next to the unwanted language and select Remove. You must change your display language first if it’s the one you wish to remove.
What Does Adding a Language Do?
Adding a new language in Windows 11 lets you change how your computer looks and sounds, making it easier to use if you speak multiple languages.
- Language pack: Changes Windows menus and messages to that language.
- Windows Display Language: Makes Windows apps and settings show in that language.
- Text-to-speech: Lets your PC read text out loud.
- Speech recognition: Lets you use your voice to control your PC.
- Handwriting: Recognizes your handwriting on touch devices.
- Keyboard: Adds the keyboard for that language.
- Basic typing: Includes spell check and dictionaries.
- Optical character recognition (OCR): Lets you select text from images.
How to Remove a Language Using Settings
You can easily remove a language from Windows 11 using the Settings app by going to Time & language, then Language & region.- Open Settings: Press Windows key + I on your keyboard.
- On the left side, click Time & language. Then click Language & region on the right.
- Under Preferred languages, find the language you want to remove.
- Click the three dots (…) next to the language and select Remove.
- If the language is your current display language, you won’t be able to remove it. Change your display language first.
- Confirm by clicking Yes when asked.
- Close Settings when done.
How to Remove a Language Using PowerShell
For those comfortable with commands, removing a language in Windows 11 is also possible using PowerShell, which offers a more advanced way to manage installed languages.
- Open Windows Terminal by right-clicking the Start button and choosing it. Select Windows PowerShell as the tab.
- Type
Get-WinUserLanguageListand press Enter. This shows all languages installed on your account. - Find the LanguageTag for the language you want to remove. For example, “en-GB” is English (United Kingdom).
- Type
$LangList = Get-WinUserLanguageListand press Enter. - Type this command, replacing LanguageTag with the tag you found:
$MarkedLang = $LangList | Where LanguageTag -eq "LanguageTag"
- Type
$LangList.Remove($MarkedLang)and press Enter. - Finally, type
Set-WinUserLanguageList $LangList -Forceand press Enter. - You can now close PowerShell.
Things to Remember
- You can remove languages either through Settings or PowerShell.
- You cannot remove a language that is currently your Windows display language. Change your display language first.
- Removing a language also deletes its extra features like text-to-speech and handwriting.
- Always confirm the removal when prompted to avoid mistakes.
Need More Help?
Check out these official Microsoft guides:
- Manage language and keyboard settings in Windows 11
- Remove unwanted keyboard or language from Windows 11
- PowerShell command for managing language list
By following these steps, you can keep your Windows 11 language settings organized just the way you like them!
“`
How do I completely remove a language from 🪟 Windows 11?
Remove a language pack To remove a currently installed language pack: Select Start and then select Settings > Time & language > Language. In the Language window, under Preferred languages, select the language that needs to be removed and then select the Remove button.
How do I remove multi language?
And click on the time. And language option here and it will bring up for this time. And language settings for you. So go and click onto the language and region.
Was this guide helpful?

About the Author
Richard
Tech Writer, IT Professional
Richard, a writer for Geek Rewind, is a tech enthusiast who loves breaking down complex IT topics into simple, easy-to-understand ideas. With years of hands-on experience in system administration and enterprise IT operations, he’s developed a knack for offering practical tips and solutions. Richard aims to make technology more accessible and actionable. He's deeply committed to the Geek Rewind community, always ready to answer questions and engage in discussions.

No comments yet — be the first to share your thoughts!