How to Keep Notification Center and Quick Settings Always Open in Windows 11
Want to keep the Notification Center and Quick Settings open on your Windows 11 screen until you’re ready to close them? This guide shows you how.
Edit the Windows Registry by creating a new DWORD (32-bit) Value named DisableLightDismiss in the Launcher key. Set its Value data to 1 and restart your PC.
What Are Notification Center and Quick Settings?
The Notification Center in Windows 11 is where you see all your alerts and messages, while Quick Settings lets you quickly adjust common settings like Wi-Fi and volume.
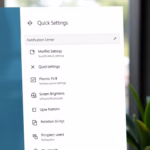
Quick Settings gives you access to important settings like volume, Wi-Fi, brightness, Bluetooth, and more. Open it by pressing ⊞ Win+A or clicking the network, sound, or battery icons in the taskbar corner.
What Happens Normally?
Normally, both Notification Center and Quick Settings close automatically when you click or tap anywhere else on the screen.
How to Make Them Stay Open Until You Close Them
To change this, you need to make a modification in the Windows Registry. This involves editing system settings, so please follow the steps with care.
Note: You need administrator privileges on your PC to do this.
Step 1Backup Your Registry (Important!)
Before making any changes, it’s a good idea to backup your registry or create a System Restore point. This will help you fix things if anything goes wrong.
Step 2Open Registry Editor
Press ⊞ Win+R, type regedit, and press Enter. If prompted, click Yes to permit the changes.
Alternatively, follow this guide to open it securely: How to Open Windows Registry Editor
Step 3Go to the Key Location
In the Registry Editor window, use the left sidebar to navigate to this folder:
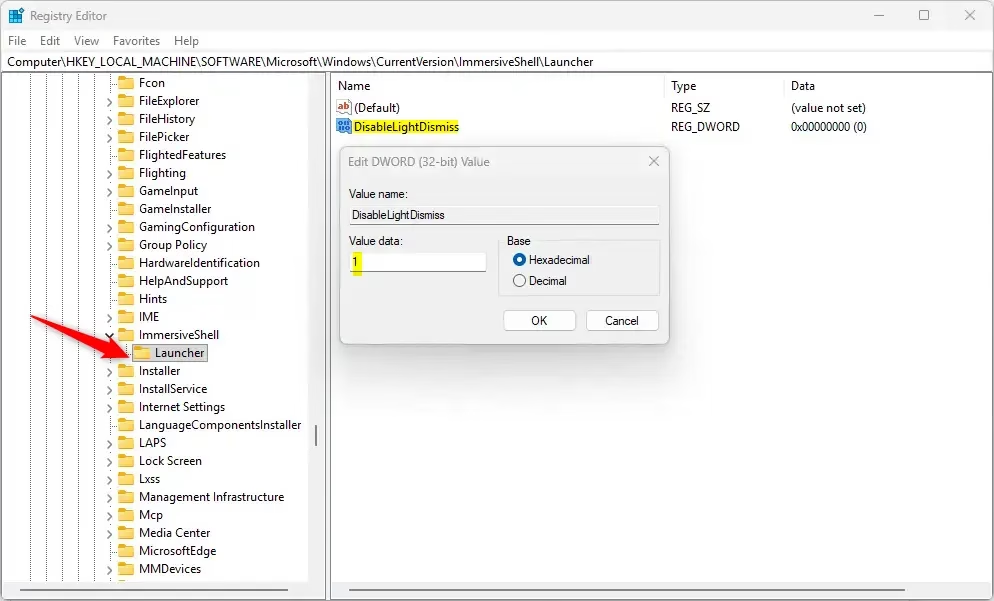
Computer\HKEY_LOCAL_MACHINE\SOFTWARE\Microsoft\Windows\CurrentVersion\ImmersiveShell\Launcher
Step 4Create a New Value
- Right-click on the Launcher folder.
- Choose New > DWORD (32-bit) Value.
- Name the new value:
DisableLightDismiss
Step 5Change the Value
- Double-click on
DisableLightDismiss. - Choose Decimal under Base.
- Type
1in the Value data box. - Click OK.
Step 6 Restart Your PC
Close Registry Editor, then restart your computer for the changes to take effect.
How to Undo This Change
If you want to revert to the default behavior where Notification Center and Quick Settings close automatically, here’s how:
- Open Registry Editor again.
- Go back to the Launcher folder.
- Right-click the
DisableLightDismissvalue and choose Delete. - Restart your PC.
Summary
- Keep Notifications and Settings Always Visible: No more closing when you accidentally click away.
- Better Workflow: Access your notifications and settings easily while working.
- Easy to Change: Just one registry setting controls it.
- Be Careful: Always back up before editing the Registry.
- Reversible: You can undo the change anytime.
Keeping the Notification Center and Quick Settings open means you won’t lose your place when you click away, making your workflow smoother and giving you faster access to important alerts and settings.
How do you change to tap to open the notification instead of having the open button come up after tapping?
To change notification behavior on your phone, navigate to Settings, then Accessibility. Tap on Touch, scroll down, and select Back tap. From there, choose Double tap.
How to make notifications show on always on display?
Open your phone’s Settings app and go to Notifications. Under “Lock screen,” tap Notifications on lock screen or On lock screen, then select Show alerting and silent notifications.
Was this guide helpful?

About the Author
Richard
Tech Writer, IT Professional
Richard, a writer for Geek Rewind, is a tech enthusiast who loves breaking down complex IT topics into simple, easy-to-understand ideas. With years of hands-on experience in system administration and enterprise IT operations, he’s developed a knack for offering practical tips and solutions. Richard aims to make technology more accessible and actionable. He's deeply committed to the Geek Rewind community, always ready to answer questions and engage in discussions.
No comments yet — be the first to share your thoughts!