How to Install WordPress with WSL on Windows 11


Installing WordPress with WSL on Windows 11 lets you run a complete Linux website server directly on your PC. WSL, which stands for Windows Subsystem for Linux, is a built-in feature that puts a real Linux environment inside Windows so you can use standard server tools without installing a separate operating system or dual-booting.
Microsoft first launched WSL in 2016, and the modern WSL2 version uses a real Linux kernel to make running database software like MySQL and web servers much faster and more reliable.
Install Windows Subsystem for Linux by opening an administrator Command Prompt and running ‘wsl –install’, then reboot your computer. Next, install a Linux distribution like Ubuntu using ‘wsl –install -d ubuntu-20.04’.
Install Windows Subsystem for Linux in 🪟 Windows 11
Installing the Windows Subsystem for Linux (WSL) on Windows 11 lets you run Linux tools right on your computer.
Next, right-click the Command Prompt app and choose to Run as administrator.
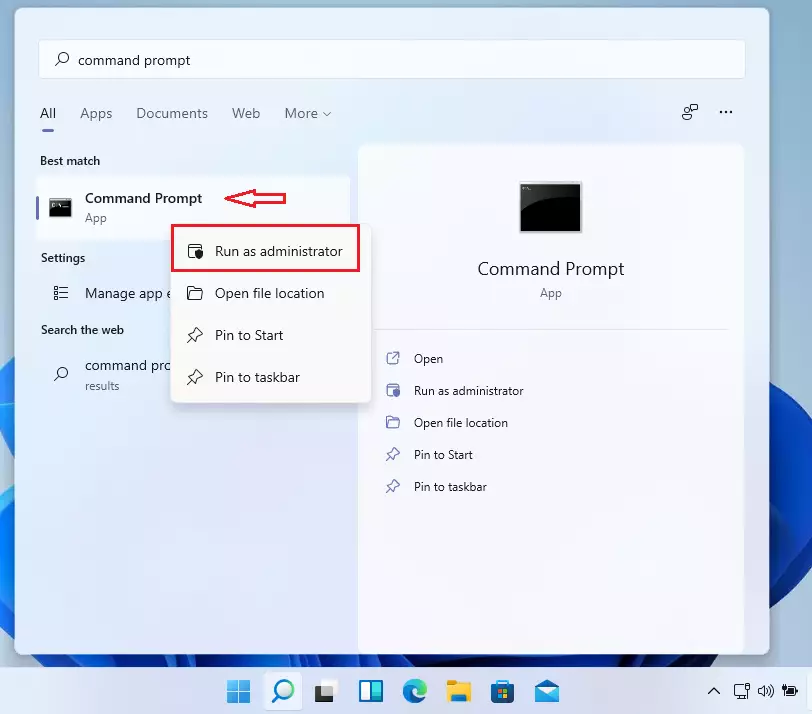
When the console opens, run the commands below to install Windows Subsystem for Linux (WSL):
wsl --install
Wait for WSL to be installed.
After installing, you should get a success message similar to the lines below:
Installing: Virtual Machine Platform
Virtual Machine Platform has been installed.
Installing: Windows Subsystem for Linux
Windows Subsystem for Linux has been installed.
Downloading: WSL Kernel
Installing: WSL Kernel
WSL Kernel has been installed.
Downloading: GUI App Support
Installing: GUI App Support
GUI App Support has been installed.
Downloading: Ubuntu
The requested operation is successful. Changes will not be effective until the system is rebooted.
Restart your computer.
WSL should be installed and ready to use. When you want to update, simply run the commands below:
wsl --update
Install Specific Linux distro on 🪟 Windows 11
Now that WSL is installed, you can install your own Linux distro. To list the available distributions to install, simply run the commands below:
wsl --list --online
You should then see all available distributions that can be installed on WSL.
NAME            FRIENDLY NAME
Ubuntu          Ubuntu
Debian          Debian GNU/Linux
kali-linux      Kali Linux Rolling
openSUSE-42     openSUSE Leap 42
SLES-12         SUSE Linux Enterprise Server v12
Ubuntu-16.04    Ubuntu 16.04 LTS
Ubuntu-18.04    Ubuntu 18.04 LTS
Ubuntu-20.04    Ubuntu 20.04 LTS
To install a Linux distribution from the list above, simply run the commands below using the distribution name. For example, to install Ubuntu 20.04, run the commands below:
wsl --install -d ubuntu-20.04You should then get a message that the distribution is installed.
Downloading: Ubuntu 20.04 LTS
Installing: Ubuntu 20.04 LTS
Ubuntu 20.04 LTS has been installed.
Launching Ubuntu 20.04 LTS.
After installing, you should get a Ubuntu command console with setup details.
Installing, this may take a few minutes.
Please create a default UNIX user account. The username does not need to match your Windows username.
For more information visit: https://aka.ms/wslusers
Enter new UNIX username: Richard
New password:
Retype new password:
passwd: password updated successfully
Installation successful!
To run a command as administrator (user "root"), use "sudo <command>".
See "man sudo_root" for details.

Welcome to Ubuntu 20.04 LTS (GNU/Linux 4.4.0-22000-Microsoft x86_64)
Some troubleshooting commands to run when you run into issues.
wsl --set-default-version 1
bcdedit /set hypervisorlaunchtype auto start
Now that Ubuntu Linux is installed and ready, continue below to install the LEMP server to run WordPress. First, install the Nginx HTTP Server.
Install Nginx HTTP Server
WordPress needs a web server to work, and Nginx is a great option for your Ubuntu setup inside WSL.
To install Nginx on Ubuntu, run the commands below:
sudo apt update
sudo apt install nginx
After installing Nginx, the commands below can be used to stop and start Nginx services.
sudo service nginx stop
sudo service nginx start
To test whether Nginx is installed and functioning, open your web browser and browse to the server's IP address or hostname.
http://localhost
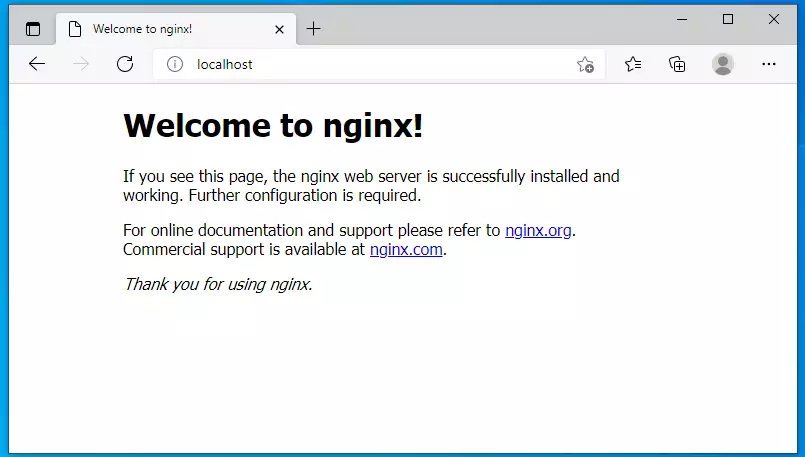
If you see the above page in your browser, Nginx works as expected.
Install MariaDB Server
WordPress stores all your website's content in a database, and MariaDB is a popular, free choice for this job on Ubuntu in WSL.
The MariaDB database server, an open-source option for WordPress, is fast and secure. MariaDB is the default server for approximately 95% of Linux servers.
To install MariaDB, run the commands below:
sudo apt install mariadb-server mariadb-client
After installing MariaDB, the commands below can stop and start the service and enable it to start when the server boots.
sudo service mysql stop
sudo service mysql start
sudo mysql_secure_installation
When prompted, answer the questions below by following the guide.
- Enter current password for root (enter for none): Just press the Enter
- Set root password? [Y/n]: Y
- New password: Enter password
- Re-enter new password: Repeat password
- Remove anonymous users? [Y/n]: Y
- Disallow root login remotely? [Y/n]: Y
- Remove test database and access to it? [Y/n]: Y
- Reload privilege tables now? [Y/n]: Y
To verify and validate that MariaDB is installed and working, log in to the database console using the commands below:
sudo mysql -u root -p
Type the root password when prompted.
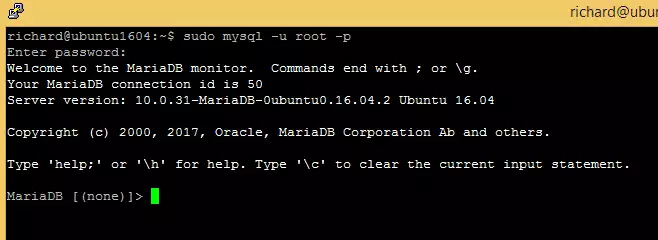
The server was successfully installed if you see a similar screen.
Install PHP and Related Modules
WordPress is built using PHP, so you need to install PHP and its special add-ons for it to work right on your WSL system.
sudo apt install php-fpm php-common php-mysql php-gmp php-curl php-intl php-mbstring php-xmlrpc php-gd php-xml php-cli php-zip
After installing PHP, configure some basic settings required for WordPress to function properly.
sudo nano /etc/php/7.4/fpm/php.iniBelow are good settings to configure for most WordPress websites.
file_uploads = On
allow_url_fopen = On
short_open_tag = On
memory_limit = 256M
cgi.fix_pathinfo = 0
upload_max_filesize = 100M
max_execution_time = 360
date.timezone = America/Chicago
That should get PHP 7.4 installed with some basic settings to allow WordPress to function.
After setting up PHP, the command below can be used to stop and start PHP7.4 services.
sudo service php7.4-fpm stop
sudo service php7.4-fpm start
Create WordPress Database
Now that your servers are set up, you can create the database WordPress will use to store all your site's information.
Login to the MariaDB database console using the commands below:
sudo mysql -u root -p
Then, create a database called wpdb
CREATE DATABASE wpdb;Next, create a database user called wpdbuser and set a password
CREATE USER 'wpdbuser'@'localhost' IDENTIFIED BY 'new_password_here';
Then, grant the user full access to the database.
GRANT ALL ON wpdb.* TO 'wpdbuser'@'localhost' WITH GRANT OPTION;
Finally, save your changes and exit.
FLUSH PRIVILEGES;
EXIT;
Download WordPress
You can now download the newest WordPress version and put it in a spot your web server can easily reach.
cd /tmp
wget https://wordpress.org/latest.tar.gz
tar -xvzf latest.tar.gz
sudo mv wordpress /var/www/wordpress
Then, run the command below to allow the www-data user to own the WordPress directory.
sudo chown -R www-data:www-data /var/www/wordpress/
sudo chmod -R 755 /var/www/wordpress/
Configure Nginx VirtualHost
To get your WordPress site showing up online, you need to tell Nginx how to handle visitor requests by setting up a VirtualHost file.
Run the commands below to create a new VirtualHost file called WordPress in the /etc/nginx/sites-available/ directory.
sudo nano /etc/nginx/sites-available/wordpress
Below is a very good configuration setting for most WordPress sites on the Nginx server. This configuration should work great.
Copy the content below and save it into the file created above.
server {
    listen 80;
    listen [::]:80;
    root /var/www/wordpress;
    index  index.php index.html index.htm;
    server_name  example.com www.example.com;

    client_max_body_size 100M;
    autoindex off;

    location / {
        try_files $uri $uri/ /index.php?$args;
    }

    location ~ .php$ {
         include snippets/fastcgi-php.conf;
         fastcgi_pass unix:/var/run/php/php7.4-fpm.sock;
         fastcgi_param SCRIPT_FILENAME $document_root$fastcgi_script_name;
         include fastcgi_params;
    }
}
Save the file and exit.
After saving the file above, run the commands below to enable the new site, then restart the Nginx server.
sudo ln -s /etc/nginx/sites-available/wordpress /etc/nginx/sites-enabled/
sudo service nginx restart
At this stage, WordPress is ready and can be launched by going to the server's IP or hostname.
http://example.com
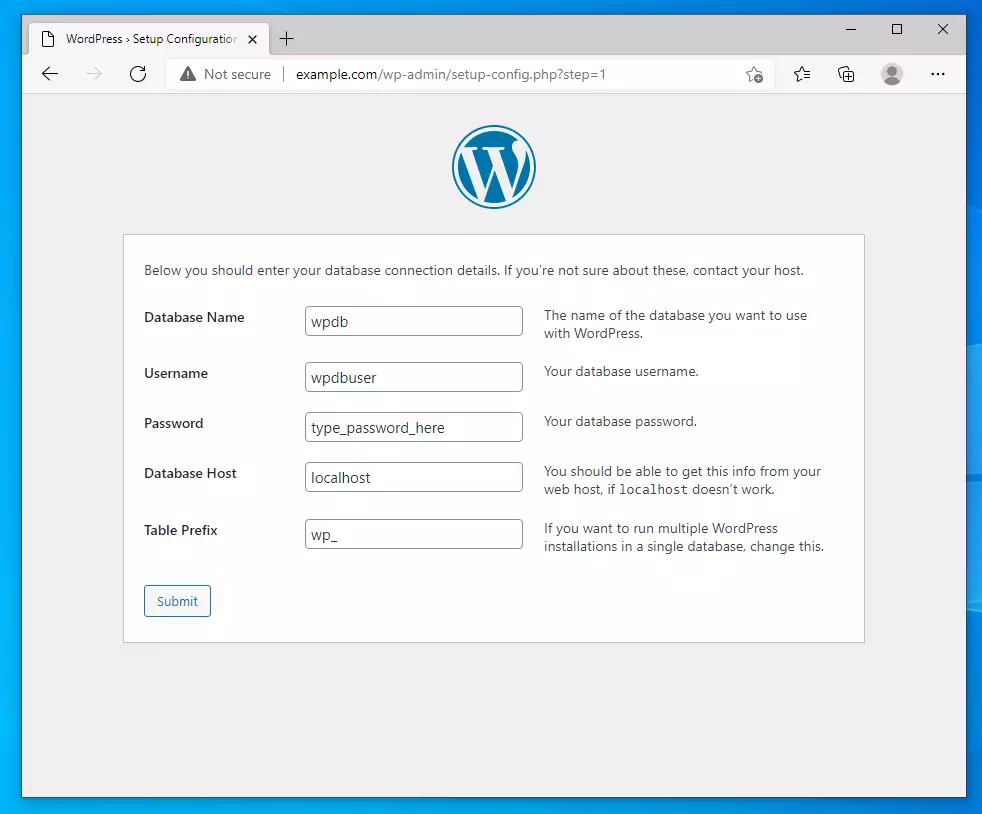
That should bring up the WordPress setup wizard.
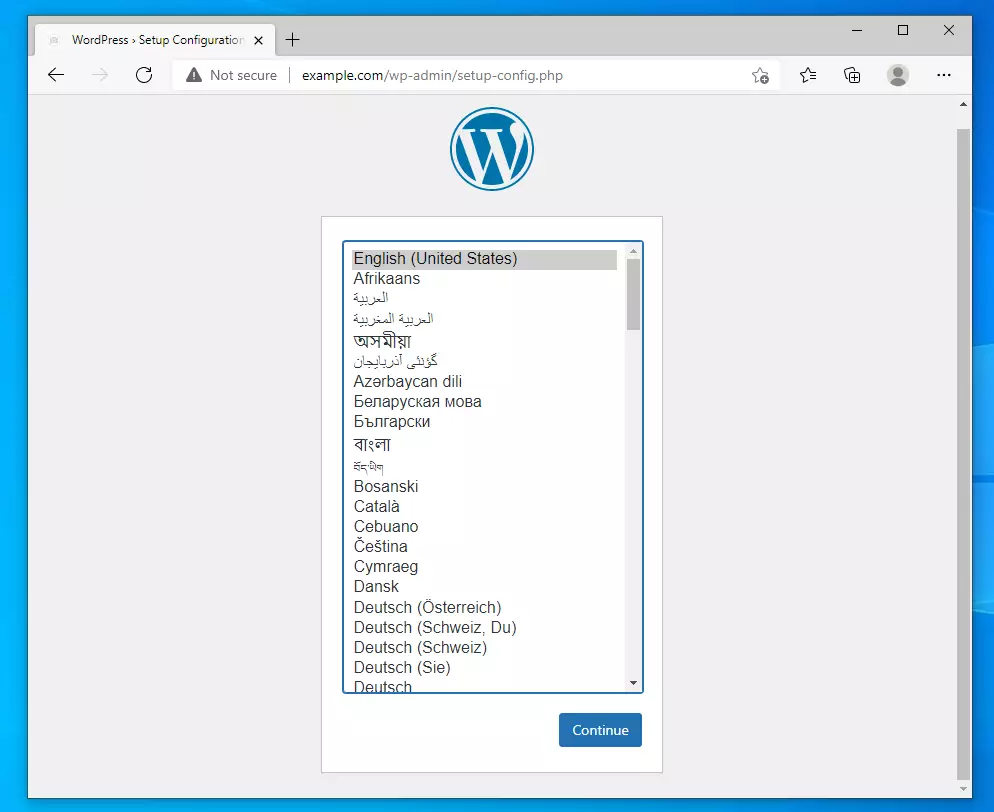
Type in the database connection and continue.
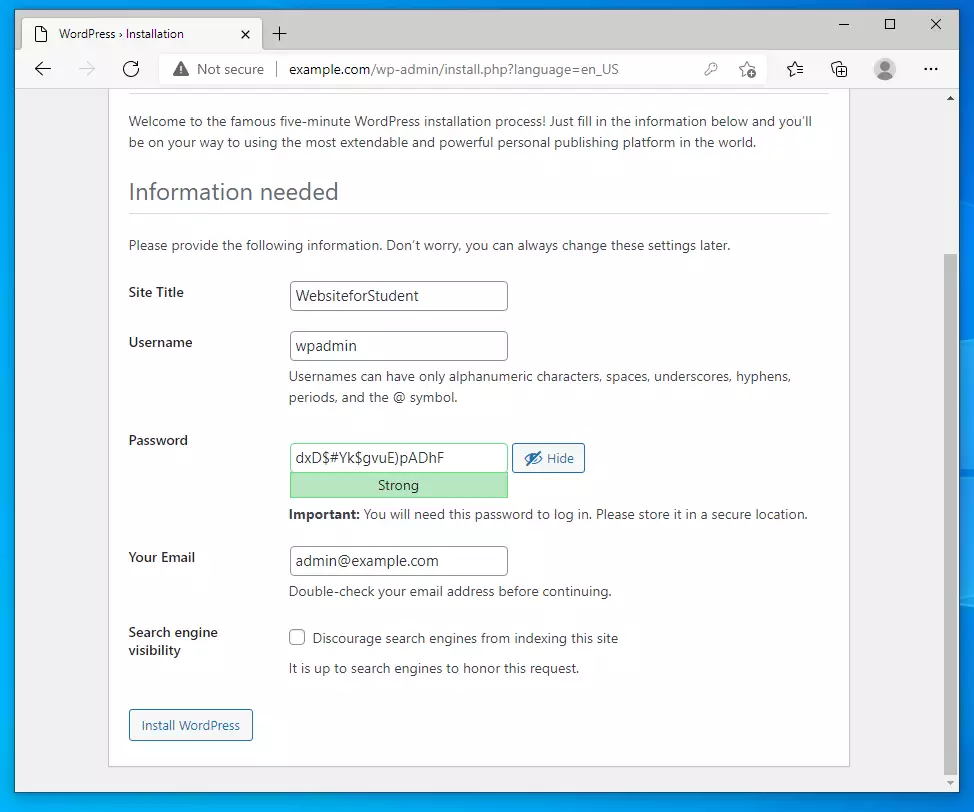
Create a WordPress admin account and password, then click Install WordPress.
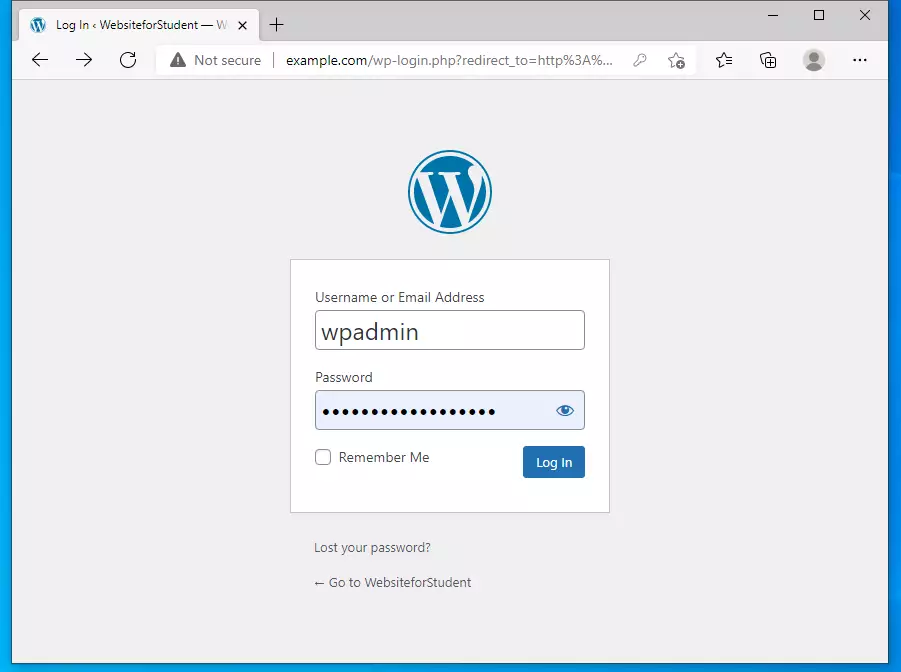
Log in with the account above, and you're done.
That's it!
Conclusion:
This post showed you how to install WSL 2 on Windows 11, install Ubuntu, and run WordPress. If you find any error, please report it in the comment form below.
Was this guide helpful?

About the Author
Richard
Tech Writer, IT Professional
Richard, a writer for Geek Rewind, is a tech enthusiast who loves breaking down complex IT topics into simple, easy-to-understand ideas. With years of hands-on experience in system administration and enterprise IT operations, he’s developed a knack for offering practical tips and solutions. Richard aims to make technology more accessible and actionable. He's deeply committed to the Geek Rewind community, always ready to answer questions and engage in discussions.



Thanks for awesome guide. I managed to install with PHP 8.0.
Also if somebody stuck with opening example.com to external site, you must edit windows host file and add these two lines to the bottom.
127.0.0.1 example.com
127.0.0.1 http://www.example.com
according to this guide
https://geekrewind.com/how-to-edit-windows-11-hosts-file/
You cannot not use example.com with IP 127.0.0.1 externally. You can only view it from the same machine.
Yes, unless you do not assign 127.0.0.1 to example.com in Windows host file.
Great, it worked!
Do not forget to edit the hosts file in windows
Hello,
I’ve followed these instructions perfection but getting an error “502 Gateway Error” when loading “example.com”. Do you have any suggestions? Tried all the obvious steps (ie., clearing cache, checking installations are correct, etc). Any thoughts on the next steps?
Hi,
WSL networking has improved since this article. However, there are some checks you need to perform after installing WordPress.
Add your domain name (example.com) in the hosts file on your Windows machine.
Read this post below to learn how to edit your Windows hosts file.
https://geekrewind.com/how-to-edit-windows-11-hosts-file/
Confirm that the PHP-FPM version is referenced correctly in the Nginx config file.
fastcgi_pass unix:/var/run/php/php7.4-fpm.sock;
If a different version of PHP is installed, ensure it’s used in the config file.
Always start services for good measures.
sudo service nginx startsudo service php7.4-fpm start
sudo service mariadb start
Hope this helps.
Thanks
Finally after 5 days of struggling and trying 5 different instructions I have WP. Only this instruction worked.
The only thing missing is what to do after rebooting the PC, how to make http://www.example.com work again
Thank you very much
I’m already a programmer :-)))))))