This brief tutorial shows students and new users how to install the Jira project management platform on Ubuntu 18.04 | 16.04 servers.
Jira is a proprietary project management software from Atlassian that allows bug tracking and agile project management. It has a user-friendly web interface allows users to create stories and issues and plan and distribute tasks across teams and departments.
Whether you’re creating a personal or company setting up a self-hosted project management platform, Jira can help you build and manage your content on every device with its intuitive and powerful user and admin dashboard.
For more about Jira, please check its homepage.
When you’re ready to install Jira on Ubuntu, follow the steps below:
Update Ubuntu
Before installing Jira software on Ubuntu, you must first prepare Ubuntu and update installed packages.
To do that, run the commands below:
sudo apt update
sudo apt dist-upgrade
Continue below to install and set up Jira.
Install MariaDB Database Server
Jira also needs a database server to store its content. And MariaDB database server is a great place to start when looking at open-source database servers to use with Jira.
To install MariaDB, run the commands below.
sudo apt install mariadb-server mariadb-client
After installing MariaDB, the commands below can stop, start, and enable the service to start when the server boots.
Run these on Ubuntu
sudo systemctl stop mariadb.service
sudo systemctl start mariadb.service
sudo systemctl enable mariadb.service
After that, run the commands below to secure the MariaDB server by creating a root password and disallowing remote root access.
sudo mysql_secure_installation
When prompted, answer the questions below by following the guide.
- Enter current password for root (enter for none): Just press the Enter
- Set root password? [Y/n]: Y
- New password: Enter password
- Re-enter new password: Repeat password
- Remove anonymous users? [Y/n]: Y
- Disallow root login remotely? [Y/n]: Y
- Remove test database and access to it? [Y/n]: Y
- Reload privilege tables now? [Y/n]: Y
Restart MariaDB server
To test if MariaDB is installed, type the commands below to log into the MariaDB server
sudo systemctl status mariadb.service
You should see similar messages below:
mariadb.service - MariaDB 10.1.44 database server
   Loaded: loaded (/lib/systemd/system/mariadb.service; enabled; vendor preset: enabled)
   Active: active (running) since Thu 2020-03-05 12:14:17 CST; 1min 15s ago
     Docs: man:mysqld(8)
           https://mariadb.com/kb/en/library/systemd/
 Main PID: 16048 (mysqld)
   Status: "Taking your SQL requests now."
    Tasks: 27 (limit: 4666)
   CGroup: /system.slice/mariadb.service
           └─16048 /usr/sbin/mysqld

Mar 05 12:14:17 ubuntu1804 /etc/mysql/debian-start[16081]: information_schema
Mar 05 12:14:17 ubuntu1804 /etc/mysql/debian-start[16081]: mysql
Mar 05 12:14:17 ubuntu1804 /etc/mysql/debian-start[16081]: performance_schema
That’s how to install MariaDB on Ubuntu.
Create Jira Database
Now that MariaDB is installed, create a blank Jira database.
Run the commands below to log on to MariaDB. When prompted for a password, type the root password you created above.
sudo mysql -u root -p
Then, create a database called jira
CREATE DATABASE jira CHARACTER SET utf8mb4 COLLATE utf8mb4_bin;
Create a database user called jirauser with a new password
CREATE USER 'jirauser'@'localhost' IDENTIFIED BY 'new_password_here';
Then grant the user full access to the jira database.
GRANT ALL ON jira.* TO 'jirauser'@'localhost' WITH GRANT OPTION;
Finally, save your changes and exit.
FLUSH PRIVILEGES;
EXIT;
Next, run the commands below to open the MariaDB configuration file.
sudo nano /etc/mysql/mariadb.conf.d/50-server.cnf
Copy and paste the highlighted lines under [mysqld]
# this is only for the mysqld standalone daemon
[mysqld]

#
# * Basic Settings
#
user            = mysql
pid-file        = /var/run/mysqld/mysqld.pid
socket          = /var/run/mysqld/mysqld.sock
port            = 3306
basedir         = /usr
datadir         = /var/lib/mysql
tmpdir          = /tmp
lc-messages-dir = /usr/share/mysql
skip-external-locking

default-storage-engine= INNODB
character_set_server = utf8mb4
innodb_default_row_format = DYNAMIC
innodb_large_prefix = ON
innodb_file_format = Barracuda
innodb_log_file_size = 2G
sql_mode = NO_AUTO_VALUE_ON_ZERO
Save the file and exit.
When you’re done, restart MariaDB.
sudo systemctl restart mariadb.service
That should be it!
Download and Install Jira
To get Jira installed, visit its download page from the link below:
https://www.atlassian.com/software/jira/download
As of this writing, the current version is 8.7.1.
Change into the temp directory and download Jira. Then extract the downloaded file using the commands below:
cd /tmp
wget https://www.atlassian.com/software/jira/downloads/binary/atlassian-jira-software-8.7.1-x64.bin
chmod a+x atlassian-jira-software-8.7.1-x64.bin
Next, run the commands below to begin the installation.
sudo ./atlassian-jira-software-8.7.1-x64.bin
As highlighted below, you will be prompted to answer some questions when running the binary file. You can choose to install Jira in any directory.
To simplify things, I chose to install it in my home folder.
Unpacking JRE .
Starting Installer .
This will install Jira Software 8.7.1 on your computer.
OK [o, Enter], Cancel [c]
o
Click Next to continue, or Cancel to exit Setup.
Choose the appropriate installation or upgrade option.
Please choose one of the following:
Express Install (use default settings) [1], Custom Install (recommended for advanced users) [2, Enter], Upgrade an existing Jira installation [3]
2
Select the folder where you would like Jira Software to be installed.
Where should Jira Software be installed?
[/opt/atlassian/jira]
Enter
Default location for Jira Software data
[/var/atlassian/application-data/jira]
Enter
Configure which ports Jira Software will use.
Jira requires two TCP ports that are not being used by any other
applications on this machine. The HTTP port is where you will access Jira
through your browser. The Control port is used to startup and shutdown Jira.
Use default ports (HTTP: 8080, Control: 8005) - Recommended [1, Enter], Set custom value for HTTP and Control ports [2]
1
Jira can be run in the background.
You may choose to run Jira as a service, which means it will start
automatically whenever the computer restarts.
Install Jira as Service?
Yes [y, Enter], No [n]
y
Details on where Jira Software will be installed and the settings that will be used.
Installation Directory: /opt/atlassian/jira
Home Directory: /var/atlassian/application-data/jira
HTTP Port: 8080
RMI Port: 8005
Install as service: Yes
Install [i, Enter], Exit [e]
i
Extracting files .
Please wait a few moments while Jira Software is configured.
Installation of Jira Software 8.7.1 is complete
Start Jira Software 8.7.1 now?
Yes [y, Enter], No [n]
y
Please wait a few moments while Jira Software starts up.
Launching Jira Software .
Installation of Jira Software 8.7.1 is complete
Your installation of Jira Software 8.7.1 is now ready and can be accessed
via your browser.
Jira Software 8.7.1 can be accessed at http://localhost:8080
Finishing installation .
After that, Jira should be installed and started.
Download the MySQL JDBC driver before you can configure Jira for web portal access. You can get it from the link below:
Run the commands below to download it:
cd /tmp
wget https://dev.mysql.com/get/Downloads/Connector-J/mysql-connector-java-8.0.18.zip
unzip mysql-connector-java-8.0.18.zip
sudo cp mysql-connector-java-8.0.18/mysql-connector-java-8.0.18.jar /opt/atlassian/jira/lib
After that, stop and start Jira services
sudo /etc/init.d/jira stop
sudo /etc/init.d/jira start
To access its portal, simply open your browser and browser to the server hostname or IP address followed by port 8080.
http://localhost:8080
The first page presents two options, as shown. Click on I’ll set it up myself and click on the Next button.
 On the next Window, click on My database, and for the Database type value, click and select MySQL 5.7+.
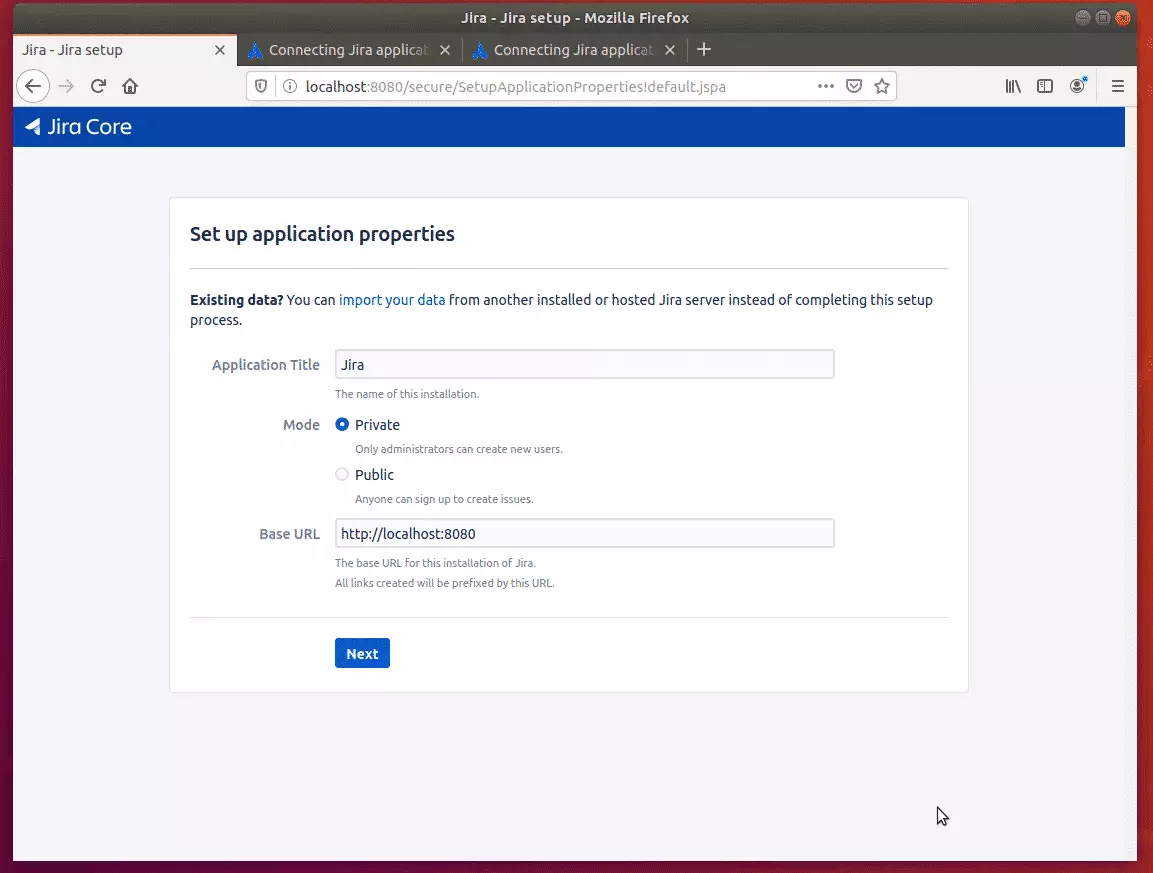
 Set up your application property and continue.
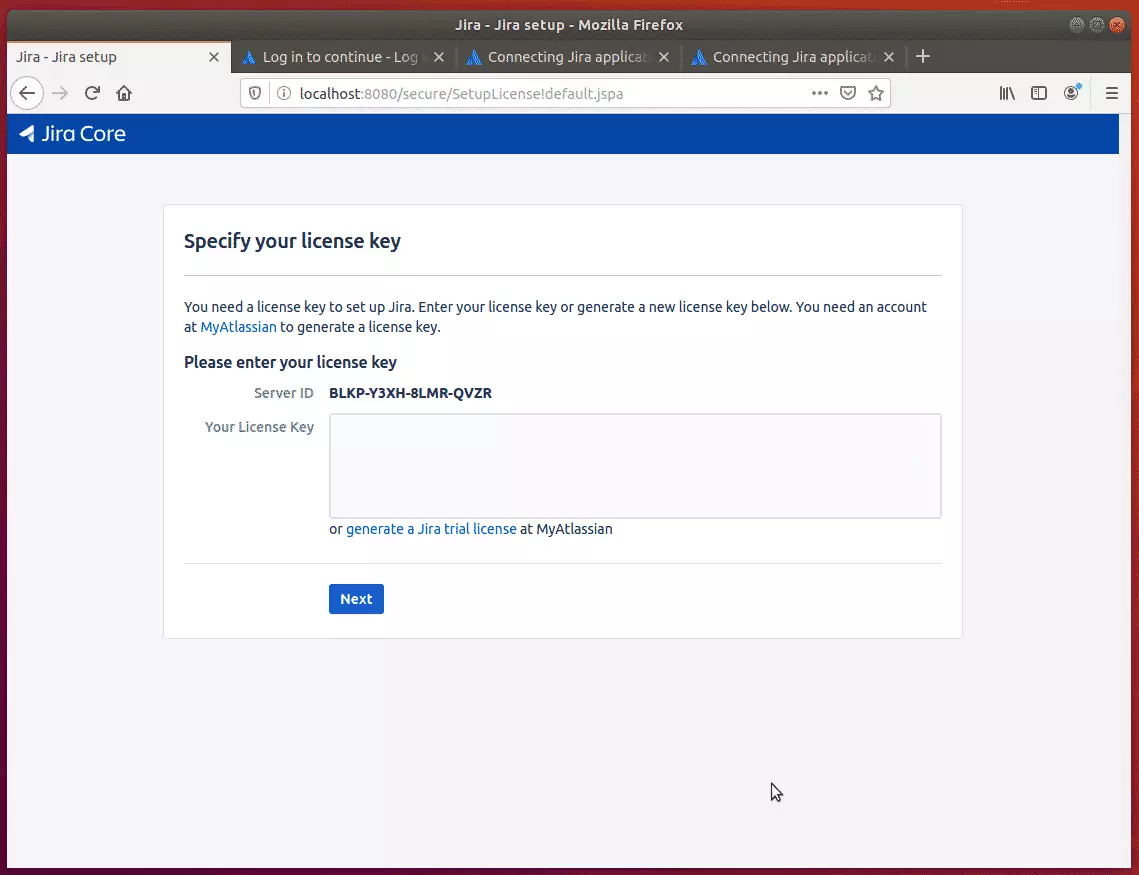
Next, you will be required to enter the license key of JIRA.
It would be best to have a license key to set up Jira. Enter your license key or generate a new license key below. You need an account at MyAtlassian to generate a license key.
Create an account if you don’t already have one; log in and generate a trial license key for your application.
Then, paste the license key in the box and continue.
Create an admin account and continue.

Continue and complete the installation wizard. Once done, you should be able to set up your projects.
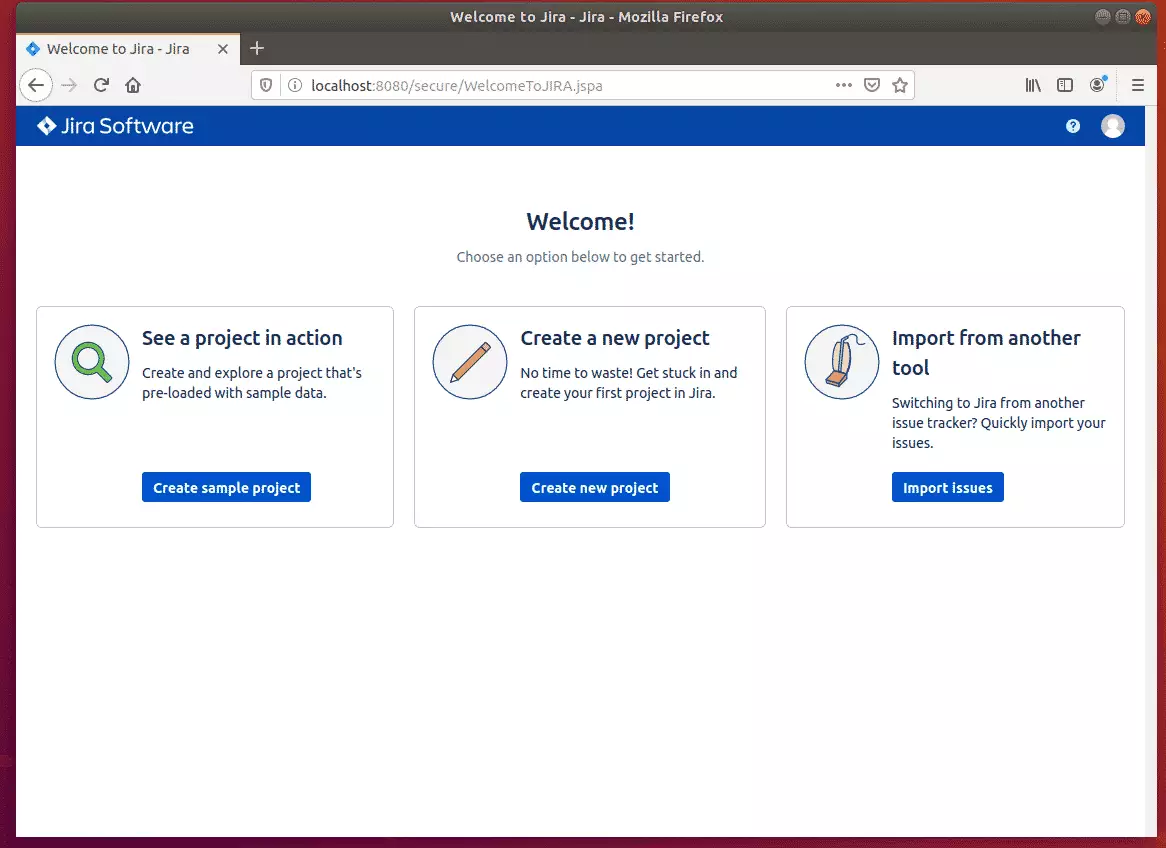
That’s it!
Conclusion:
This post showed you how to install Jira software on Ubuntu 18.04 | 16.04. If you find any error, please report it in the comment form below.
Thanks,


Leave a Reply to nigel dewar Cancel reply