How to Install Ghost on Ubuntu Linux with Nginx

Ghost on Ubuntu Linux is a free blogging platform running on Node.js that powers your personal website. Setting up Ghost requires Ubuntu 22.04 or 24.04, Nginx to handle web traffic, and MariaDB to store your blog data.
A secure Ghost site also uses a free Let’s Encrypt SSL certificate to protect visitor data. These steps get your new blog online without needing advanced technical skills.
Install Ghost by first updating your package list and installing Nginx and MariaDB. Then, create a dedicated database user and grant it privileges. Finally, run the Ghost installer command to set up the blogging platform.
How to install Nginx on Ubuntu Linux
To install Nginx on Ubuntu Linux, open your terminal and run the update command followed by the package installation command. Nginx acts as a web server and reverse proxy, which directs visitors to your Ghost blog. This setup takes only a minute and gives your site the foundation it needs to load pages properly for your readers.
To install Nginx, run the commands below:
sudo apt update
sudo apt install nginx
After installing Nginx, the commands below can be used to stop, start, and enable the Nginx service to always start up with the server boots.
sudo systemctl stop nginx.service
sudo systemctl start nginx.service
sudo systemctl enable nginx.service
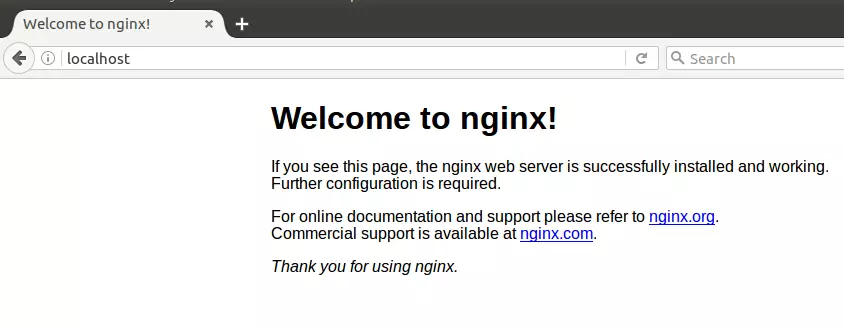
Once Nginx is installed, open a web browser and browse to the server hostname or IP address. If you see a Nginx welcome page, it has been successfully installed and is running on Ubuntu.
http://localhost
How to install MariaDB on Ubuntu Linux
To install MariaDB on Ubuntu Linux, use the terminal to download the database server package that Ghost requires to store all your posts, pages, and user data. MariaDB runs quietly in the background to keep your blog content safe and accessible whenever someone visits your site.
To install MariaDB, run the commands below:
sudo apt install mariadb-server
After installing MariaDB, the commands below can stop, start, and enable the service to start when the server boots.
sudo systemctl stop mariadb.service
sudo systemctl start mariadb.service
sudo systemctl enable mariadb.service
sudo mysql_secure_installation
When prompted, answer the questions below by following the guide.
If you've just installed MariaDB, and haven't set the root password yet, you should just press enter here.

Enter current password for root (enter for none): PRESS ENTER

Switch to unix_socket authentication [Y/n] n

Change the root password? [Y/n] n

Remove anonymous users? [Y/n] y

Disallow root login remotely? [Y/n] y

Remove test database and access to it? [Y/n] y

Reload privilege tables now? [Y/n] y

All done!
The latest MariaDB servers have a root user set to use the auth_socket authentication method by default.
The auth_socket plugin authenticates users that connect from the local host through the Unix socket file. You can't authenticate as a root by providing a password.
To fix these Ghost database connection issues, change the default authentication method from `auth_socket` to `mysql_native_password`. This change allows Ghost to connect to its database without requiring elevated permissions from the application.
Dedicated user accounts for database servers provide safer remote access to database management, unlike using root users which pose security risks. Creating a dedicated user account for database servers reduces the chance of unauthorized access and data breaches.
Since you don't want to connect to the MariaDB database server from phpMyAdmin as the root user, you should probably create a separate account instead of connecting with the root.
Run the commands below to log on to the MariaDB server.
sudo mysql -u root -p
Then, run the SQL commands below to create a new user for Ghost to connect to the database.
CREATE USER 'ghostadmin'@'localhost' IDENTIFIED BY 'very_strong_password_here';
Then, grant the user full access to manage the database server.
GRANT ALL PRIVILEGES ON *.* TO 'ghostadmin'@'localhost' WITH GRANT OPTION;
The server was successfully installed if you see a similar screen.
Create Ghost Database on Ubuntu Linux
To create a Ghost database on Ubuntu Linux, log into your MariaDB command prompt with root privileges and run a simple SQL query to set up a dedicated storage space. Your blog needs this specific database to keep track of every article, image link, and setting you save.
To log on to MariaDB, run the commands below.
sudo mysql -u root -p
Then, create a database called Ghost.
CREATE DATABASE ghost;
Next, use the Ghost account created above and give it access to the Ghost database.
GRANT ALL ON ghost.* TO 'ghostadmin'@'localhost' WITH GRANT OPTION;
Finally, save your changes and exit.
FLUSH PRIVILEGES;
EXIT;
How to install Node.js on Ubuntu Linux
To install Node.js on Ubuntu Linux, download the required setup script through your terminal so your system has the JavaScript runtime that Ghost relies on to run. Ghost cannot function without Node.js, making this setup step mandatory before you download the actual blogging software.
sudo apt install curl
curl -sL https://deb.nodesource.com/setup_14.x | sudo bash -
Next, run the commands below to install Node.js and the required packages for Ghost to function. An Nginx webserver will be needed for this. s
sudo apt install nodejs
Next, run the commands below to include and enable the Yarn repository.
curl -sS https://dl.yarnpkg.com/debian/pubkey.gpg | sudo apt-key add -
echo "deb https://dl.yarnpkg.com/debian/ stable main" | sudo tee /etc/apt/sources.list.d/yarn.list
Once the repository is enabled, install yarn with the following:
sudo apt update
sudo apt-get -o Dpkg::Options::="--force-overwrite" install yarn
How to download and install Ghost
To download and install Ghost, use the command-line interface tool after setting up your Node.js environment and package manager. The Ghost command-line tool guides you through the entire installation process, configures your domain, and gets your new blog running on your Ubuntu server.
Run the commands below to install the Ghost install tool.
sudo yarn global add ghost-cli
We will create a folder for Ghost content in the /var/www/ghost directory. To create the folder, run the commands below.
sudo mkdir -p /var/www/ghost
Next, change the folder ownership to your account so you can run the Ghost tool to download Ghost packages.
sudo chown $USER:$USER /var/www/ghost
sudo chmod 775 /var/www/ghost
Next, change into the directory and install Ghost.
cd /var/www/ghost
To start the installation, run the command below. The command will install and configure Ghost, Nginx as a reverse proxy, and secure the site with a free let's encrypt SSL certificate.
ghost install
You should begin to see Ghost changing for packages that are required. Once all is validated, Ghost should begin downloading its package dependencies to install.
Checking system Node.js version - found v14.18.0 ✔ Checking logged in user ✔ Checking current folder permissions ✔ Checking system compatibility ✔ Checking for a MySQL installation ✔ Checking memory availability ✔ Checking free space ✔ Checking for latest Ghost version ✔ Setting up install directory Downloading and installing Ghost v4.16.0 Installing dependencies >
Next, set up the database connection with the info created above.
? Enter your blog URL: http://example.com
? Enter your MySQL hostname: localhost
? Enter your MySQL username: ghostadmin
? Enter your MySQL password: [hidden]
? Enter your Ghost database name: ghost
✔ Configuring Ghost
✔ Setting up instance
When asked if you want to set up Nginx, type yes.
 Setting up "ghost" system user
ℹ Setting up "ghost" mysql user [skipped]
? Do you wish to set up Nginx? Yes
+ sudo nginx -s reload
✔ Setting up Nginx
? Do you wish to set up SSL? Yes
? Enter your email (For SSL Certificate) admin@example.com
Running sudo command: mkdir -p /etc/letsencrypt
Running sudo command: ./acme.sh --install --home /etc/letsencrypt
Running sudo command: /etc/letsencrypt/acme.sh --issue --home /etc/letsencrypt --domain example.com --webroot /var/www/ghost/system/nginx-root --reloadcmd "nginx -s reload" --accountemail admin@example.com
Running sudo command: openssl dhparam -out /etc/nginx/snippets/dhparam.pem 2048
Running sudo command: mv /tmp/ssl-params.conf /etc/nginx/snippets/ssl-params.conf
✔ Creating ssl config file at /var/www/ghost/system/files/example.com-ssl.conf
Running sudo command: ln -sf /var/www/ghost/system/files/example.com-ssl.conf /etc/nginx/sites-available/example.com-ssl.conf
Running sudo command: ln -sf /etc/nginx/sites-available/example.com-ssl.conf /etc/nginx/sites-enabled/example.com-ssl.conf
Running sudo command: nginx -s reload
✔ Setting up SSL
When prompted with questions below, choose yes.
 Do you wish to set up Systemd? Yes
✔ Setting up Systemd
? Do you want to start Ghost? Yes
✔ Starting Ghost
If all goes well, you should see a complete setup message similar to the one below.
Running sudo command: /var/www/ghost/current/node_modules/.bin/knex-migrator-migrate --init --mgpath /var/www/ghost/current
✔ Running database migrations
? Do you want to start Ghost? Yes
Running sudo command: systemctl is-active ghost_example-com
✔ Ensuring user is not logged in as ghost user
✔ Checking if logged in user is directory owner
✔ Checking current folder permissions
Running sudo command: systemctl is-active ghost_example-com
✔ Validating config
✔ Checking folder permissions
✔ Checking file permissions
✔ Checking content folder ownership
✔ Checking memory availability
Running sudo command: systemctl start ghost_example-com
✔ Starting Ghost
Running sudo command: systemctl is-enabled ghost_example-com
Running sudo command: systemctl enable ghost_example-com --quiet
✔ Starting Ghost
You can access your publication at https://example.com
Next, go to your admin interface at https://example.com/ghost/ to complete the setup of your publication

Ghost uses direct mail by default
To set up an alternative email method read our docs at https://docs.ghost.org/docs/mail-config
After that, open your browser and browse to the Ghost admin interface using the server hostname or IP address followed by /ghost/
https://example.com/ghost/

To get started, click on the Create your account button to create your account and start configuring Ghost.
That should do it!
Conclusion:
This post guides users through installing Ghost CMS on Ubuntu with Nginx. Users can report errors or add information using the comment form.
How to install Ghost on Ubuntu server?
To install Ghost on Ubuntu server, you must prepare your environment by installing Nginx for web traffic, MariaDB for data storage, and Node.js to run the application. Once these dependencies are ready, you can download the Ghost command-line tool to finish setting up your self-hosted blog.
Is Ghost free if you self host?
Yes, the Ghost blogging platform software itself is completely free to use. You can download and install it on your own server. You will only pay for the server space and any domain name you choose to use for your blog.
How to install Ghosty in Ubuntu?
It seems you might be asking about installing 'Ghost' on Ubuntu. To do this, you'll set up Nginx as a web server and MariaDB to manage your blog's information. You'll also need to install Node.js and then follow Ghost's specific installation steps.
Does Ghost work on Linux?
Yes, Ghost runs very well on Linux. In fact, Linux is the recommended operating system for self-hosting Ghost. You can install it on various Linux distributions, including Ubuntu, by setting up necessary software like Node.js, Nginx, and a database.
Was this guide helpful?

About the Author
Richard
Tech Writer, IT Professional
Richard, a writer for Geek Rewind, is a tech enthusiast who loves breaking down complex IT topics into simple, easy-to-understand ideas. With years of hands-on experience in system administration and enterprise IT operations, he’s developed a knack for offering practical tips and solutions. Richard aims to make technology more accessible and actionable. He's deeply committed to the Geek Rewind community, always ready to answer questions and engage in discussions.




No comments yet — be the first to share your thoughts!