How to Hide Specific Drives in Windows 11
You hide specific drives in Windows 11 by modifying the Windows Registry to remove their drive letters from File Explorer. This process stops casual users from seeing or accessing your chosen drives through File Explorer, which is the standard interface.
Hiding a drive is a way to declutter File Explorer. It can be useful for concealing backup partitions or external storage devices. Windows 11, like previous versions, allows you to selectively hide drives without impacting their functionality.
For example, if you want to hide your D: drive, you’ll be making a specific registry edit to achieve this. This guide will show you exactly how to do it. Your selected drives will disappear from view, but you can still access them when needed.
You hide drives in Windows 11 by editing the Registry. Open Registry Editor, navigate to the Explorer folder, and create or modify the NoDrives DWORD value with a specific number for each drive you want to hide. Restart File Explorer or your PC to apply changes.
What Does Hiding a Drive Do?
- The drive won’t appear in This PC or the sidebar in File Explorer.
- The drive keeps its letter (like D: or E:).
- You can still open the drive by typing its letter in the File Explorer’s address bar or other ways.
How Can You Access Hidden Drives?
Even if you hide drives in Windows 11, you can still get to them easily. You can type the drive’s letter directly into the File Explorer address bar, like typing ‘F:’ and pressing Enter. Another way is to open Disk Management by searching for ‘diskmgmt.msc’ in the Start menu.
- Type the drive letter (for example, F:) in the File Explorer address bar and press Enter.
- Open Disk Management by typing
diskmgmt.mscin the Start menu search, right-click the drive, and select Open. - Use a command prompt or Windows Terminal and type the drive letter followed by Enter.
Note: To hide or unhide drives, you need to be signed in as an administrator (the person who can make changes to your computer).
Follow These Easy Steps to Hide Drives
Step 1Open the Registry Editor
- Press Windows key + R, type
regedit, and press Enter.
⚠️ Admin Required
Step 2Go to the Explorer Folder in Registry
In Registry Editor, use the left sidebar to find this folder:
HKEY_LOCAL_MACHINE\SOFTWARE\Microsoft\Windows\CurrentVersion\Policies\ExplorerHere’s what it looks like:
Step 3Choose to Hide or Unhide Drives
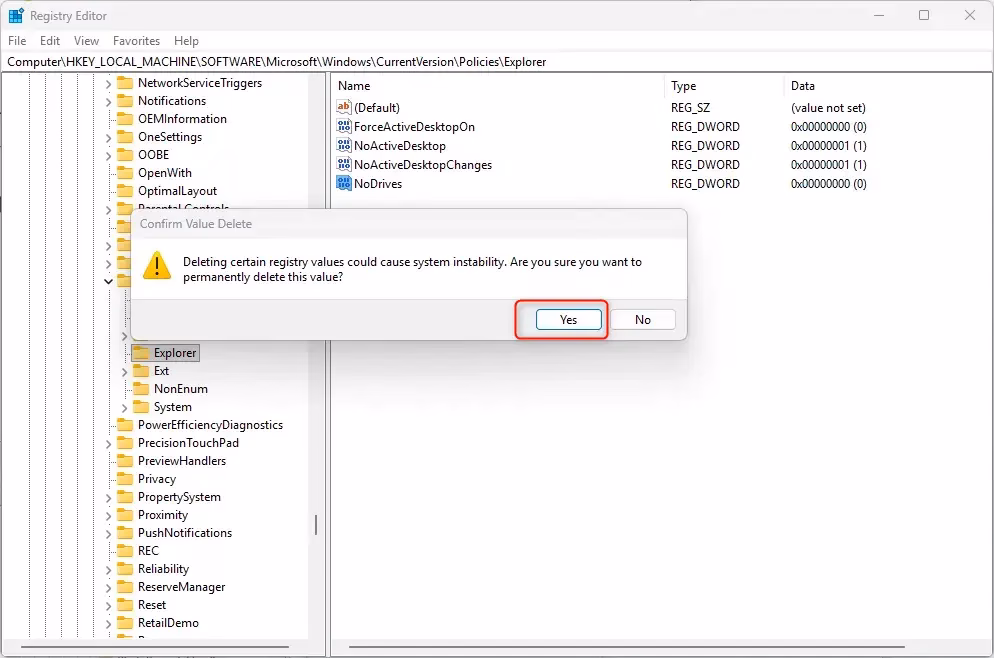
To Unhide All Drives
- Look for a setting called
NoDriveson the right side. - If you see
NoDrives, right-click it and select Delete. - Confirm by clicking Yes.
To hide specific drives in Windows 11 using the Registry Editor, you’ll need to create a new value. If you don’t see a setting called ‘NoDrives’ already, right-click in the right pane, select ‘New’, then ‘DWORD (32-bit) Value’. Name this new value ‘NoDrives’ and then double-click it to set its data.
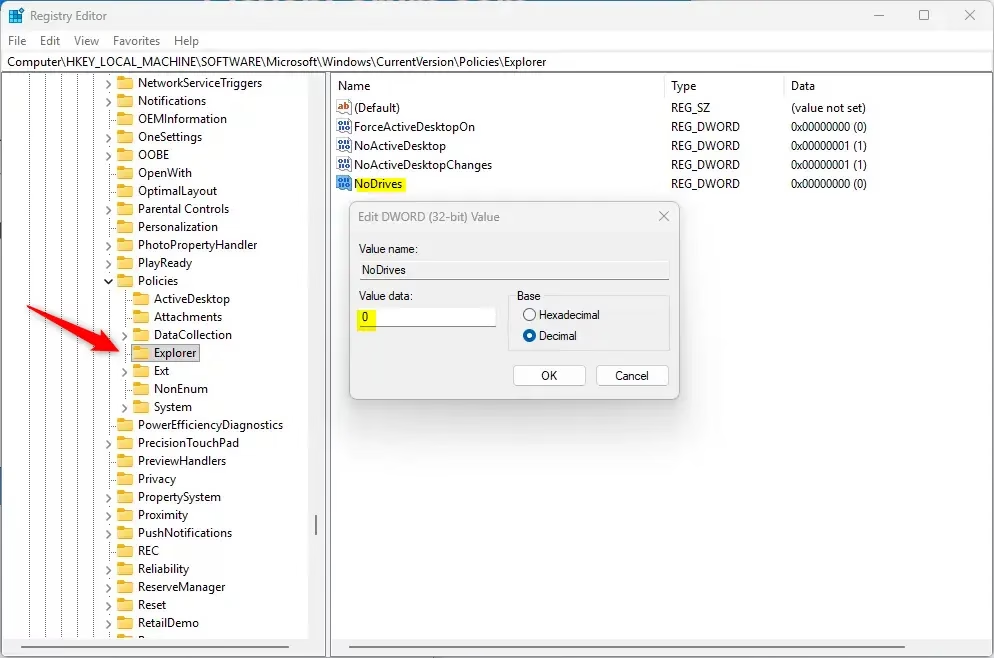
To Hide Specific Drives
- If you don’t see
NoDrives, right-click on a blank space on the right pane, choose New → DWORD (32-bit) Value. - Name it
NoDrives. - Double-click
NoDrivesto edit it. - Select Decimal and enter the number that matches the drive(s) you want to hide (see the table below for the numbers).
- Click OK.
To hide specific drives in Windows 11 using the Registry Editor, you’ll need to create a new value. If you don’t see a setting called ‘NoDrives’ already, right-click in the right pane, select ‘New’, then ‘DWORD (32-bit) Value’. Name this new value ‘NoDrives’ and then double-click it to set its data.
Drive Letter Numbers Table
| Drive Letter | Number to Enter |
|---|---|
| A | 1 |
| B | 2 |
| C | 4 |
| D | 8 |
| E | 16 |
| F | 32 |
| G | 64 |
| H | 128 |
| I | 256 |
| J | 512 |
| K | 1024 |
| L | 2048 |
| M | 4096 |
| N | 8192 |
| O | 16384 |
| P | 32768 |
| Q | 65536 |
| R | 131072 |
| S | 262144 |
| T | 524288 |
| U | 1048576 |
| V | 2097152 |
| W | 4194304 |
| X | 8388608 |
| Y | 16777216 |
| Z | 33554432 |
Tip: To hide more than one drive at a time, add the numbers together. For example, to hide E (16) and F (32), enter 48 (16 + 32).
Step 4Finish Up
- Close the Registry Editor.
- You need to restart your File Explorer or your computer for the change to work:
- Press Ctrl+Shift+Esc to open Task Manager.
- Find Windows Explorer under Processes.
- Right-click it and choose Restart.
- Or simply sign out and sign back in or restart your PC.
Summary
- You can hide one or many drives from showing in File Explorer.
- The drives keep their letters and can still be accessed by typing their letter or using Disk Management.
- You need admin rights to change these settings.
- Use the Registry Editor carefully — follow the steps exactly.
- Restart File Explorer or your PC to see the changes.
You can hide one or many drives in Windows 11 so they don’t show up in File Explorer. These drives still work and can be opened by typing their letter or using Disk Management. Remember, you need administrator rights to make these changes, so be careful when editing the Registry Editor and restart File Explorer or your PC to see the changes.
How do I hide a drive in 🪟 Windows 11?
Click on delete. If you see a warning message, don’t worry, just click ‘Yes.’ Now you’ll see that the D drive is no longer in File Explorer. To unhide this drive…
How do I hide drives in my PC?
Right-click on the Start button and select ‘Run.’ Type `gpedit.msc` in the Run dialog box and press ‘OK.’ Navigate to ‘User Configuration,’ then ‘Administrative Templates,’ and finally ‘Windows Components.’
Was this guide helpful?

About the Author
Richard
Tech Writer, IT Professional
Richard, a writer for Geek Rewind, is a tech enthusiast who loves breaking down complex IT topics into simple, easy-to-understand ideas. With years of hands-on experience in system administration and enterprise IT operations, he’s developed a knack for offering practical tips and solutions. Richard aims to make technology more accessible and actionable. He's deeply committed to the Geek Rewind community, always ready to answer questions and engage in discussions.


No comments yet — be the first to share your thoughts!