How to Find Your MAC Address in Windows 11
You find your MAC address in Windows 11 using the Settings app or Command Prompt.
A MAC address, or Media Access Control address, is a unique hardware identifier assigned to your network interface controller. This is the physical hardware enabling your PC to connect to a network.
This 12-character hexadecimal string, often looking like ’00:1A:2B:3C:4D:5E’, acts as your device’s unique digital serial number on a local network.
You might need your MAC address for troubleshooting network issues or for security measures like MAC filtering on your router. It ensures your computer is clearly identified among other devices.
Find your MAC address in Windows 11 via Settings under Network & internet > Advanced network settings, or use the Command Prompt with ipconfig /all. Look for “Physical address (MAC)” in either location.
Method 1Using Windows Settings
You can find your MAC address in Windows 11 using the Settings app by going to Network & internet, then Advanced network settings, and looking for your network adapter.
- Press the Windows key + I on your keyboard to open Settings.
- Click Network & internet.

- Click Advanced network settings at the bottom of the list.

- Click the arrow next to your Ethernet or Wi-Fi adapter.

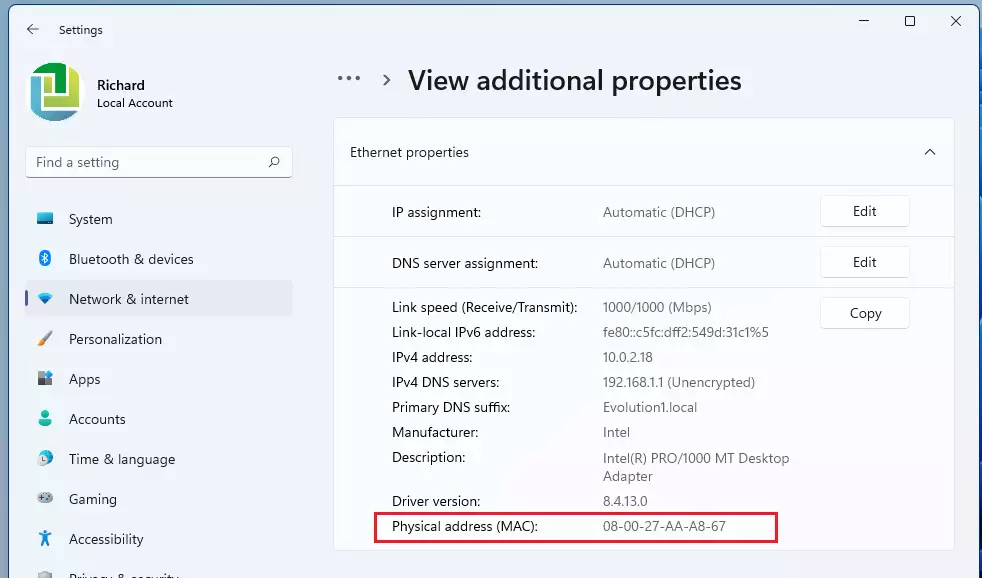
- Click View additional properties.
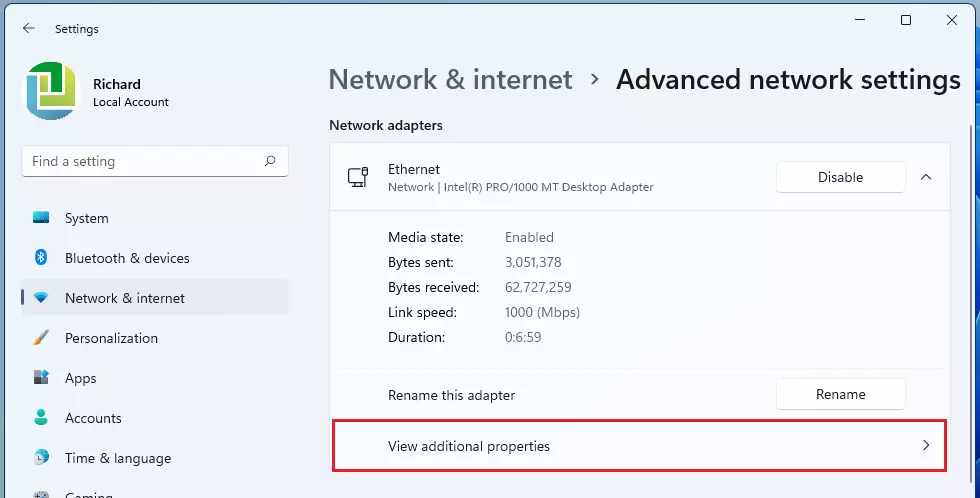
- Look for the line labeled Physical address (MAC).
Method 2Using Command Prompt
To find your MAC address in Windows 11 using the Command Prompt, open cmd, type ‘ipconfig /all’, and look for the ‘Physical Address’ under your active network connection.
- Click the Start button and type cmd.
- Select Command Prompt.
- Type the following command and press Enter:
ipconfig /allLook for Physical Address under your active network connection. Pro Tip: You can highlight the address in the window and press Enter to copy it to your clipboard.
Method 3Using PowerShell
PowerShell provides a clean view of your network hardware through the Windows PowerShell app.
- Right-click the Start button and select Terminal or PowerShell.
- Type the following command and press Enter:
Get-NetAdapterYou will see a table. The MacAddress column lists the ID for each adapter.
Troubleshooting and Common Issues
If you cannot find your address, ensure your network drivers are installed correctly. Sometimes, virtual machines can create additional network adapters that appear in your list. If you are having trouble connecting, you might want to learn how to set a static IP in Windows 11 to stabilize your connection.
MAC Address Randomization
Windows 11 uses random hardware addresses to protect your privacy. This means your device may show a different MAC address to public Wi-Fi networks than it does to your home router. You can toggle this in your Wi-Fi settings if you need a consistent address for filtering.
Summary
A MAC address is your device’s unique network ID, like a fingerprint for your computer on the internet, and you can find it in Windows 11 using either the Settings app or the Command Prompt.- A MAC address is a unique ID used to identify your device on a network.
- You can find this easily in the Settings app under Network & internet.
- Advanced users can use the
ipconfig /allcommand in Command Prompt. - You can also use the
Get-NetAdaptercommand in PowerShell to see a list of your network hardware. - MAC address randomization is a privacy feature that may change your visible ID on public networks.
Is the MAC address the same as the IP address?
No. A MAC address is a permanent physical ID assigned to your network hardware by the manufacturer. An IP address is a temporary digital label assigned by your router or network to help route data to your specific device. They serve different purposes in network communication.
Can I change my MAC address in 🪟 Windows 11?
Yes, you can change it through the Device Manager. Note: This requires admin privileges. Right-click the Start button, select Device Manager, find your network adapter, and look for the Network Address property under the Advanced tab. Changing this can cause connectivity issues if not done correctly.
Was this guide helpful?

About the Author
Richard
Tech Writer, IT Professional
Richard, a writer for Geek Rewind, is a tech enthusiast who loves breaking down complex IT topics into simple, easy-to-understand ideas. With years of hands-on experience in system administration and enterprise IT operations, he’s developed a knack for offering practical tips and solutions. Richard aims to make technology more accessible and actionable. He's deeply committed to the Geek Rewind community, always ready to answer questions and engage in discussions.


No comments yet — be the first to share your thoughts!