How to Verify and Enable TPM 2.0 on Your PC
This guide helps you check and turn on TPM 2.0. This is a small security chip that your computer needs to run Windows 11 and stay up to date.
Why enable TPM 2.0?
TPM stands for Trusted Platform Module. Think of it as a digital vault inside your computer. It keeps your passwords, encryption keys, and sensitive data safe from hackers. Enabling it is a mandatory requirement for Windows 11. It ensures your hardware is secure and ready for modern software.
What happens when done?
Once you enable TPM 2.0, your PC meets the security requirements for Windows 11. You can use advanced features like BitLocker for drive encryption and Windows Hello for secure logins. Your system will also be eligible for all future Windows updates, keeping your machine protected against new threats.
How to check if your PC supports TPM 2.0
Microsoft has specific basic requirements for Windows 11. The easiest way to check is using the Windows 11 PC Health Check app. If your processor is from the last few years, your computer likely has this feature built-in.
To check manually, follow these steps:
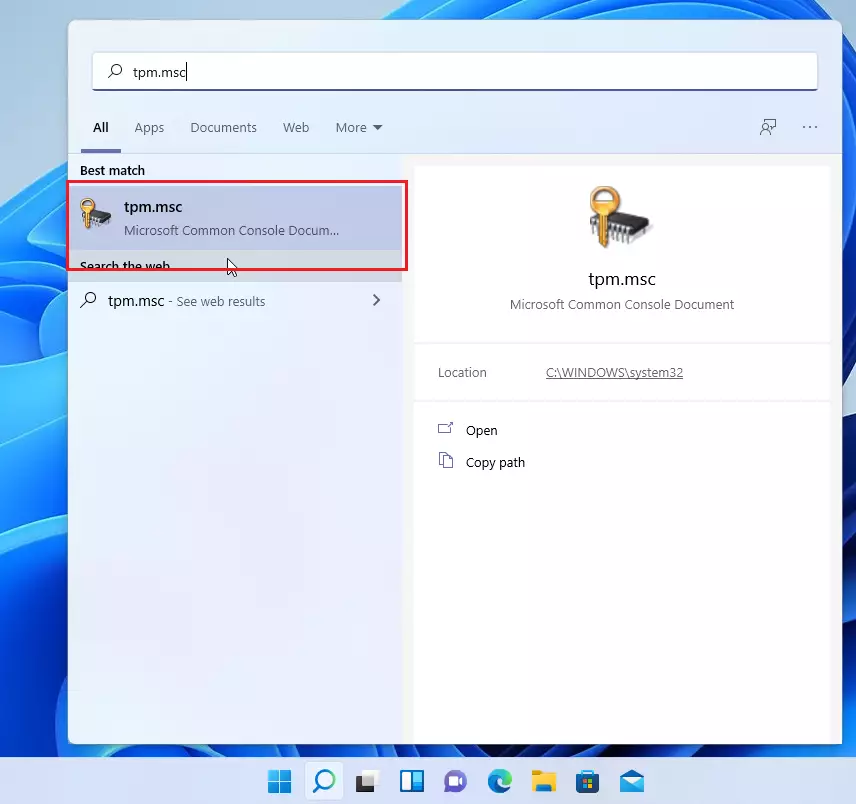
- Click the Start button.
- Type
tpm.mscinto the search bar and press Enter.
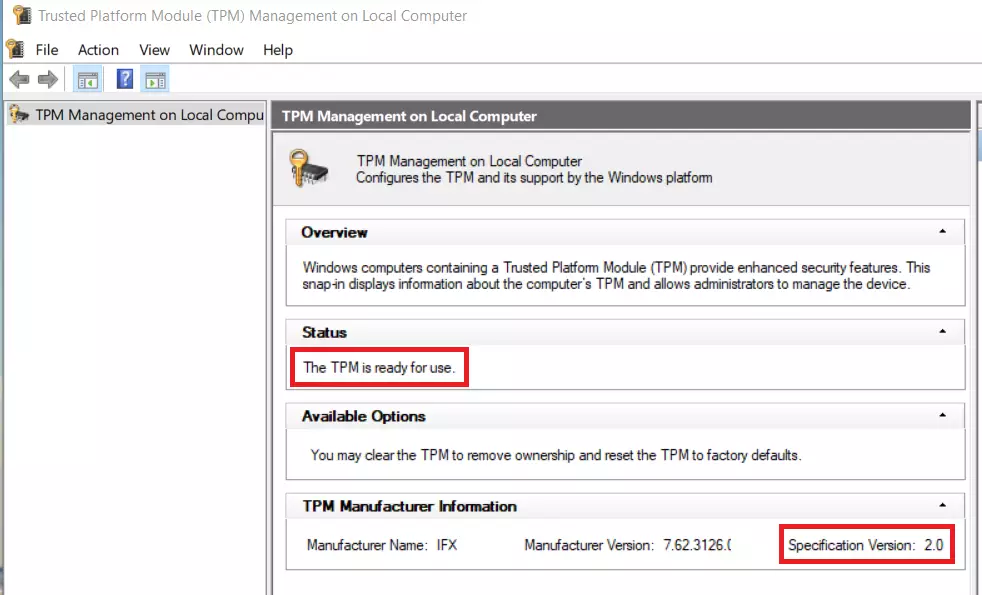
A window will open. Look at the Status section. It should say “The TPM is ready for use.” Under TPM Manufacturer Information, make sure the Specification version says 2.0.
How to enable TPM 2.0 in BIOS/UEFI
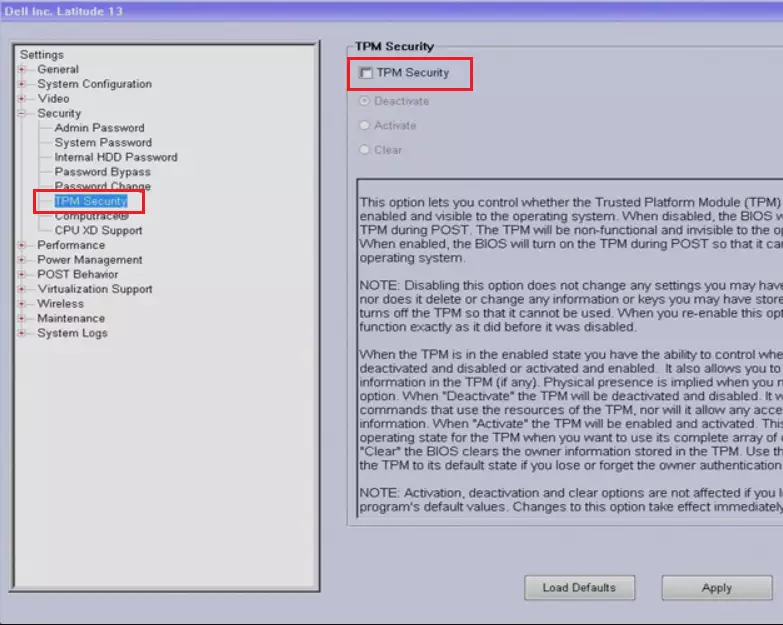
If the check shows that TPM 2.0 is not enabled, you need to turn it on in your computer’s BIOS or UEFI firmware settings. Note: This process requires admin privileges and access to your computer’s low-level hardware settings.
First, restart your computer. As it turns on, press the BIOS key repeatedly. Common keys include F2, Del, F10, or F12 depending on your brand:
- ASUS: Press F2 or Del.
- MSI: Press Del.
- Gigabyte: Press Del.
- HP: Press F10 or Esc.
- Dell: Press F2 or F12.
Once inside the BIOS, look for these settings based on your processor:
- Intel: Search for Intel Platform Trust Technology (PTT).
- AMD: Search for AMD fTPM or Firmware TPM.
Toggle the setting to Enabled, then save your changes and exit. Your computer will restart with the security processor active.
Troubleshooting Common Errors
If you cannot find the TPM setting, ensure your BIOS is updated to the latest version from your manufacturer’s website. Sometimes, the TPM option is hidden under an Advanced or Security sub-menu. If you see an error stating “TPM device not found,” ensure Secure Boot is also enabled in your BIOS settings, as these two features often work together.
Summary
- TPM 2.0 is a security chip that protects your data and is required for Windows 11.
- You can check your status by running
tpm.mscin the search bar. - If disabled, you must enter your computer’s BIOS menu to turn it on.
- Enabling this feature ensures your system stays secure and up to date.
Can I enable TPM 2.0 if my CPU doesn’t support it?
No, TPM 2.0 is a hardware-based security feature. If your CPU or motherboard lacks the physical chip or the firmware-based support (fTPM/PTT), you cannot enable it through software. You would need to upgrade your hardware to meet Windows 11 requirements.
Is TPM 2.0 safe to enable?
Yes, it is very safe. TPM 2.0 is a standard industry security feature designed to protect your data from unauthorized access. It is widely used by businesses and home users to secure encryption keys and verify system integrity, making your computer significantly more secure against modern cyber threats.
Does enabling TPM 2.0 affect gaming performance?
No, enabling TPM 2.0 does not affect gaming performance. It operates as a background security processor and does not consume significant system resources. You will not notice any frame rate drops or latency issues while gaming after turning this feature on in your BIOS settings.
Was this guide helpful?


Leave a Reply Cancel reply