How to Check when Windows Update was Last Checked in Windows 11
You can check when Windows Update was last checked in Windows 11 by looking at the “Last checked for updates” timestamp in the Windows Update settings.
This timestamp tells you the precise date and time your PC last communicated with Microsoft servers to search for available updates.
Knowing this information confirms your automatic update service is active and functioning correctly. It helps you ensure your system is receiving the latest security patches and feature enhancements.
For example, if you see a recent timestamp, like today’s date, your Windows 11 PC is actively checking for updates. If the timestamp is old, you might want to perform a manual check.
You can check when Windows Update was last checked in Windows 11 by opening Settings, navigating to Windows Update, and looking for the “Last checked” timestamp near the top. This date and time indicates when your PC last searched for available updates. You can also use PowerShell with a specific command for more technical details.
Option 1Check the Settings Home Page
- Press ⊞ Win+I to open Settings.
- Click Home on the left menu.
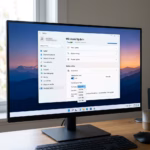
- Look for the Last checked label at the top. Open Settings Home
Option 2Check the Windows Update Page
- Open Settings (⊞ Win+I).
- Select Windows Update from the left sidebar.
- The Last checked time appears near the top. This is the most accurate place to see your Windows update last check status. Open Windows Update

Option 3Use PowerShell for Technical Details
If you want the exact timestamp from the Windows Update Agent API, use this command. This does not require admin privileges.
- Right-click the Start button and select Terminal.
- Paste this command and press Enter:
powershell "(New-Object -Com 'Microsoft.Update.AutoUpdate').Results.LastSearchSuccessDate.ToLocalTime()"
Pro Tip: Resetting the Timestamp
If the date looks old, click the Check for updates button. This forces the USOClient to start a new scan immediately, resetting the LastScanTime value in your system logs.
Troubleshooting ‘Last Check’ Errors
If your computer says it checked but found nothing, the Windows Update service might be stuck. First, run the Windows Update Troubleshooter. If that fails, you can check the registry key at HKEY_LOCAL_MACHINE\SOFTWARE\Microsoft\Windows\CurrentVersion\WindowsUpdate\Auto Update\Results\Detect to see if the last detection code shows an error.
Summary
You can check your update status via the Settings app or by using PowerShell. Remember that a ‘Last checked’ time is just a scan, not an installation. If you have issues, use the built-in troubleshooter to fix the update agent.
Why does Windows say ‘Last checked’ but no updates were found?
This happens when your computer successfully contacts the Microsoft update server, but there are no new patches available for your specific system configuration. It confirms the Windows Update service is running correctly, but your machine is already up to date with the latest security and feature definitions.
How do I force a Windows Update check via Command Prompt?
You can force a check by opening the Terminal as an administrator and typing usoclient StartScan. This command triggers the Windows Update Agent to immediately look for new updates. Note that this runs in the background, so you may not see a progress bar immediately after executing the command.
Does the ‘Last Checked’ time include background scans?
Yes, the ‘Last checked’ timestamp reflects the most recent time the Windows Update service performed a scan. This includes both manual checks you initiate by clicking the button and automatic background scans performed by the system to ensure your computer remains secure without requiring your constant manual intervention.
Was this guide helpful?

About the Author
Richard
Tech Writer, IT Professional
Richard, a writer for Geek Rewind, is a tech enthusiast who loves breaking down complex IT topics into simple, easy-to-understand ideas. With years of hands-on experience in system administration and enterprise IT operations, he’s developed a knack for offering practical tips and solutions. Richard aims to make technology more accessible and actionable. He's deeply committed to the Geek Rewind community, always ready to answer questions and engage in discussions.


No comments yet — be the first to share your thoughts!