How to Enable Voice Typing Launcher in Windows 11
This guide shows you how to turn the voice typing launcher on or off in Windows 11. Voice typing lets you speak into your microphone to type text instead of using your keyboard.
Why use voice typing in Windows 11?
Voice typing is a powerful accessibility feature that lets you dictate text instead of typing on a keyboard. Why use it? It saves time, helps with spelling, and reduces physical strain on your hands and wrists. What happens when done? Your computer uses advanced speech recognition to turn your spoken words into digital text in real-time.
This feature relies on Azure Speech services to process your voice. It is a core part of the Windows 11 accessibility features suite designed to make computing easier for everyone.
How to enable the voice typing launcher
The voice typing launcher is a small button that appears when you click in a text box. It makes starting your dictation much faster.
- Press Windows key + H to open the voice typing tool.
- Click the Settings (gear icon) in the window.
- Toggle the Voice typing launcher switch to On.
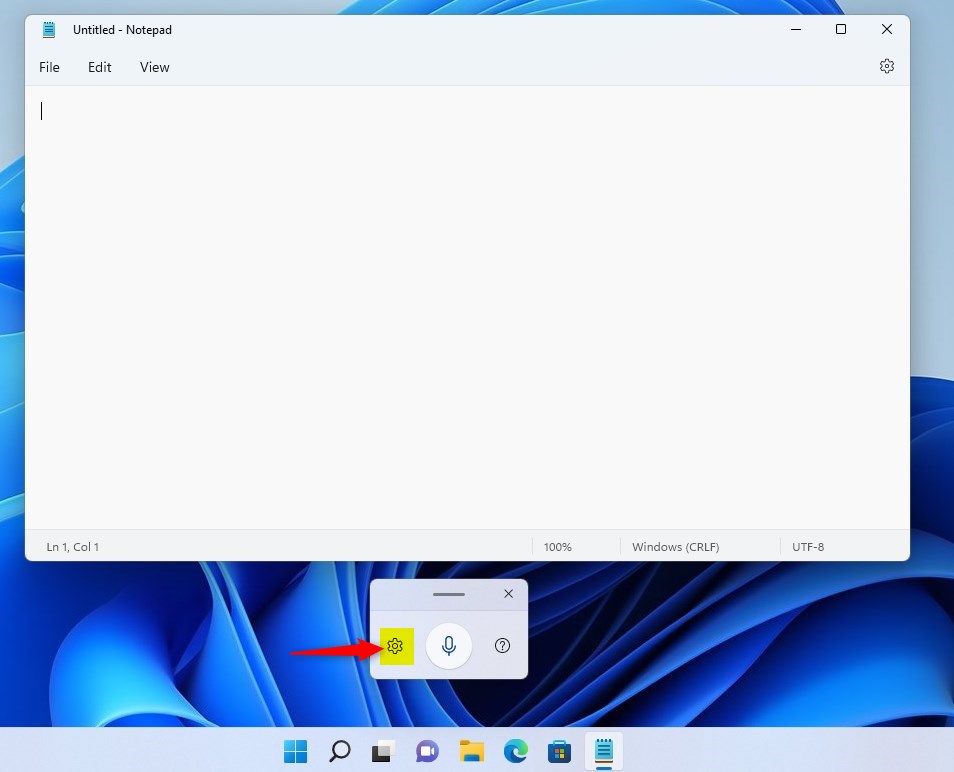
Once enabled, you will see a microphone icon whenever you click into a text field. This gives you instant access to speech to text Windows 11 capabilities.
Troubleshooting voice typing issues
If you face a voice recognition error, try these steps:
- Check your microphone: Go to Settings > System > Sound and ensure the correct input device is selected.
- Check internet connection: Online speech recognition requires an active connection to reach Microsoft servers.
- Permissions: Ensure your privacy settings allow apps to access your microphone.
Admin Note: If you are on a managed work computer, you may need Administrator privileges to modify system-wide speech settings or update drivers in C:\Windows\System32.
Privacy and data collection
You might wonder: Is voice typing data sent to Microsoft? Yes, when you use online speech recognition, your voice data is sent to Microsoft to improve their services. You can manage this in Settings > Privacy & security > Speech. For more details, visit the official Microsoft privacy documentation.
Advanced configuration
You can improve accuracy by enabling Inking and typing personalization. This allows Windows to learn your vocabulary. You can also toggle Device-based speech recognition if you prefer to process some data locally.
Supported Languages
Windows 11 supports many languages including English (US/UK), Spanish, French, German, Chinese, and Japanese. Ensure your language pack is downloaded in Settings > Time & language > Language & region.
Summary
Voice typing is an essential tool for modern Windows 11 users. By enabling the launcher, you gain quick access to dictation, which helps you type faster and more comfortably. Remember to check your microphone settings and privacy preferences to get the best results. Whether you are writing an email or a long document, voice typing makes the process seamless.
Why does Windows Key + H not work in certain applications?
The shortcut may not work if the application does not support standard text input fields or if the voice typing service is disabled in your privacy settings. Ensure your microphone is active and you have clicked inside a valid text box before pressing the keys.
Does voice typing work offline in Windows 11?
Basic voice typing generally requires an internet connection to use Azure Speech services. While some offline speech recognition features exist for specific commands, the most accurate dictation experience requires you to be connected to the internet to process your speech data effectively.
Was this guide helpful?


Leave a Reply Cancel reply