How to Enable or Disable Cellular Data Use in Windows 11
Does your Windows 11 computer have a SIM card or eSIM? If so, you can use cellular-whenever-wi-fi-is-poor-in-windows-11/" class="sal-link" rel="noopener" target="_blank" data-sal-id="35469">cellular data to connect to the internet. This is helpful when Wi-Fi is weak or not available.
This guide shows you how to turn on a useful feature called “Use Cellular whenever Wi-Fi is poor”. When you enable it, Windows automatically switches to cellular data if your Wi-Fi signal gets bad. This keeps your internet fast and reliable.
What Is Cellular Data on 🪟 Windows 11?
Cellular data works like the internet on your phone. If your computer has a SIM or eSIM card, it can connect to mobile networks (like 4G or 5G) to get online without Wi-Fi.
Learn more about connecting to cellular data here: How to Turn On or Off Cellular on Windows 11
Turn On “Use Cellular Whenever Wi-Fi is Poor” in Settings
Why do this? This setting makes your internet connection more reliable by automatically using cellular data when Wi-Fi is not good enough.
What happens when done? Your Windows 11 device will switch to cellular data without you having to do anything.
Step 1Open the Settings App
- Click the Start menu and select Settings, or
- Press Windows key + I together on your keyboard.
Step 2Go to Cellular Settings
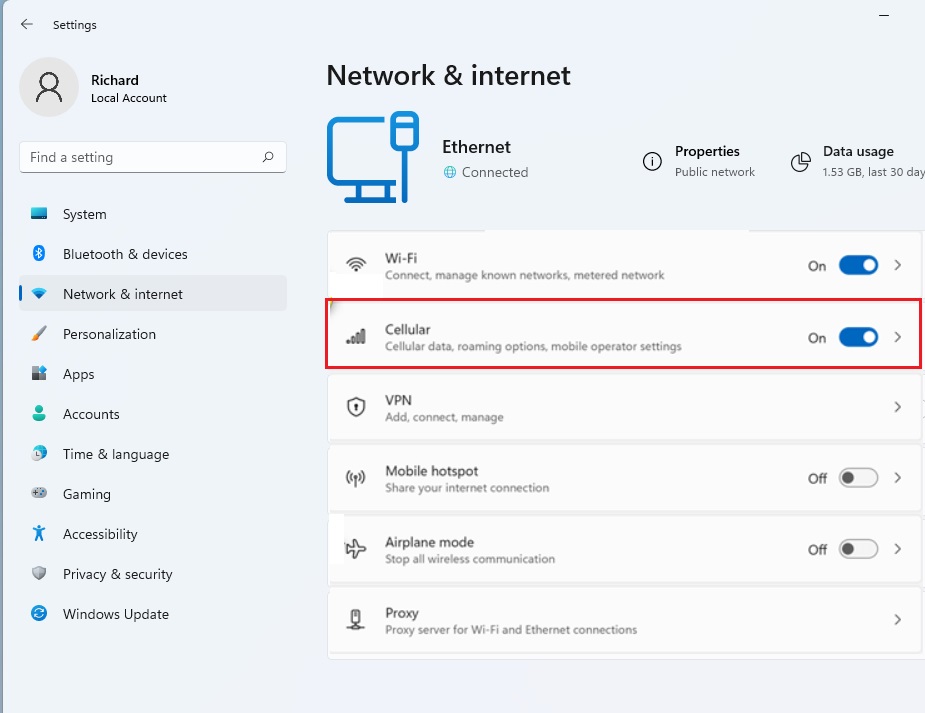
- In Settings, click Network & internet on the left menu.
- Click on Cellular on the right side to see cellular options.
Step 3Turn On the Feature
- Find the switch for “Use cellular whenever Wi-Fi is poor” and toggle it On to enable it .
- To turn it off later, just toggle the switch back to Off.
Alternative: Turn On or Off Using the Registry Editor
Why use this method? Some users prefer making changes through the Registry Editor for more control.
What happens when done? The same setting will be enabled or disabled, just like using the Settings app.
⚠️ Admin privileges required for this section
Warning: Be careful when using the Registry Editor. Changing the wrong settings might cause problems. Only do this if you are comfortable making advanced changes.
Step 1Open Registry Editor
- Type
regeditin the Start menu search and press Enter. - Click Yes if Windows asks for permission.
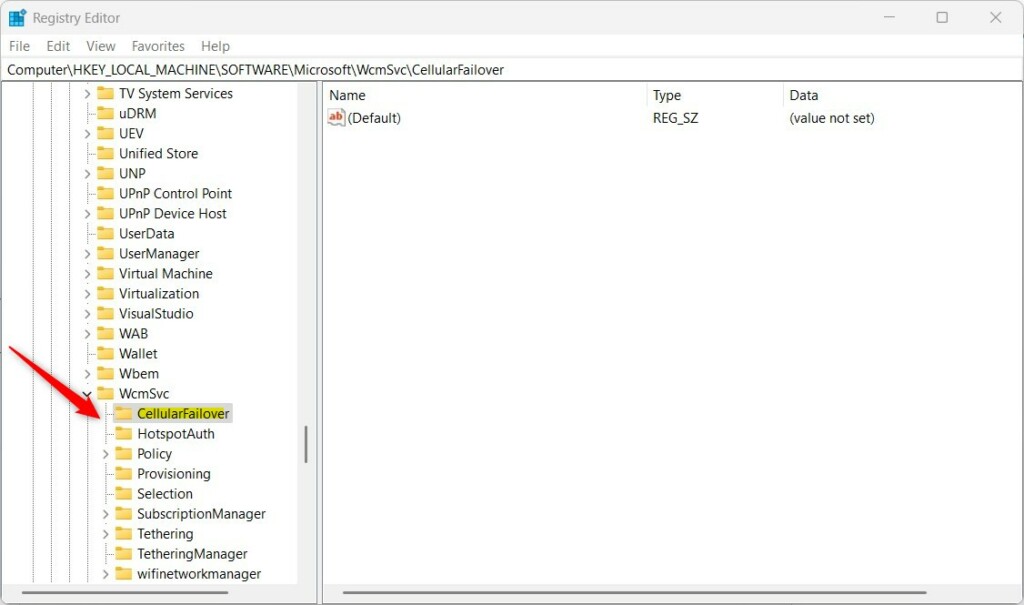
Step 2Find or Create the CellularFailover Folder
- Go to this location:
HKEY_LOCAL_MACHINE\SOFTWARE\Microsoft\WcmSvc\CellularFailover - If you don’t see the CellularFailover folder, right-click on WcmSvc, choose New > Key, and name it CellularFailover.
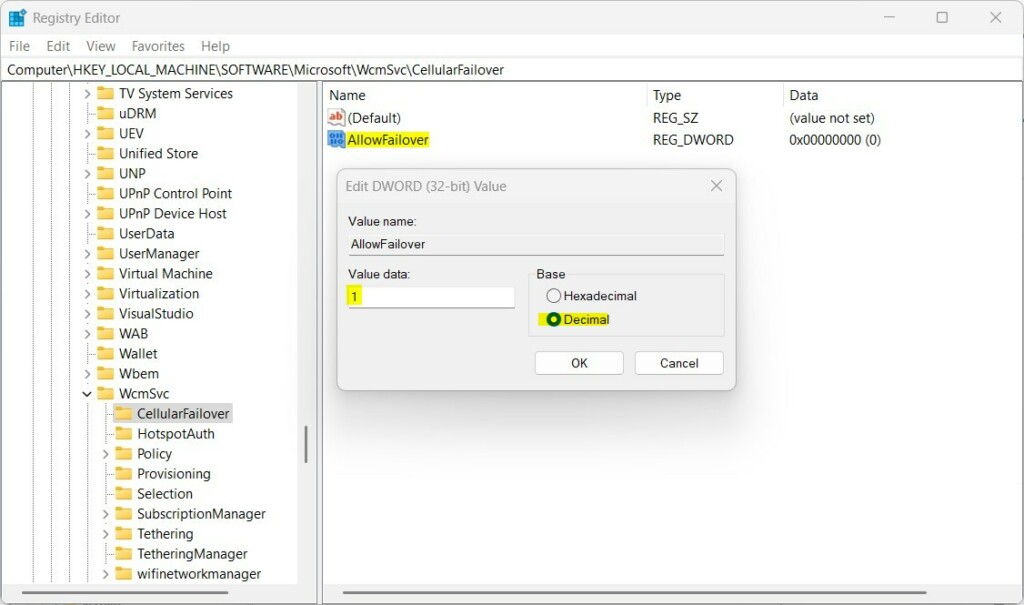
Step 3Create or Edit the AllowFailover Value
- Right-click inside the CellularFailover folder’s right panel, then choose New > String Value.
- Name it AllowFailover.
- Double-click AllowFailover and set the value to:
2to enable “Use cellular whenever Wi-Fi is poor”
0to disable it
Step 4 Restart Your Computer
- After making changes, restart your computer to apply them.
Summary
- Windows 11 can automatically use cellular data when Wi-Fi is weak.
- This keeps your internet working smoothly without you needing to switch networks manually.
- You can turn this feature on or off through the Settings app or the Registry Editor.
- The Settings app method is easier for most users.
- The Registry Editor method requires admin privileges and is for advanced users.
If you have questions or want to share your experience, feel free to leave a comment below!
Was this guide helpful?

About the Author
Richard
Tech Writer, IT Professional
Richard, a writer for Geek Rewind, is a tech enthusiast who loves breaking down complex IT topics into simple, easy-to-understand ideas. With years of hands-on experience in system administration and enterprise IT operations, he’s developed a knack for offering practical tips and solutions. Richard aims to make technology more accessible and actionable. He's deeply committed to the Geek Rewind community, always ready to answer questions and engage in discussions.


No comments yet — be the first to share your thoughts!