How to Change Cursor Blink Rate in Windows 11
You change your text cursor blink rate in Windows 11 by adjusting a specific setting within the system’s accessibility options.
Your text cursor is that blinking vertical line indicating where your typed characters will appear. In Windows 11, this blink typically occurs every 530 milliseconds by default.
Adjusting this speed can significantly improve visibility and reduce eye strain, especially for prolonged typing sessions. You can make it blink faster, slower, or even disable blinking entirely for a solid line.
Open Control Panel, change “View by” to Icons, select Keyboard, and use the Speed tab’s “Cursor blink rate” slider. You can also set the blink rate to -1 in the Registry Editor at 🗝️HKEY_CURRENT_USER\Control Panel\Desktop to stop blinking.
Change the Blink Rate via Control Panel
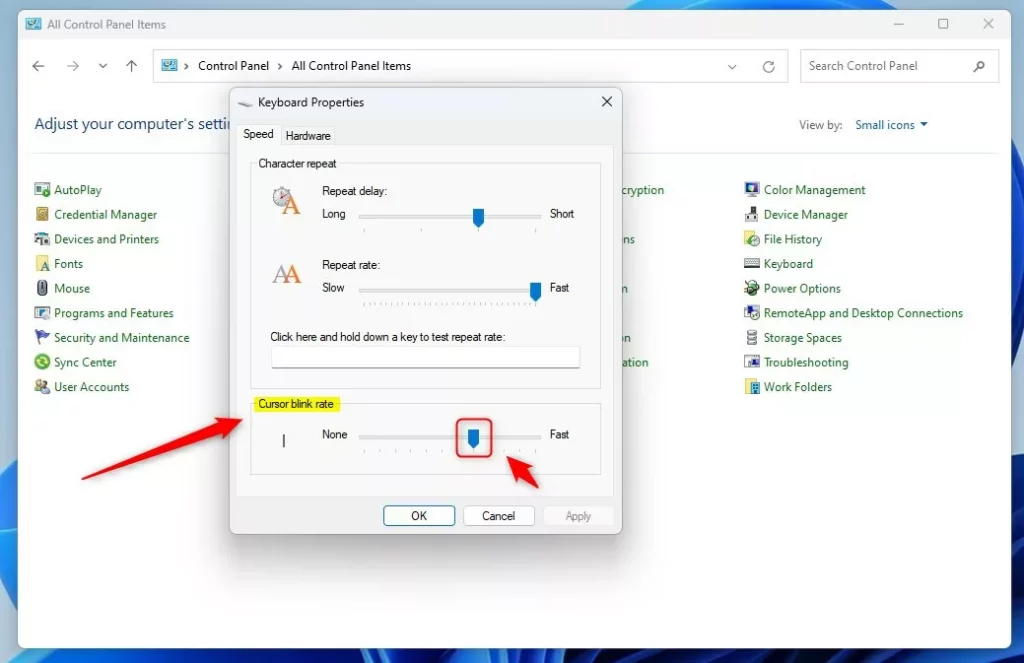
You can change how fast your cursor blinks in Windows 11 using the Control Panel. This is the simplest and safest way for most people to adjust the cursor blink rate.
- Open the Control Panel from your Start menu.
- Change the “View by” setting to Icons.
- Select Keyboard from the list.
In the window that appears, look for the Speed tab. You will see a slider labeled Cursor blink rate. Move it to the left to make it slower or to the right to make it faster. Click OK to finish.
Change Cursor Thickness for Better Visibility
If your cursor is still hard to see, you can change its thickness in Windows 11. Making the cursor thicker can help it stand out on busy backgrounds or in long documents.
- Open Settings and go to Accessibility.
- Select Text cursor.
- Use the Text cursor thickness slider to make the line wider.
This makes the cursor stand out against busy backgrounds or long documents.
Advanced: Change Blink Rate via Registry Editor
Advanced users can change the cursor blink rate in Windows 11 using the Registry Editor. Be very careful when making changes here, as errors could cause problems with your system.
- Open the Windows Registry Editor.
- Navigate to this path:
HKEY_CURRENT_USER\Control Panel\Desktop
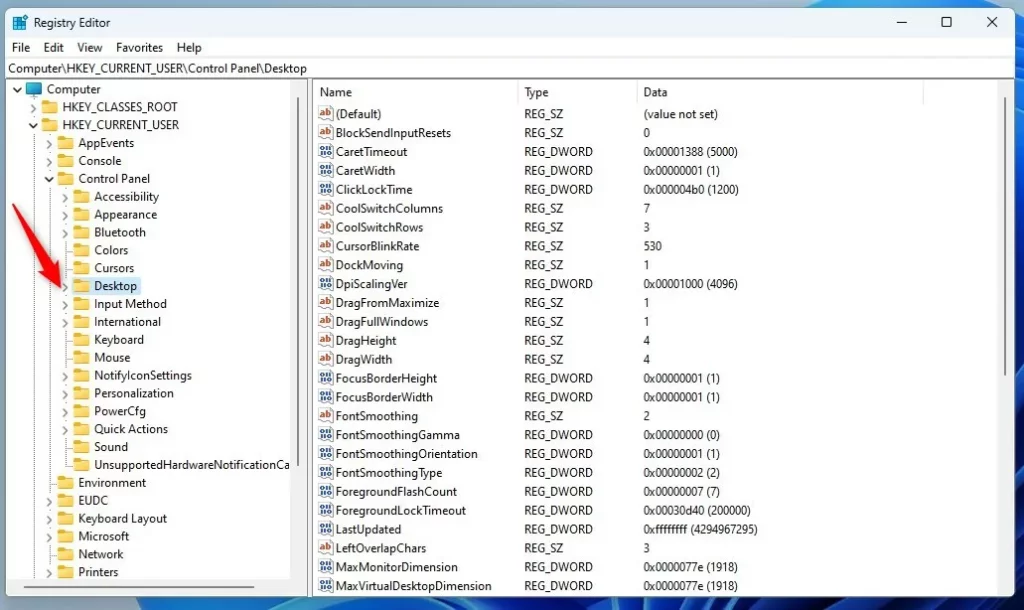
- Right-click in the empty space on the right and select New > String Value.
- Name the value
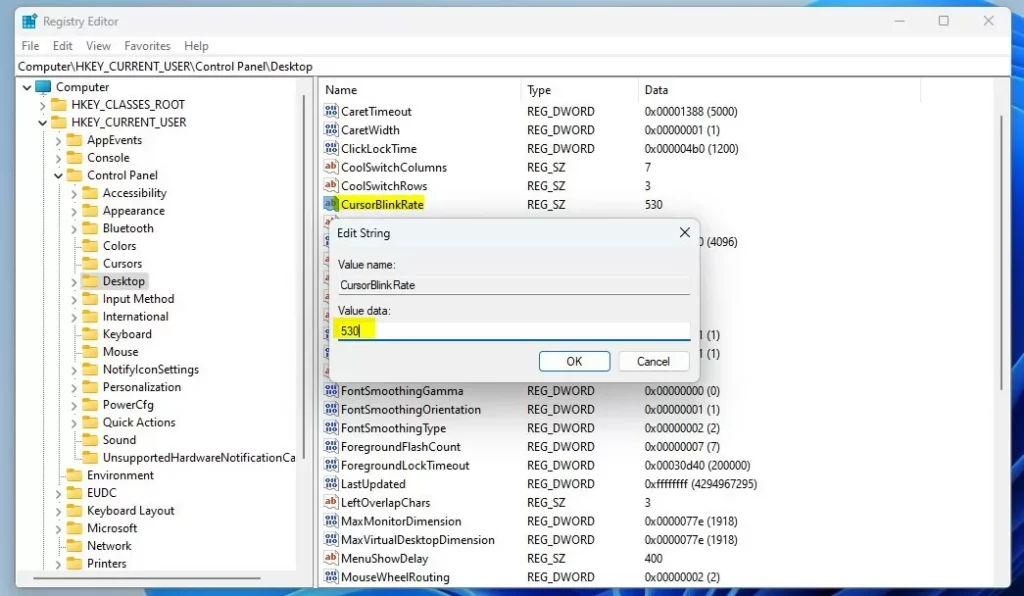
CursorBlinkRate. - Double-click it and enter a number between 200 (fast) and 1200 (slow).
- To stop the blinking, set the value to
-1.
Restart your computer to apply these changes.
Summary
Customizing your text cursor is a great way to improve your visual comfort. You can use the Control Panel for simple speed adjustments or the Registry Editor for precise control. For more help with visual settings, visit the official Microsoft Accessibility documentation.
Can I stop the cursor from blinking entirely?
Yes, you can stop the cursor from blinking by setting the CursorBlinkRate value to -1 in the Windows Registry. This makes the cursor appear as a solid, non-moving line. This is a popular choice for users who find the constant movement of a blinking cursor distracting or visually uncomfortable.
Does changing the blink rate affect all applications?
Yes, changing the cursor blink rate through the Control Panel or the Registry Editor is a system-wide setting. Once you apply the change and restart your computer, the new blink speed will be used by all applications, including word processors, web browsers, and system text fields.
How do I reset the cursor blink rate to default?
To reset the blink rate, simply return to the Keyboard settings in the Control Panel and move the slider back to the middle position. If you used the Registry Editor, you can delete the CursorBlinkRate entry or change the value back to the default of 530 milliseconds.
Was this guide helpful?

About the Author
Richard
Tech Writer, IT Professional
Richard, a writer for Geek Rewind, is a tech enthusiast who loves breaking down complex IT topics into simple, easy-to-understand ideas. With years of hands-on experience in system administration and enterprise IT operations, he’s developed a knack for offering practical tips and solutions. Richard aims to make technology more accessible and actionable. He's deeply committed to the Geek Rewind community, always ready to answer questions and engage in discussions.

[…] text cursor is the blinking vertical line you see when you type. It shows where you will type next. Sometimes, […]
[…] Change Cursor Blink Rate in Windows 11 […]
[…] guide explains how to change the thickness of your text cursor in Windows 11. The text cursor is the blinking line that appears when you type. Sometimes, this line is too thin to see on modern, […]