How to Change Text Cursor Color in Windows 11
You can change your text cursor color in Windows 11 within the Accessibility settings to improve visibility.
The text cursor, often called the insertion point, is the blinking vertical line showing where your text will appear as you type.
Windows 11 offers a dozen pre-set cursor colors, plus the option to select a custom shade. This personalization helps your cursor stand out on any background, reducing eye strain and making it easier to track your typing across all applications.
Go to Settings > Accessibility > Text cursor. Turn on the Text cursor indicator, then choose a color from the recommended options or create a custom one. You can also adjust the cursor’s thickness on this page.
How to Change the Text Cursor Color
Follow these steps to customize your view:
- Open the Settings app by pressing
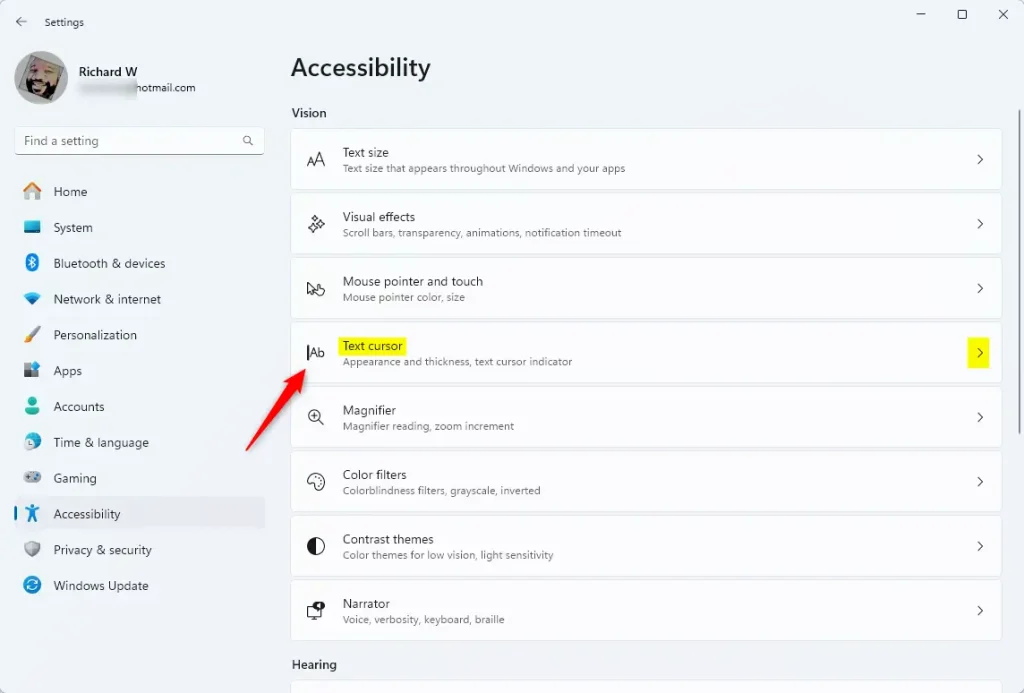
Windows key + I. - Click on Accessibility in the left menu.
Accessibility button in the Settings app - Click on Text cursor on the right side.
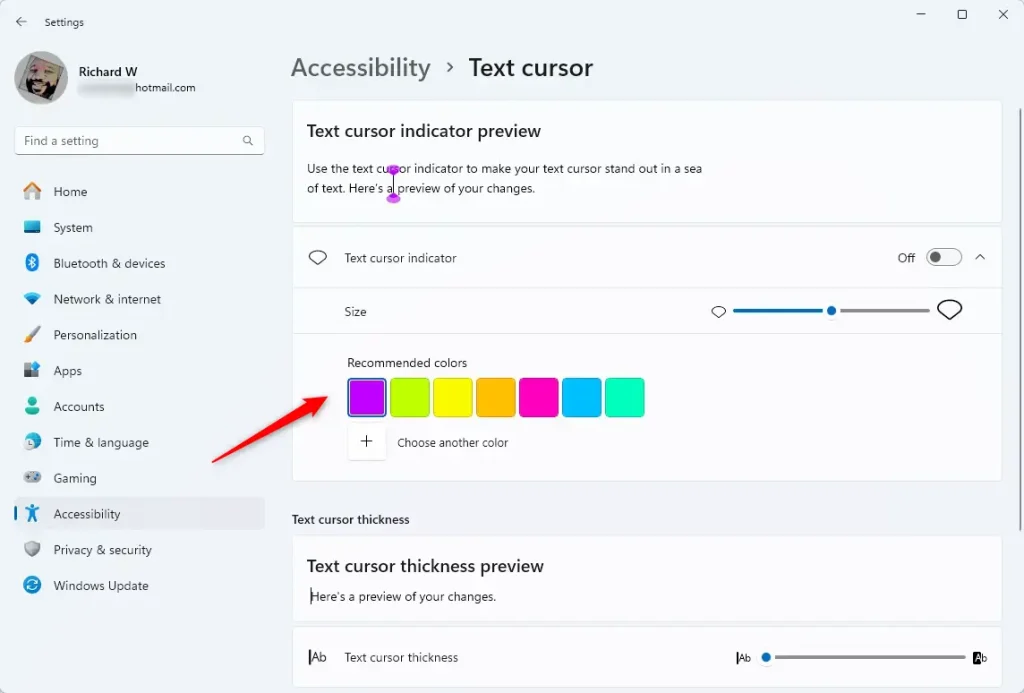
Windows 11 settings for changing text cursor color - Under Text cursor indicator, make sure the toggle is On.
- Pick a color from the Recommended colors list.
Windows 11 Text cursor colors
Customizing Your Cursor
Changing your text cursor color in Windows 11 is easy and helps you see the blinking line better when you’re typing. You can pick any color you like to make it stand out from the background, which is super helpful if you find the default white or gray hard to spot. This setting is found in the Accessibility options.
Troubleshooting Missing Settings
If you do not see these options, ensure your Windows 11 is fully updated. If you are using an older version like Windows 10, the menu is found under Ease of Access instead of Accessibility. If the settings are greyed out, you may need to check your system policies.
Advanced Registry Method (Admin Required)
Note: This requires admin privileges. Modifying the registry incorrectly can cause system issues.
- Press
Windows key + R, typeregedit, and press Enter. - Navigate to:
HKEY_CURRENT_USER\Control Panel\Accessibility\CursorIndicator - Look for the
Colorvalue. You can change the RGB values here to force a specific color.
Summary
Changing your text cursor color in Windows 11 is a simple tweak that can really help your typing.
Why can’t I see the text cursor indicator option?
If the option is missing, your Windows version might be outdated. Ensure you have installed the latest updates via Windows Update. Additionally, verify that you are looking under the Accessibility menu. If you are on an older Windows 10 build, look for the Ease of Access section instead of Accessibility.
Does changing the text cursor color affect all applications?
Yes, changing the text cursor color via Windows settings applies to most standard Windows applications and text fields. However, some specialized software or web-based code editors may override system settings to use their own custom cursor styles, meaning the color change might not appear inside those specific programs.
How do I revert the text cursor color to default?
To revert to the default, return to the Text cursor settings page. Simply select the original color or turn the Text cursor indicator toggle to the Off position. This will return your cursor to the standard blinking vertical line used by the Windows operating system by default.
Was this guide helpful?

About the Author
Richard
Tech Writer, IT Professional
Richard, a writer for Geek Rewind, is a tech enthusiast who loves breaking down complex IT topics into simple, easy-to-understand ideas. With years of hands-on experience in system administration and enterprise IT operations, he’s developed a knack for offering practical tips and solutions. Richard aims to make technology more accessible and actionable. He's deeply committed to the Geek Rewind community, always ready to answer questions and engage in discussions.

No comments yet — be the first to share your thoughts!