How to Control DLNA Device Access in Windows 11
You control DLNA device access in Windows 11 by managing its network sharing settings, preventing unauthorized media streaming.
DLNA, or Digital Living Network Alliance, is a standard that allows compatible devices on your home network, like smart TVs and game consoles, to share media files such as music, photos, and videos. Windows 11 uses its built-in media streaming features to enable this functionality.
For instance, Windows 11 allows you to specifically permit or block individual devices from accessing your shared media library through these settings.
Securing your media is crucial; otherwise, any device connected to your network could potentially access your personal files. Learning to manage these DLNA settings ensures only your chosen devices can stream your content, keeping your media library safe.
Control DLNA device access by navigating to Control Panel > Network and Internet > Network and Sharing Center > Media streaming options. Here, you can turn media streaming on or off, and then individually allow or block specific devices from accessing your media library.
Enabling Network Discovery for DLNA
If your devices do not appear, you must enable Network Discovery. This is a common requirement for DLNA to function.
- Open Settings and go to Network & internet.
- Select Advanced network settings.
- Click Advanced sharing settings.
- Ensure Network discovery is set to On for your current network profile.
Configuring Media Streaming Options
Turning on media streaming in Windows 11 lets you control which DLNA devices can access your computer’s media.
- Open the Control Panel app.
- Navigate to: Control Panel -> Network and Internet -> Network and Sharing Center -> Media streaming options.
- If it is not already on, click the button that says Turn on media streaming.
When you turn this on, Windows updates your firewall rules to allow SSDP Discovery Service and UPnP traffic. Only do this on a network you trust, like your home Wi-Fi.
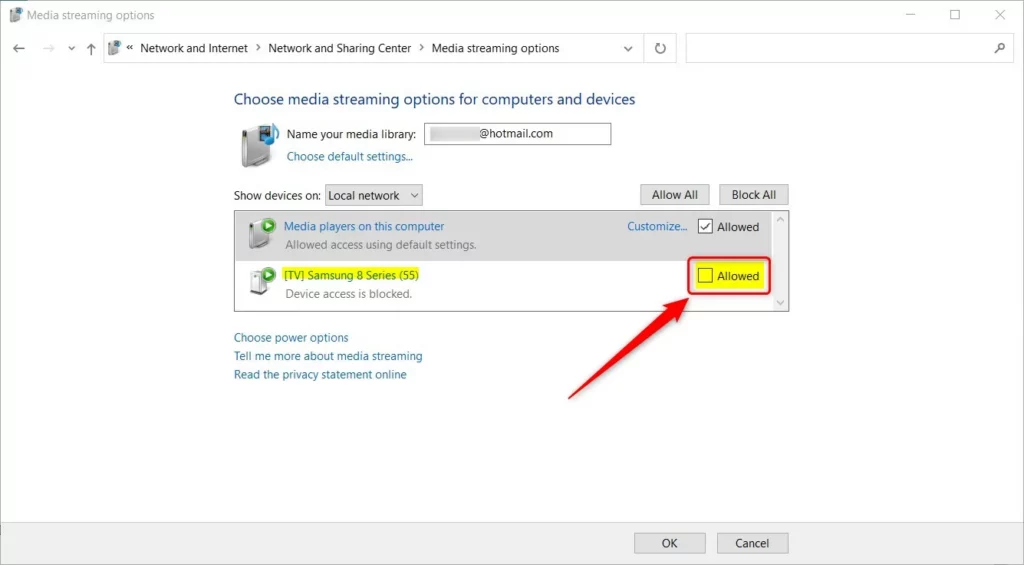
How to block or allow specific devices
Once media streaming is on, Windows shows a list of DLNA devices, allowing you to easily block or allow each one separately.
- Allow All: Gives every device on your network access to your media.
- Block All: Stops all devices from accessing your media.
- Individual Control: Find the device in the list. Uncheck the Allowed box to block that specific device.
Advanced Troubleshooting and Registry Settings
If you’re having trouble with DLNA device access in Windows 11, start by checking that essential services like SSDP Discovery are running.
For those comfortable with more advanced settings, you can check the registry path for media sharing at: HKEY_LOCAL_MACHINE\SOFTWARE\Microsoft\Windows\CurrentVersion\Media Center. Be careful: Changing the registry incorrectly can cause problems with your system.
Summary
By using the Media streaming options in the Control Panel, you can keep your media library accessible to your favorite devices while keeping unwanted devices blocked. Enabling Network Discovery and managing your device list ensures a safe and seamless streaming experience on Windows 11.
Why can’t I find Media Streaming Options in 🪟 Windows 11?
If the option is missing, ensure the Windows Media Player Legacy feature is installed. Go to Settings > Apps > Optional features and search for Windows Media Player Legacy. Install it, restart your computer, and the Media Streaming Options will appear in the Control Panel.
Is DLNA secure for home networks?
DLNA is generally safe for private home networks, but it lacks robust encryption. It is designed for convenience rather than high-security environments. Always ensure your home Wi-Fi is password-protected with WPA3 or WPA2 encryption to prevent unauthorized users from connecting to your local network and accessing your media.
Was this guide helpful?

About the Author
Richard
Tech Writer, IT Professional
Richard, a writer for Geek Rewind, is a tech enthusiast who loves breaking down complex IT topics into simple, easy-to-understand ideas. With years of hands-on experience in system administration and enterprise IT operations, he’s developed a knack for offering practical tips and solutions. Richard aims to make technology more accessible and actionable. He's deeply committed to the Geek Rewind community, always ready to answer questions and engage in discussions.


[…] If a device is on the list you don’t want to stream to or allow access to your Windows machine, you can selectively block access to your shared resources. […]