How to Change Internet Time Server in Windows 11
You change your Internet Time server in Windows 11 to ensure your PC’s clock stays accurate by syncing with a specific Network Time Protocol (NTP) server.
The Windows Time service (W32Time) uses NTP to keep your system clock perfectly synchronized. This service typically uses UDP port 123 to connect to a default Microsoft time server.
You manually change this server if your PC’s clock is frequently inaccurate or if the default server isn’t performing reliably. Selecting an alternative, trustworthy NTP server, such as `time.google.com`, improves time synchronization.
Open Control Panel, go to Clock and Region, then Set the time and date, click the Internet Time tab, and select “Change settings.” You can then choose a server from the list or enter a new one and click “Update now.
Prerequisites
To change these settings, you must be logged in with an account that has administrative privileges. Without these rights, Windows will block your attempts to modify time server configurations.
Change the Time Server via Control Panel
You can change the internet time server in Windows 11 using the Control Panel to pick from a list of pre-set options or add your own.
- Open the Control Panel.
- Navigate to Clock and Region.
- Click on Set the time and date.
- Click the Internet Time tab.
- Click the Change settings button (Requires Admin).

- Select a server from the list or type a new one, then click Update now.

Force Time Sync via Command Line
If your time is off, you can force an instant sync using the command line. This uses the w32tm.exe tool.
- Press the Windows key, type cmd, right-click it, and select Run as administrator.
- Type the following command and press Enter:
w32tm /resync
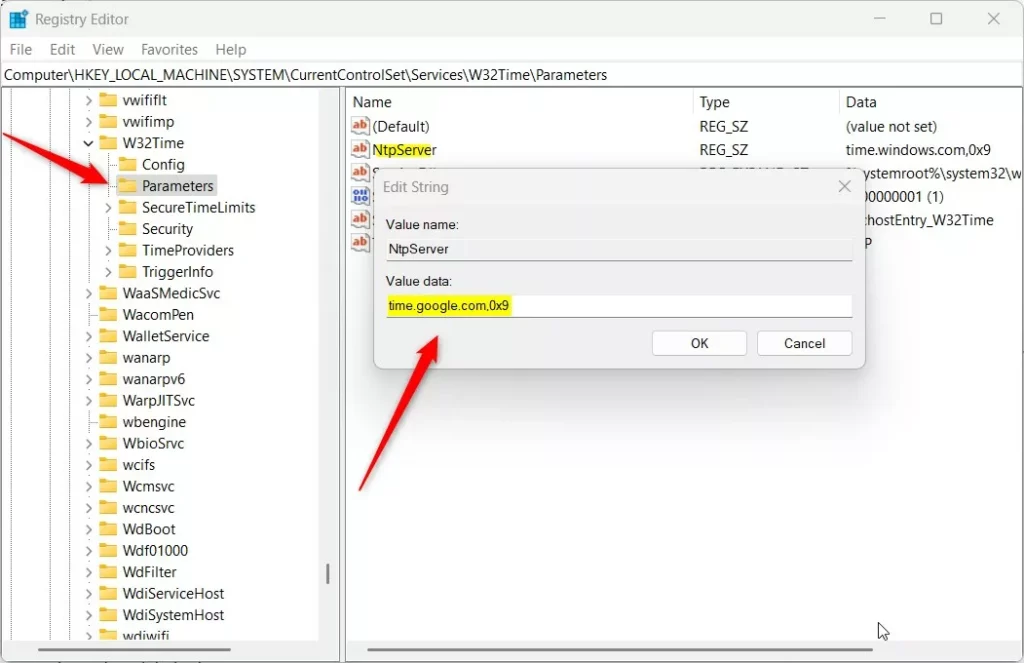
Advanced Configuration via Registry Editor
For more advanced control, you can change the internet time server in Windows 11 by editing the Registry Editor to add custom server addresses.
- Open Registry Editor (Requires Admin).
- Navigate to:
HKEY_LOCAL_MACHINE\SOFTWARE\Microsoft\Windows\CurrentVersion\DateTime\Servers - Right-click in the right pane to create a new String Value, name it with a number, and enter your server address.
- Navigate to:
HKEY_LOCAL_MACHINE\SYSTEM\CurrentControlSet\Services\w32time\Parameters - Modify the NtpServer value to your server name followed by
,0x9.
Summary
Keeping your Windows 11 computer’s clock accurate is important for system stability, and you can easily change the internet time server using the Control Panel or Registry Editor.
Why is my Windows time not syncing?
Your Windows computer might not be syncing time correctly if the Windows Time service is off, your firewall blocks port 123, or the chosen internet time server is down.
What are the best public NTP servers to use?
Good public NTP servers to use for syncing your Windows time include pool.ntp.org, time.google.com, and time.windows.com, with pool.ntp.org often being the best choice.
Was this guide helpful?

About the Author
Richard
Tech Writer, IT Professional
Richard, a writer for Geek Rewind, is a tech enthusiast who loves breaking down complex IT topics into simple, easy-to-understand ideas. With years of hands-on experience in system administration and enterprise IT operations, he’s developed a knack for offering practical tips and solutions. Richard aims to make technology more accessible and actionable. He's deeply committed to the Geek Rewind community, always ready to answer questions and engage in discussions.


No comments yet — be the first to share your thoughts!