How to Create a Recovery Drive in Windows 11
You create a recovery drive in Windows 11 to prepare for system issues that prevent your PC from starting normally.
Think of a recovery drive as a special bootable USB stick. It holds the system files and tools you’ll need to troubleshoot (fix problems), restore (go back to an earlier state), or reset Windows 11 if your PC refuses to start.
This process is really important for keeping your PC in good shape and can save you the headache of reinstalling your entire operating system from scratch. Make sure you’re using a USB drive with at least 16GB of storage capacity.
Open Control Panel, click Recovery, then select Create a recovery drive. Follow the prompts, checking the “Back up system files” option if desired, and select your USB drive to begin the process. This prepares a bootable USB for troubleshooting your Windows 11 PC.
Why Make a Recovery Drive?
A Windows 11 recovery drive is a lifesaver if your computer won’t start up properly, letting you fix problems or reset your PC without losing everything.
It’s a really smart move to create this drive now, *before* you run into trouble. Having this drive ready can be a lifesaver if your computer faces a major issue later on, like hardware failure. Since Windows gets updated frequently, aim to create a fresh recovery drive at least once a year. Just remember, your personal files and any apps you’ve installed won’t be saved on this drive.
What You Need
- A USB flash drive with at least 16 GB of free space (32 GB or more is better if you want to back up system files).
- Your Windows 11 PC.
How to Create a Recovery Drive
- Plug in your USB drive. Remember, this drive will be erased, so save anything important first.
- Open Control Panel:
- Click the Start button or press the Windows key.
- Type
Control Paneland open it. - Make sure the view is set to Small icons or Large icons.
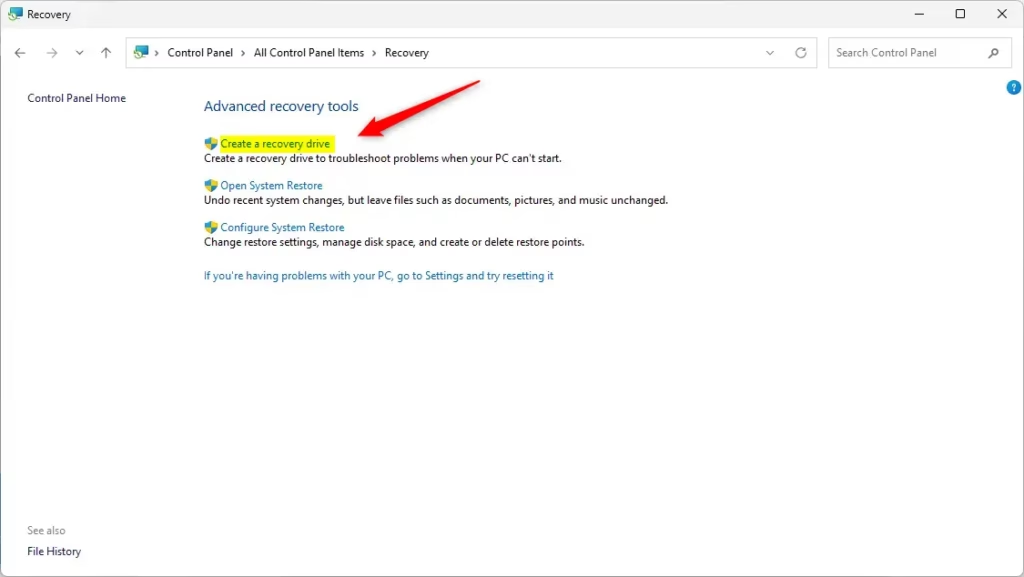
- Find and click Recovery.
- Click Create a recovery drive. This opens the Recovery Drive tool.
- Check Back up system files to the recovery drive if you want to reinstall Windows from the drive. (This needs a bigger USB, usually 32-64 GB.) Then click Next.
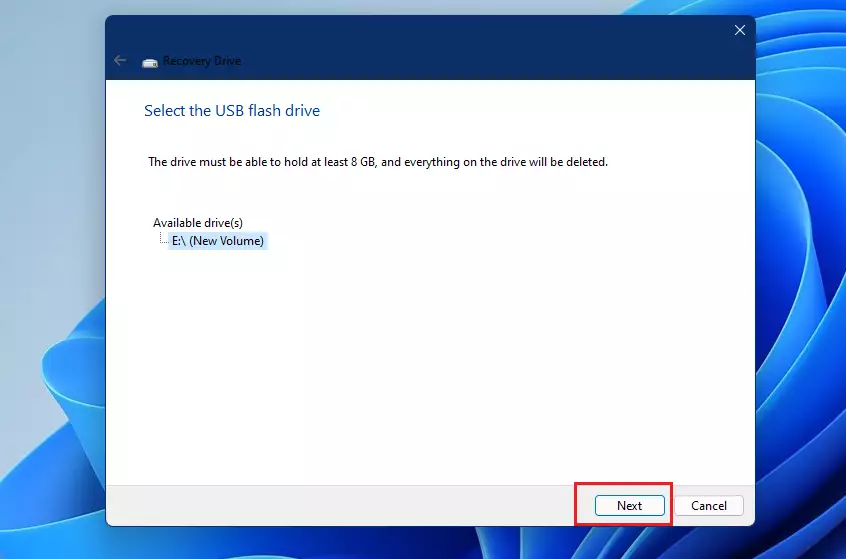
- Select your USB drive and click Next.
- Click Create to start making the recovery drive. This can take some time as Windows copies files.
- When done, click Finish. Your recovery drive is ready!
Creating a Windows 11 recovery drive is simple: first, plug in a USB drive that you don’t mind erasing, then open the Control Panel.
Creating a Windows 11 recovery drive is simple: first, plug in a USB drive that you don’t mind erasing, then open the Control Panel.
Creating a Windows 11 recovery drive is simple: first, plug in a USB drive that you don’t mind erasing, then open the Control Panel.
Example: Booting Your PC With the Recovery Drive
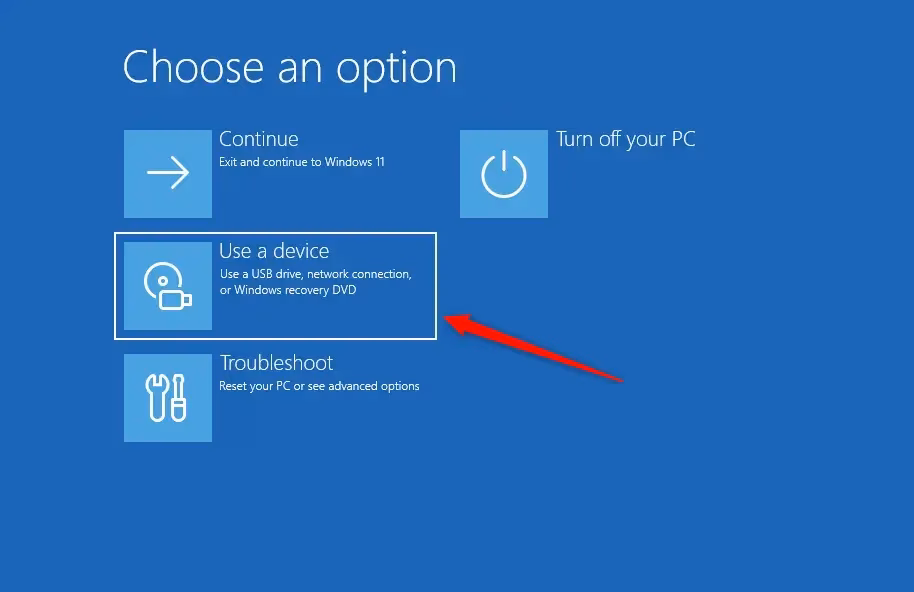
Example: Starting Your PC With the Recovery Drive If your PC won’t start properly, you can ‘boot’ (start) it using this USB drive. This will open Windows’ repair tools, which are sometimes called Advanced Startup or WinRE.
Important Tips
- USB size: Use a USB drive with at least 16 GB. For backing up system files, use 32-64 GB.
- Data loss: Creating the recovery drive erases everything on the USB, so save your files first.
- Update yearly: Make a new recovery drive every year to keep it up-to-date.
- Personal files not saved: Your photos, documents, and apps won’t be copied to the recovery drive.
- Recovery options: This drive lets you reset Windows, restore from a backup, or fix startup problems.
When making a Windows 11 recovery drive, remember to use a USB stick that’s at least 16 GB, and know that it will be completely erased.
More Help from Microsoft
- Create a Recovery Drive – Microsoft Support Official guide on creating a recovery drive.
- Recovery options in Windows – Microsoft Support Learn about all the ways to recover your Windows PC.
- USB Recovery Drive for Surface Devices
Summary
A Windows 11 recovery drive is a USB stick with tools to fix your PC if it won’t start, and you can make one using the Control Panel.
Does 🪟 Windows 11 have a recovery drive?
If your device won’t boot up, you can use your recovery drive to get into Windows’ repair tools (also known as WinRE). From there, you can either restore your system from a previous restore point or reinstall Windows using the drive.
Does creating a recovery drive delete everything?
If all your files are backed up, you can use the recovery USB flash drive to perform a system recovery. CAUTION: Performing this step will remove your personal files, user accounts, settings, and any apps that didn’t come with the computer.
Was this guide helpful?

About the Author
Richard
Tech Writer, IT Professional
Richard, a writer for Geek Rewind, is a tech enthusiast who loves breaking down complex IT topics into simple, easy-to-understand ideas. With years of hands-on experience in system administration and enterprise IT operations, he’s developed a knack for offering practical tips and solutions. Richard aims to make technology more accessible and actionable. He's deeply committed to the Geek Rewind community, always ready to answer questions and engage in discussions.


No comments yet — be the first to share your thoughts!